


Collaborating with your team in Webflow
Webflow empowers your entire team to contribute to the success of your website. Collaborating in Webflow helps your team move faster — whether you're working in parallel or teaming up to tackle design and development challenges together. And now with real-time collaboration embedded into your team's processes, you can enable seamless workflows and reviews.
When designing in Webflow, you have two options:
- Design on the main page
- Design on a branch
Consider the urgency, complexity, and risk of the change to determine when to design directly on the main page or in a branch:
Page
Urgency of change
Complexity of change
Risk-level of change
Examples
Main page
High
Low
Low
- Fixing a typo on the homepage
- Updating a blog post
- Debugging or pairing with another designer
Branch
Low
High
High
- Updating brand styles on site
- Experimenting with a new layout
Use real-time when you need speed. Use branching when you need control.
Page branching

The value of page branching
Webflow Enterprise customers can leverage page branching to enable multiple team members to work on different parts of the site (pages, components, classes) safely, with minimal risk to production. Benefits of using page branching include:
- Streamlined collaboration: Multiple contributors can contribute to a site without disrupting ongoing work.
- Minimized risk: Changes made in a branch remain isolated until they are ready to be merged into the main site.
- Controlled merging: Teams can review, test, and refine updates before integrating them into the live site.
Use cases
Branching is ideal for:
- Creating and testing changes without affecting live content
- Isolating in-progress work from the main site, preventing unapproved changes from going live
- Safely making large page updates or global design changes
How to use page branching effectively
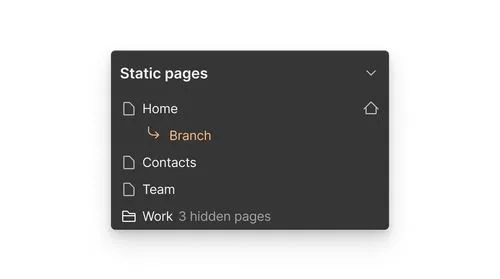
Creating a page branch
Webflow’s page branching focuses the scope of a branch on individual pages, rather than the full-site. This means when you branch a page, you take a “snapshot” of one of the pages on your site, which lets you safely explore new design changes without affecting the original page or the rest of the site.
Ensure accuracy by pulling updates from the main site
Because branches are isolated from the main site, any changes that are made outside of the branch are not automatically integrated into the branch. It’s good to periodically check for main site updates and sync to ensure your branch is up to date.
Test by publishing to branch staging
In order to test changes, you can publish your page branch to its own staging subdomain (separate from your main Webflow staging subdomain or custom staging domain) before merging it into the main site. This lets you and your teammates test and review branches on a published site — and evaluate custom code, performance, integrations, and responsiveness.
Your staged page branch URL includes a snapshot of the full site — so you can view how your branch changes impact the rest of the main site.
Resolve conflicts prior to merging
If you have classes, states, or main components that have been updated across both the main site and its branch, you’ll need to resolve those conflicts before merging your branch. It’s important to carefully review conflicts in order to avoid any unexpected changes or loss of work.
Reduce the potential for conflicts by:
- Avoiding making changes to the same page across the main site and its branch
- Periodically pulling in updates from the main site
Merging branches
When you’re ready to integrate the branch changes into the main site, you can proceed with merging. It’s important to carefully review your proposed changes in the merge summary and site activity log to ensure accuracy and consistency.
After merging, test the page to confirm that all updates are reflected correctly. To keep the site project organized and accurate, delete any old or unused branches.
For enterprises that want more control over users merging branches, they can take advantage of Design Approvals in order to give a Senior Designer more visibility and approve branches or request additional changes if needed.
How long should branches live?
To avoid conflicts, it’s best to create branches only for specific purposes and merge as soon as the changes are approved.
Next up: Building & editing content
Webflow’s platform allows the entire website experience team to come together to drive results for the business, without bottlenecks.

More ways to level up
 Webflow University
Explore courses and pathways to grow your skills or prepare for a Webflow-verified certification.
Go to University Help Center
Find solutions to your Webflow questions and get help from our expert customer support team.
Go to docs Community
Connect with other designers and developers to share tips, ask questions, and show off your work.
Go to Community