

.jpg)


How do you know what content performs the best?
Or what page is the most popular?
Google Analytics, the leading global analytics software, can do that and much more. Here’s how to get started.
You might have heard about data-driven design – the practice of making design decisions based on customer data. But how do you gather that data?
Google Analytics is a web analytics software that allows you to collect user data, analyze it, and extract actionable insights. According to W3Techs, a web technology survey site, Google Analytics is used by 85.9% of websites whose traffic analysis tools are known to them — that’s 55.5% of all websites.
Google Analytics is a popular choice not just because it’s free, but also because it’s one of the most powerful web analytics tools available.
How to install Google Analytics on a new website
Let’s go through the step-by-step of how to add the go-to analytics solution for digital marketing and SEO professionals to your website.
1. Create a Google Analytics account
You will need a Google account to create a Google Analytics account. While you can also create a Gmail address, only the Google account is required. Depending on the project, you can use a personal or business account, or create a completely new account explicitly for this purpose.
Go to google.com/analytics and click Get started today. You’ll then be asked to log into your Google account.

Next, you’ll need to:
- Enter an account name
- Choose account data sharing settings
- Create a Google Analytics property (you can use your website name as your property name)
- Provide basic information about your business (company size, industry category, etc.)
- Agree with Google Analytics Terms of Service
2. Add Google Analytics tracking code (gtag.js) to your website
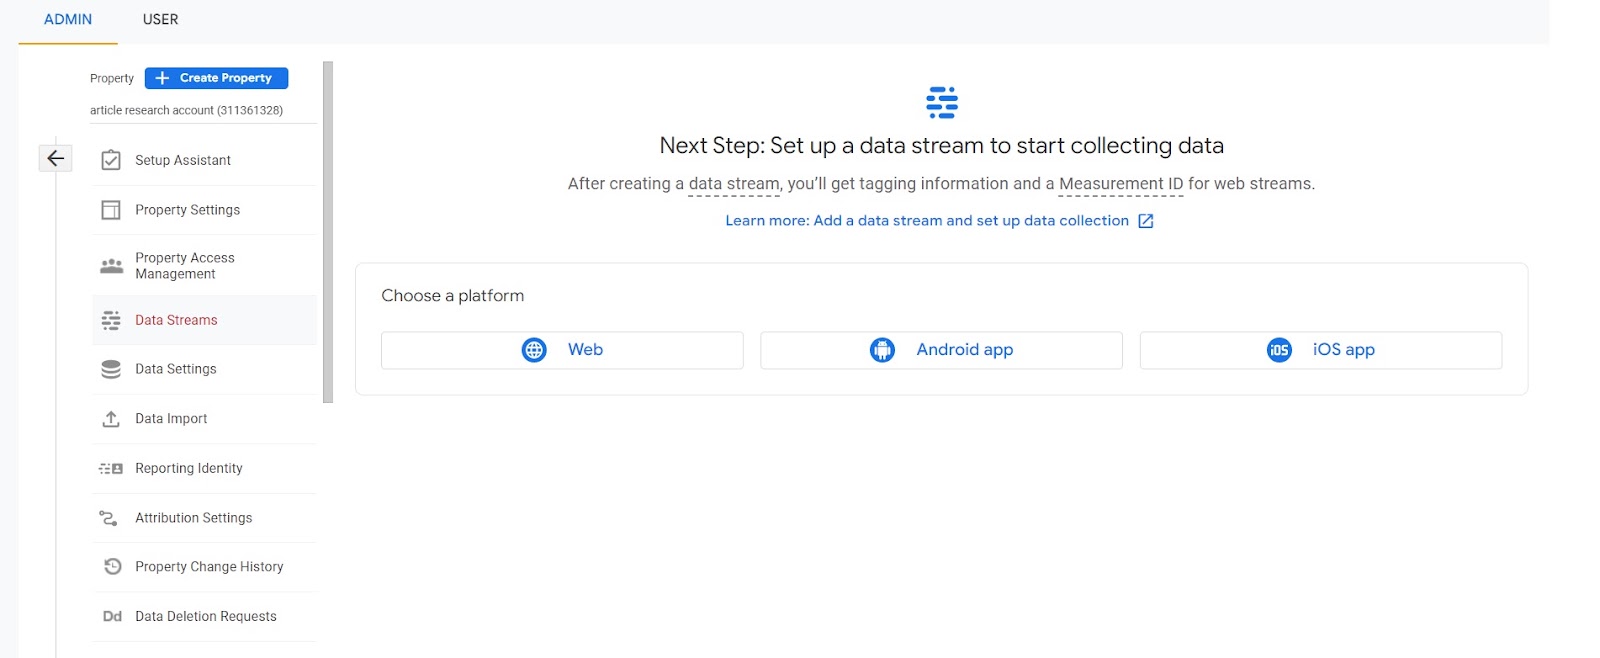
Once your Google Analytics account is created, you’ll be redirected to the Google Analytics home screen. Now it’s time to get a measurement ID.
Google Analytics can be used for both websites and mobile apps, so you will be asked to choose a platform:
- Web
- Android app
- iOS app
For a website, choose Web.
You will then be asked to set up a data stream for your website. Add your website URL, enter a stream name, then click Create stream.
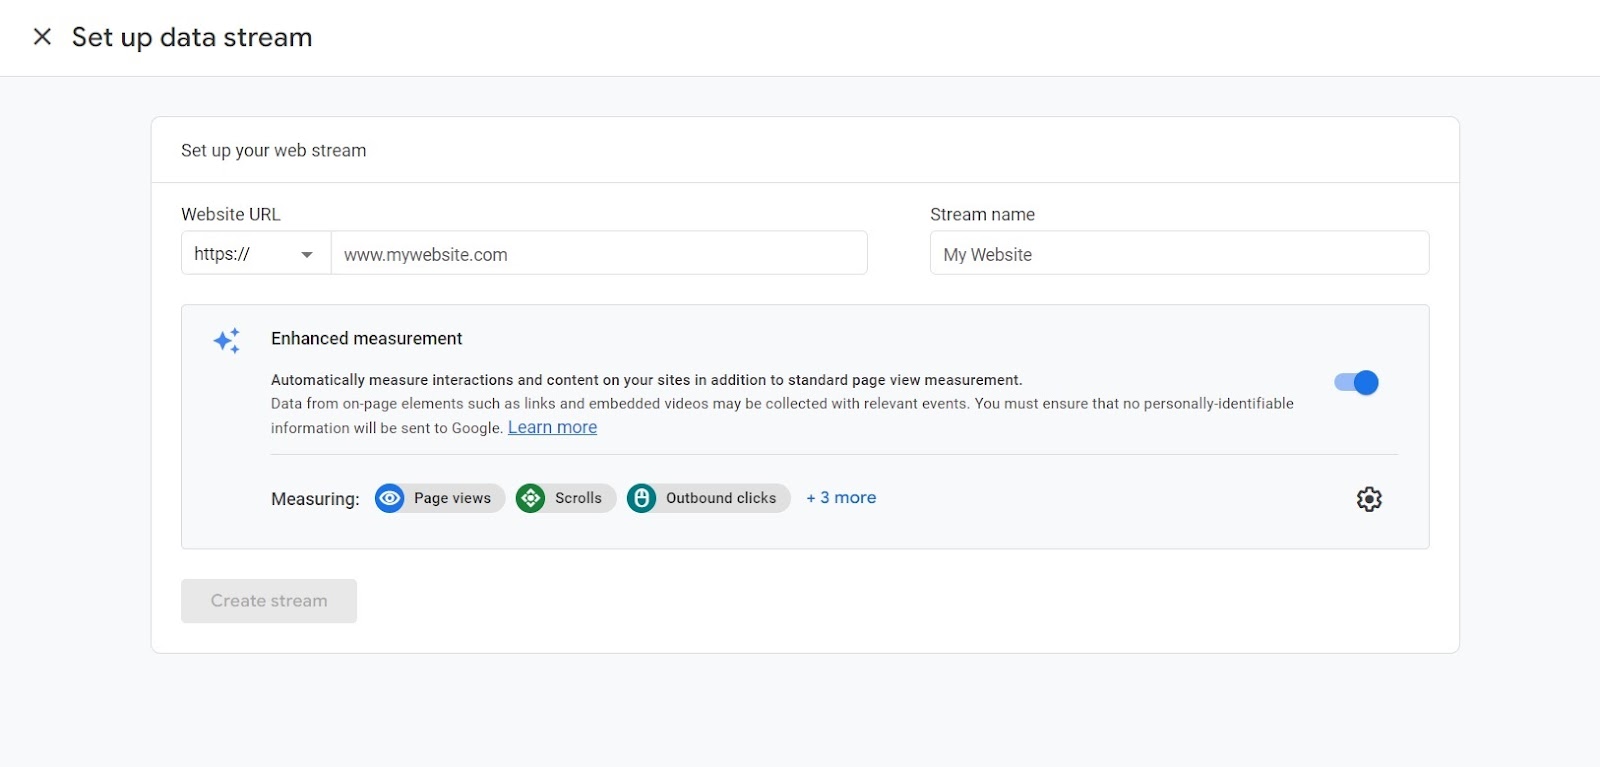
You’ll be shown the details of your web stream. Copy the measurement ID (previously called tracking ID), then add it to your website.
The exact way to do that varies depending on your website builder. It’s best to check its knowledge base for specific instructions.
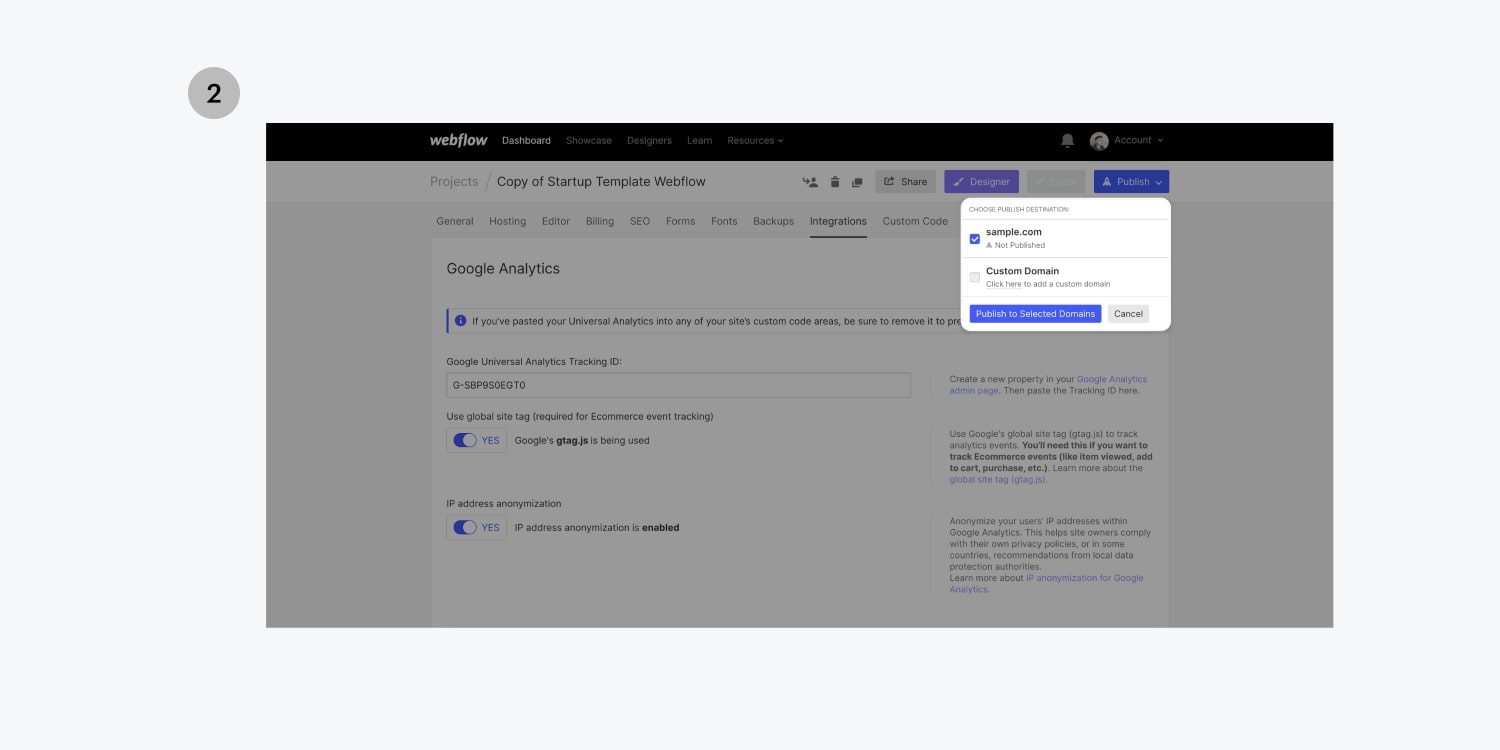
Popular site builders and ecommerce platforms typically have Google Analytics integrations, so installing it should be pretty straightforward. For example, Webflow allows you to add Google Analytics through Project Settings > Integrations.
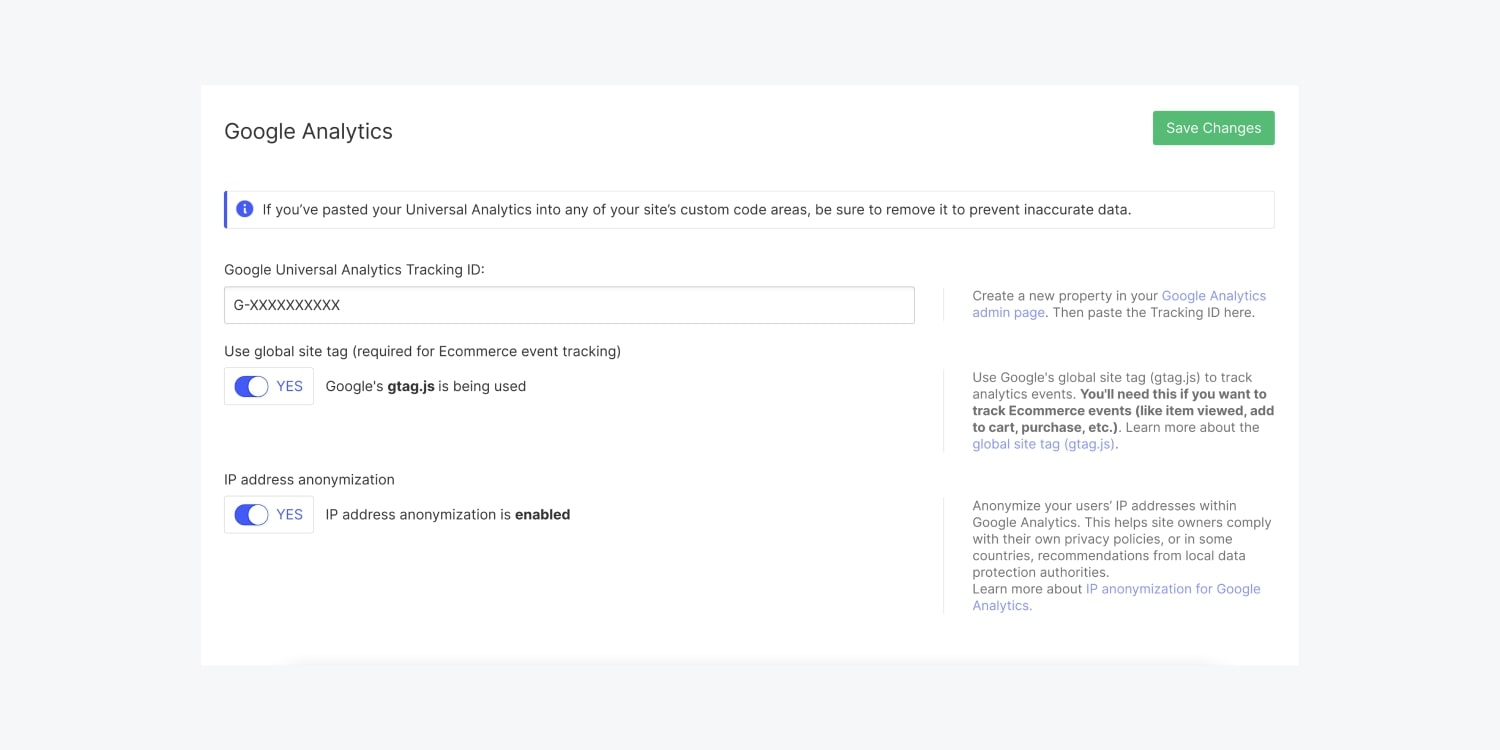
From there, you’ll paste the measurement ID into the relevant field:
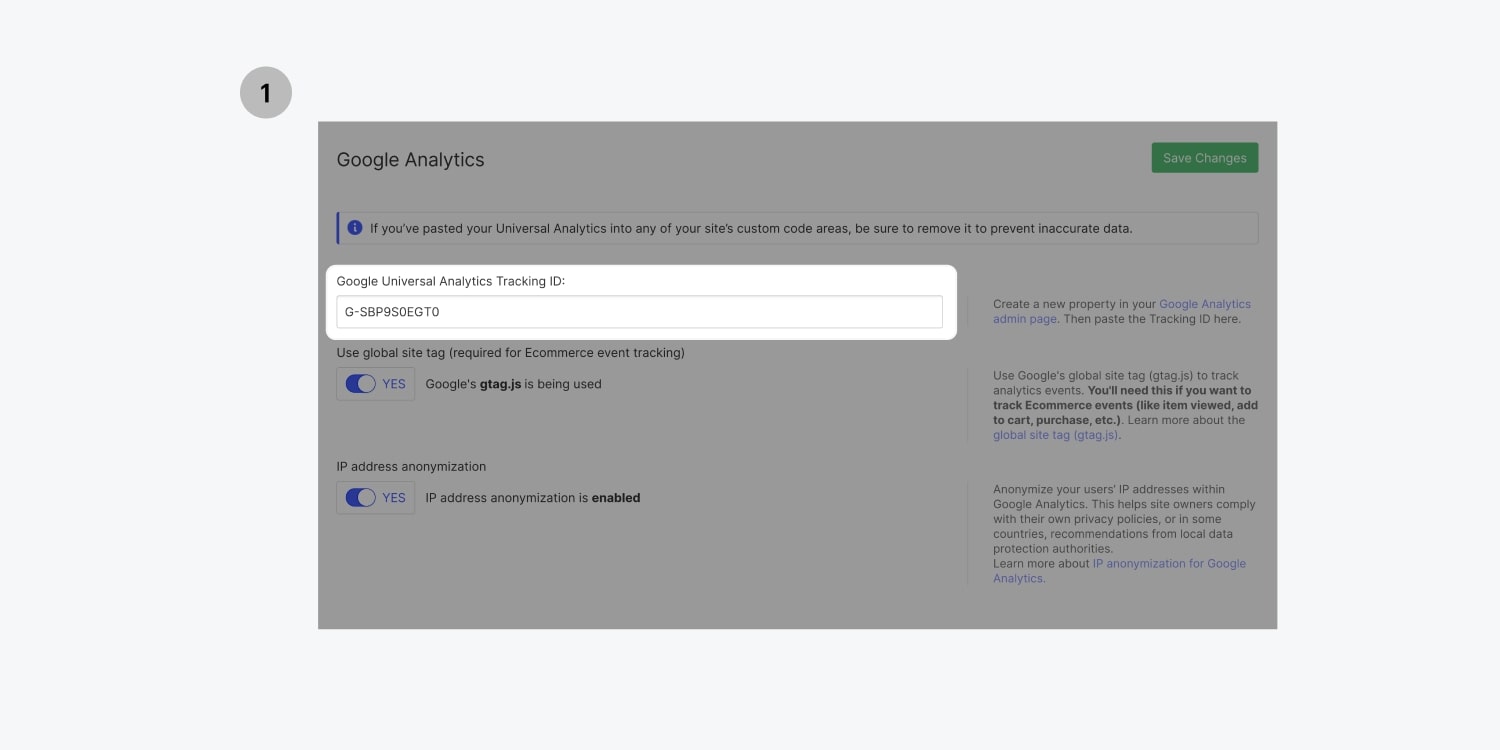
Click save changes, then Publish to Selected Domains.
To add a Google Analytics measurement ID to your website manually:
- Open Google Analytics
- Click Admin
- Click Data Streams
- Click Web
- Under Tagging Instructions, click Add new on-page tag
- Look for Global Site Tag (gtag.js)
- Copy and paste the entire Global Site Tag immediately after <head> on each page of your website
Note that the Global Site Tag code snippet begins with:
<!-- Global Site Tag (gtag.js) - Google Analytics -->
and ends with:
</script>
You need to paste the entire snippet for the analytics tag to work.
Be careful not to mix up <head> and <header>, which are two different HTML elements. The <head> element is the one that contains metadata!
Use Webflow's visual development platform to build completely custom, production-ready websites — or high-fidelity prototypes — without writing a line of code.
Use Webflow's visual development platform to build completely custom, production-ready websites — or high-fidelity prototypes — without writing a line of code.
3. Install and set up Google Tag Manager (optional)
Adding a Google Analytics measurement ID to your website will help you collect general site traffic data and track metrics such as users, page views, bounce rate, etc.
But if you want to get more granular data that shows user behavior, you will have to create custom measurement IDs. Of course, the more of these custom measurement IDs (tags) you create, the harder it becomes to manage them.
And that’s where Google Tag Manager comes in. It allows you to manage all these custom Google Analytics measurement IDs, as well as other types of tags such as Google Ads tracking ID, Facebook Pixel tracking info, etc.
To install it on your website:
- Go to tagmanager.google.com.
- Create a Google Tag Manager account.
- Setup a container.
- Add and publish your tags.
Google has a general Google Tag Manager video tutorial. If you want to integrate Google Tag Manager with Google Analytics in Webflow, there’s a tutorial for that as well.
4. Validate your Google Analytics code
Now that you’ve set up Google Analytics, you need to make sure that everything is working. To do so, open up your website and then open Google Analytics in a new tab. Click real time and then overview.
If your Google Analytics integration was successful, you should see at least one visitor on your website — yourself.
You can also use tools such as GA checker and Google Analytics test.
Note that some analytics data might take 24-48 hours to show up, though it usually happens sooner.
If you don’t see any data, then something went wrong. Here are a few troubleshooting options:
- Clear your browsing data and disable caching. Your browser might be loading the cached version of your website, so the changes you made to its code aren’t showing up.
- Use the standard Google Analytics tracking code. It’s best to use it as it’s provided by Google. If you have made any changes to it, try the standard version instead.
- Disable ad blockers. If you are using an ad blocker, it might be blocking Google Analytics. Try disabling it.
Set up Google Analytics like a pro
Set up views
By default, Google Analytics gives you an unfiltered view of each website in your account.
If you have three websites associated with it, all that data will be sent to one Google Analytics property.
To set up separate views:
- Open Google Analytics
- Click Admin
- Go to the account and property you want to add a view
- In the View column, click the menu, then +Create View
- Enter a view name. Be specific!
- Select a reporting time zone.
- For User ID enabled properties, click the toggle ON to create a User ID view, leave the toggle set to OFF for a reporting view.
- Click Create View.
Set up event tracking
Google Analytics allows you to track events, which (in simple terms) are the actions that users take on your website. Tracking events allows you to measure conversions in granular detail.
To create events:
- Open Google Analytics
- Go to All Events
- Click Create Event
- Click Create
- Enter an event name
- Set up conditions for your event
- Configure the parameters (optional)
- Click Create
- Go to Conversions
- Click New Conversion Event
- Type in the name of the event you’ve just created
Then, you can go to the website, simulate the conversion, and see if it shows up on Google Analytics. View a video tutorial for more guidance.
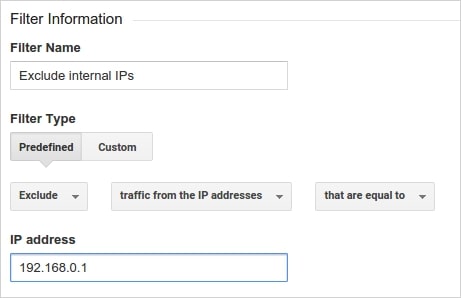
Add a traffic filter for yourself
You also want to create a traffic filter for yourself so that you won’t distort the data by constantly checking your own website.
You can do that by excluding your IP from traffic reports:
- Open Google Analytics
- Click Admin
- Go to the relevant view
- In the View column, click Filters
- Click +Add a Filter
- Enter a name for the filter.
- Leave the Filter Type as Predefined
- Choose Exclude from the Select filter type menu
- Choose traffic from the IP addresses from the Select source or destination menu
- Choose the that are equal to expression in the Select expression menu.
- Enter the IP address
What’s next?
Google Analytics is a sophisticated web analytics solution notorious for its steep learning curve. That’s why I suggest taking the time to familiarize yourself with this software in a structured way.
There are quite a few free Google Analytics courses on YouTube that can help you get up to speed. Alternatively, if you want to truly master this platform, consider taking one of the premium Google Analytics courses on Udemy.