


Webflow is an excellent tool for building static sites, blogs, and even ecommerce sites. But there are moments where you’ll want to do more with your site — which is where the power of React comes in. In this article, I’ll show you how to get your React components inside your Webflow site.
Update (November 2023): Webflow is currently working on Code Libraries, which will significantly improve developers' ability to add and leverage React components in Webflow. To preview what's in development, watch our session from Webflow Conf.
___
Webflow is an amazing design tool that allows you to build stunning websites without having to write a single line of code. It has CMS functionality and they recently launched Webflow Ecommerce.
But sometimes, you might need the power of React for more customized and complex applications. In this article, we’ll show you how.
For example, I was recently tasked with porting a search component from a legacy site over to a custom-built Webflow site. The component searches a database of cargo ship schedules to find a list of ships that match the search criteria. A user then enters their loading port and destination port and the component returns a list of ship lines matching their search.
Building that function directly in Webflow would have required a lot of custom, messy coding. React allowed me to build the application easily — and migrating it to Webflow was just as simple.
Here’s the step-by-step process I used for my project. You can use it to create your own React project, set up a deployment process, and integrate your project with a Webflow site.
Note: This tutorial is quite a bit more technical than our usual fare. To tackle it, you’ll need to be familiar with working in the terminal. Familiarity with JavaScript generally, and React in particular, will obviously help.
Set up your React project
To set up your React project:
- Create a folder and name it after your project
- Run npm init and fill in any relevant information
- Install React and React-DOM by running: npm install --save react react-dom
- Create two directories, one called src and and the other dist, in the folder you created
- Create the file dist/index.html with the following content:
<!DOCTYPE html>
<html lang="en">
<head>
 <meta charset="UTF-8">
 <meta name="viewport" content="width=device-width, initial-scale=1.0">
 <meta http-equiv="X-UA-Compatible" content="ie=edge">
 <title>YOUR APP TITLE</title>
</head>
<body>
 <div id="react-target"></div>
 <script src="bundle.js"></script>
</body>
</html>
You’ll use this file to create a webpage you can load locally as you build your React component. Be sure to replace YOUR APP TITLE in the <title> tag with your app’s title.
Notice the two divs in the <body> section:
- The empty div with the id of “react-target” is where we’ll render our React component
- The script tag loads a file called bundle.js that will contain our application code generated by Webpack
Next, create a file called index.js in your src folder with the following contents:
import React, {Component} from 'react'
import ReactDOM from 'react-dom'
class App extends Component {
render() {
return (
<div>This is a React component inside of Webflow!</div>
)
}
}
ReactDOM.render(
React.createElement(App, {}, null),
document.getElementById('react-target')
);
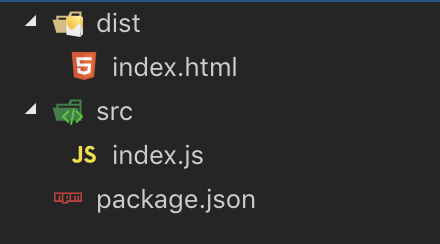
Your project structure should now look like this:
Set up Webpack
Webpack is a module bundler. It takes all your JavaScript, stylesheets, images, and any other code that makes up your app, and combines it into a single file, which we called bundle.js.
In order to get Webpack set up for your project, you’ll need to do the following:
1. Install Webpack: in your root directory, run the following to install Webpack and the tools needed to run a local webpack development server. This will allow you to see what you’re building as you work on it.
npm install --save-dev webpack webpack-dev-server webpack-cli
2. Add the following to the scripts section of your package.json:
...
"scripts": {
 "start": "webpack-dev-server --config ./webpack.config.js --mode development --progress --color --port 3000",
 ...
},
...
This will allow us to run a local development server so we can work on our app locally in a browser.
3. Set up the Webpack configuration: create a file in your root folder called webpack.config.js with the following content:
const path = require('path')

module.exports = {
 entry: './src/index.js',
 module: {
   rules: [
     {
       test: /\.(js|jsx)$/,
       exclude: /node_modules/,
       use: ['babel-loader']
     },
     {
       test: /\.css$/,
       use: ["style-loader", "css-loader"]
     },
     {
       test: /\.(pdf|jpg|png|gif|svg|ico)$/,
       use: [
         {
           loader: 'url-loader'
         },
       ]
     },
     {
       test: /\.(woff|woff2|eot|ttf|otf)$/,
       loader: "file-loader"
     }
   ]
 },
 resolve: {
   extensions: ['*', '.js', '.jsx']
 },
 output: {
   path: __dirname + '/dist',
   publicPath: '/',
   filename: 'bundle.js'
 },
 devServer: {
   static: {
     directory: path.join(__dirname, 'dist')
   }
 }
};


The modern web design process
Discover the processes and tools behind high-performing websites in this free ebook.
Set up Babel
In order to use the newest features of JavaScript, you’ll need to install Babel. Run the following code in your project directory:
npm install --save-dev @babel/core @babel/preset-env babel-loader @babel/preset-react @babel/plugin-proposal-class-properties
In your root directory, create a file called .babelrc (yes, it starts with a dot). Copy and paste the following content:
{
"presets": [
  "@babel/preset-env",
  "@babel/preset-react"
]
}
Run npm start and open your browser to http://localhost:3000.
You should see a message that says, “This is a React component inside of Webflow!”
That’s it for the React setup! Now let’s set up our deployment.
Set up S3 deployment
Since Webflow doesn’t allow you to host your own script files on their servers, we’ll have to load the script from an external server. For this, we’ll use Amazon S3.
- Create an s3 bucket and give it a unique name
- Press “next” twice
- Uncheck the following options
a. Block new public ACLs and uploading public objects
b. Remove public access granted through public ACLs - Enable public access
a. Go to the Permissions tab
b. Click Access Control List > Everyone
c. Check List Objects and Write Objects > Save
Enable CORS
Modern browsers enforce Cross-Origin Resource Sharing (CORS) rules which don’t allow your site to load content from an external URL. To get around this limitation, we need to tell S3 to send a CORS header specifying that any origin can GET the files in our bucket. To do this:
- Click CORS Configuration
- Copy and paste the following
[
 {
   "AllowedMethods": [
     "GET"
   ],
   "AllowedOrigins": [
     "*"
   ]
 }
]
Now you’ll need to install the AWS Command Line Interface (CLI) on your computer.
To do this, run the following:
curl "https://s3.amazonaws.com/aws-cli/awscli-bundle.zip" -o "awscli-bundle.zip"
unzip awscli-bundle.zip
sudo ./awscli-bundle/install -i /usr/local/aws -b /usr/local/bin/aws
Create an S3 CLI User
Now let’s create a user for the AWS CLI to use:
- In the AWS dashboard, go to Services > IAM > Users
- Add a user and give it a name
- Check Programmatic access > Next
- Attach existing policies > check AmazonS3FullAccess
- Click Next > Next > Create
- Keep this page open and open a terminal
- Type in aws configure
- Enter your access key ID and secret access key as prompted
Create a build script
To bundle an app using Webpack, you only have to use the “webpack” command, so go ahead and add the following script to your package.json:
"build": "webpack",
Create a deploy script
Add the following script to your package.json, making sure to replace BUCKETNAME with the name of your s3 bucket:
"deploy": "aws s3 cp ./dist/bundle.js s3://BUCKETNAME/ --acl public-read"
Build and deploy the script
When you run the build script, it will create a bundle.js file. This is the file we want to load in the Webflow site. In your terminal, run:
npm run build && npm run deploy
I usually like to create a shortcut script that does both, so go ahead and add the following script to your package.json. (bd stands for build and deploy):
"bd": "npm run build && npm run deploy"
Add component to Webflow
With all that out of the way, we’re finally ready to deliver on this post’s promise: adding your React component to your Webflow project.
Load the React library
- Open your Webflow project
- Open the page you want to add your React component to
- Click the gear icon
- Find the Inside <head> tag section and paste the following script tags to load React and React DOM:
<script src="https://unpkg.com/react@16.4.1/umd/react.production.min.js"></script>
<script src="https://unpkg.com/react-dom@16.4.1/umd/react-dom.production.min.js"></script>
Now your page will load both the React library and the React DOM, which is the part of React that allows you to attach elements to the document object model (DOM), which is what we techies call the structure of the page.
Load your bundled app file
Next, we’ll need to tell Webflow to load our compiled app bundle. Find the Before </body> tag section and paste in the script link to your compiled bundle.js.
<script src="https://<YOUR_BUCKET>.s3.<YOUR_S3_REGION>.amazonaws.com/bundle.js"></script>
Create a target div
The last thing you’ll need to do is to create a div for the React app to populate:
- Find where you want to render the React component on your page, and create a div
- Give the div an ID of react-target (the same name we specified in our index.js)
- Deploy the Webflow project
Now, when you view your Webflow site, your React app should render in the div you specified.
Congratulations! If you made it this far, you now have React running in Webflow. If you have any questions, send me an email. Good luck!