


Over the past few weeks, I’ve been digging deep into our docs, exploring the developer features of the Webflow platform.
One of the first things I played with was the ability to add custom extensions to the Designer. The Designer API is really flexible, and I've built a few samples I thought I'd share with you!
Getting started with Designer extensions
I'm not going to rewrite the docs for you, so if you haven't yet checked out this feature, take a quick gander at the getting started walkthrough to see how it's done. At a high level, here's what you can expect:
- You'll scaffold an application locally to create and test your extension. Out of the box, you can do this with TypeScript or React. I'm not really a React person, so I stuck to TypeScript. To be honest, I don't really use TypeScript much either, but that was no barrier to entry. For the most part, I just treated my work as vanilla JavaScript.
- You run the application locally, but install it on your Webflow site, and use it in Designer. This essentially creates an iframe loading your content from your system, and enables you to develop quicker.
- Your code has access to a huge set of Designer APIs, which is similar to your typical DOM access tailored for Webflow.
- The final step is packaging up your extension and deploying it to your site. Here is where things get interesting. You can publish your extension to the Marketplace to share it with others, but you're also welcome to simply keep it to yourself. This is great for "one offs" for sites with a particular need that no one else requires.
With that in mind, let me walk you through the code and UX of my first, super important, Enterprise-ready extension: the Cat Placeholder app.
Inserting placeholder images with an app
After I finished the Getting Started doc, I scaffolded a new app for the express purpose of adding more cats to the web, which should be a top priority for any developer. Place Cats is an image placeholder service —essentially a simple service where you can insert an img tag into your web page, set the src to their URL, specify various parameters for things like width and height, and you'll get a placeholder image useful for temporary mockups. Oh, and the temporary image is always a cat. #winning
As a simple example, here's an image using this markup: <img src="https://placecats.com/300/200">

Changing the size gives you another image, so for example, using https://placecats.com/500/300

So given this service only requires adding an image to a page, let's look at the app I built for that. When you scaffold out your Designer extension, there's a few different files you can work with, but for my needs I focused on:
src/index.ts- Where I implemented the actual logic of the apppublic/index.html- This is what the end user of your app seespublic/styles.css- A stylesheet to make your app look nice
After following the directions of the Getting Started guide and running my app locally, here's how it looks in my sample site:
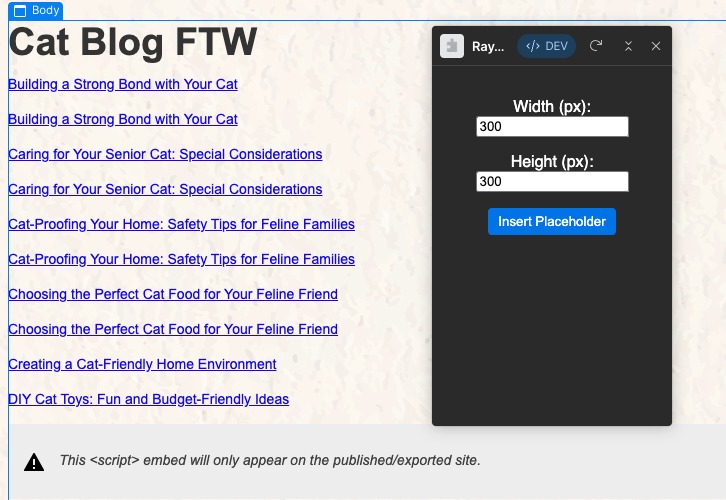
As a reminder, everything you see there — from the layout of the form labels and color of the button — can be customized. I did the bare minimum after scaffolding, but you can absolutely make things look anyway you would like!
Here's the basic HTML I used:
<!doctype >
<html lang="en">
<head>
<meta charset="UTF-8" />
<link href="./styles.css" rel="stylesheet" />
</head>
<body>
<form id="extension-form">
<p>
<label for="width">Width (px): </label>
<input type="number" id="width" name="width" min="0" value="300">
</p>
<p>
<label for="height">Height (px): </label>
<input type="number" id="height" name="height" min="0" value="300">
</p>
<button id="Insert Placeholder">Insert Placeholder</button>
</form>
<script src="index.js" defer></script>
</body>
</html>
And here's the CSS, which I believe most of, if not all, came from the initial source:
body {
  margin: 0;
  display: flex;
  flex-direction: column;
  align-items: center;
  justify-content: center;
}

form {
  padding: 16px;
  font-family: sans-serif;
  text-align: center;
  color: #fff;
}

button {
  color: #fff;
  background: #0073e6;
  padding: 4px 8px;
  border: 2px solid #0073e6;
  border-radius: 4px;
}

button:focus {
  outline: none;
  border-color: #1280ee;
}
The fun part comes in the index.ts file — let's look at that:
// pointers to the form fields
const $width = document.querySelector('#width') as HTMLInputElement;
const $height = document.querySelector('#height') as HTMLInputElement;

document.getElementById("extension-form").onsubmit = async (event) => {
  event.preventDefault();

  // what's currently selected in the Webflow Designer?
  const el = await webflow.getSelectedElement();

  // We only work with rich text elements
  if(el.type !== 'RichText') {
    await webflow.notify({ type: 'Error', message: "Please select a rich text element." });
    return;
  }

  if($width.value === '') {
    await webflow.notify({ type: 'Error', message: "Please enter a width." });
    return;
  }

  if($height.value === '') {
    await webflow.notify({ type: 'Error', message: "Please enter a height." });
    return;
  }

  // create the new element and add it
  const imgElement = await el.append(webflow.elementPresets.DOM);
  imgElement.setTag("img");
  imgElement.setAttribute("src", `https://placecats.com/${$width.value}/${$height.value}`);

};


Alright, so from the top, I begin by creating two variables that point to the DOM elements in my app — specifically the height and width fields. I use $ in front of variables that point to the DOM as just a quick visual reminder, and yes, this is from my use of jQuery back in an ancient past.
The next block is the most important bit, as it handles the form submission. My particular app has three things it needs to check:
- As I'm inserting an image, I want to ensure that a rich text block in the Webflow Designer is selected. As I mentioned earlier, you get access to the Designer in your code, and this is one simple example of that: querying what's currently selected.
- I then check both the height and width values. Note that this check,and the previous one both make use of a Webflow Designer API to throw an error message to the user in a consistent manner with other parts of the UI. Here's an example of how this looks:
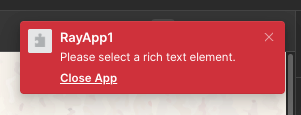
Once again, this type of error handling and the nature of how you communicate any particular issue is completely up to the developer. I could have added more validation logic, as well (for example, not allowing negative numbers).
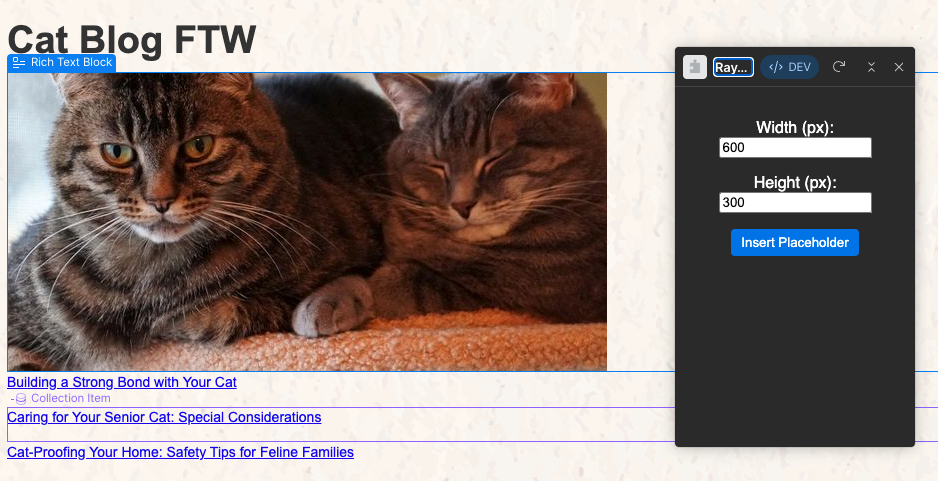
Once I've verified the inputs and the user selects a rich text block, I can add a new item to the page. I'm inserting a generic DOM element which gives me the power to select any particular tag. I set the tag to img and then specified the URL using the documentation from PlaceCats.com.
And here is the glorious result:
If you’d like to see the entire application yourself, you can find it in our repo here.
Building an extension for Google Static Maps
For my second app, I built a Designer extension for Google Static Maps. Most folks are familiar with Google Maps, not as many are familiar with the Static Map API. This is a lightweight, image-only version of Google Maps. This could be useful in HTML formatted emails, printed web pages, or just when you don't really need the full experience of a dynamic map and only want to render a simple image instead. You can still complete actions like centering, resizing, adding markers, and so forth, all through an "API" that's basically an image source URL.
Using the API does require a key, and it's one that you should be careful to assign limited privileges to, as it will be viewable in your source. You'll also want to make use of the "Host Restriction" settings to limit where your key can be used. For my testing purposes, I used *.webflow.com/* to ensure it would work in my sites hosted on Webflow.
I've been a fan of this API (if you can really call it that) for years now, and the code is nearly identical to the previous example — with just a slight change to the UI and JavaScript. First, I added new fields for the key and address:
<!doctype >
<html lang="en">
<head>
<meta charset="UTF-8" />
<link href="./styles.css" rel="stylesheet" />
</head>
<body>
<form id="extension-form">
<p>
<label for="key">Key: </label>
<input type="text" id="key" name="key" value="">
</p>
<p>
<label for="width">Width (px): </label>
<input type="number" id="width" name="width" min="0" value="300">
</p>
<p>
<label for="height">Height (px): </label>
<input type="number" id="height" name="height" min="0" value="300">
</p>
<p>
<label for="address">Address: </label>
<input type="text" id="address" name="address" value="" placeholder="May be 'latitude,longitude' or 'address'">
</p>
<button>Insert Map</button>
</form>
<script src="index.js" defer></script>
</body>
</html>And here's the JavaScript:
// pointers to the form fields
const $key = document.querySelector('#key') as HTMLInputElement;
const $width = document.querySelector('#width') as HTMLInputElement;
const $height = document.querySelector('#height') as HTMLInputElement;
const $address = document.querySelector('#address') as HTMLInputElement;
// do we have a cached key?
const LS_KEY = 'googlestaticmaps_key';
const savedKey = localStorage.getItem(LS_KEY);
if(savedKey) {
$key.value = savedKey;
}
// save key on change
$key.onchange = () => {
localStorage.setItem(LS_KEY, $key.value);
}
document.getElementById("extension-form").onsubmit = async (event) => {
event.preventDefault();
const el = await webflow.getSelectedElement();
// We only work with rich text elements
if(!el || el.type !== 'RichText') {
await webflow.notify({ type: 'Error', message: "Please select a rich text element." });
return;
}
if($key.value === '') {
await webflow.notify({ type: 'Error', message: "Please enter a key." });
return;
}
if($width.value === '') {
await webflow.notify({ type: 'Error', message: "Please enter a width." });
return;
}
if($height.value === '') {
await webflow.notify({ type: 'Error', message: "Please enter a height." });
return;
}
if($address.value === '') {
await webflow.notify({ type: 'Error', message: "Please enter an address." });
return;
}
// create the new element and add it
const imgElement = await el.append(webflow.elementPresets.DOM);
imgElement.setTag("img");
imgElement.setAttribute("src", `https://maps.googleapis.com/maps/api/staticmap?key=${encodeURIComponent($key.value)}&size=${encodeURIComponent($width.value)}x${encodeURIComponent($height.value)}¢er=${encodeURIComponent($address.value)}`);
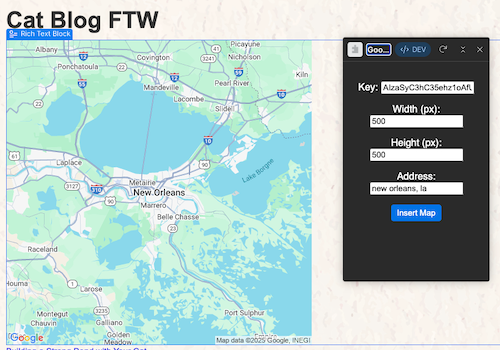
};One change you'll see is support for caching the key value. I used the browser's LocalStorage system to fetch the value on load, and cache it on change. Outside of that, the code is virtually the same. It checks my four form fields, and if all is good, I’m able to simply add a new DOM element, set it to an image, and craft my image URL based on the address provided and the docs from Google. Here's an example of this in action:
You can find the complete source for this here.
Start building your own Designer extensions today
These two examples were obviously a bit "toy" like, but they really highlight just how quickly you can go from zero to a working extension in the Webflow Designer. I essentially just used standard web tech — HTML, CSS, and JavaScript — wrapped in a lightweight API to interact with the canvas.
While inserting images is a great "Hello World" use case, the API is capable of much more. You can read current styles, modify classes, handle user interactions, and deeply integrate your own external services directly into the Designer workflow.
If you are ready to start building, head over to the Designer API documentation to see what else is possible. I can’t wait to see what you build!

We’re hiring!
We’re looking for product and engineering talent to join us on our mission to bring development superpowers to everyone.


