
We’re awash in information. Each day, humanity creates a volume of content it previously took centuries to build. But that leaves us with a big problem: how do we find, and maintain easy access to, the information we need?
It’s a problem that everyone from internet giants like Google and Pinterest to smaller but still popular tools like Pocket and Refind have tried to tackle. And they do a pretty solid job of it.
But that doesn’t mean you can’t do your part. How?
Build curation websites
Businesses built on curation focus most on two things: scale and newness. They have to try to provide content and tools for everyone. And they have to keep focused on the new to keep their stores of content relevant and engaging.
A handmade curation site, on the other hand, can focus on specificity and quality. Sure, the giants try to do that too, but in most cases, they do it on the basis of a highly sophisticated, deeply educated guess. Their combination of fine-tuned algorithms and massive-scale crowdsourcing enables them to do a really good job of inferring quality and usefulness.
But as anyone who’s ever attended high school knows: popularity does not necessarily equal quality.
That’s where a single, passionate, and well-informed human being — i.e., a curator — really has a chance to shine. As a curator, you can skip straight to the best stuff, based on your unique perspective.
With that out of the way, let’s talk about how you do it.
Curation website development process
Before you dive into building your next curated website, you’ve got to plan two things:
- What you’ll curate
- How you’ll curate it
Picking what you’ll curate
Of course, before you can make a quality-focused selection of things, you have to decide what things you’ll be curating.
You could just collect everything you think is cool, from wine keys to mountain boards. But it’s unlikely anyone will find the site, or care much about it, if it’s that general. If you’re curating for personal use, that’s a-ok.
But if you want to make a splash and get others to spread the word, you’ve got to be specific. The advantages of having a specific focus are many, but among the most important are:
- SEO: A specific focus naturally translates to specific keywords and phrases that people are probably using in search. And if/when people find you, you’re likely giving them just what they want, right when they want it.
- Relevance/shareability: While this is obviously related to the above, here I mean relevance to a specific community. If you can appeal directly to a given community’s need, they’ll be more likely to love and share what you’ve built!
But how do you pick your topic?
How to pick your curation site’s topic
This might seem hard at first. After all, you undoubtedly have tons of interests — so how do you narrow it down?!
First, keep in mind that you can always build a bunch of curation websites, each tailored to a different topic. Having a wealth of hobbies and interests just means you’ve got a rich content inventory to work with!
Second, ask yourself a few questions about each of your interests:
- Is there a passionate community around this interest?
- Would I appreciate quick and easy access to a set of resources on this interest? Would others?
- Do I have a hard time finding such resources?
- Do I have a unique perspective on these resources?
- Do I wish more people knew about these resources?
For a curation site I built last year, Voice, Tone & Content Guides, I knew I had a solid “yes” on each of these questions.
Content strategists, copywriters, editors, and brand mavens tend to be pretty passionate about the topic of style guides. And yet, they’re not exactly easy to find out there in the wild. As a content strategist myself, I definitely have a unique perspective and strongly wish more people were aware of and cared about these things.

Note that you certainly don’t have to answer “yes” to all these questions. You don’t need to want others to know more about your resources, for example. But I do think the more yes answers you have here, the stronger your concept. And the more confidence you’ll have that others will want to use and share your resource.
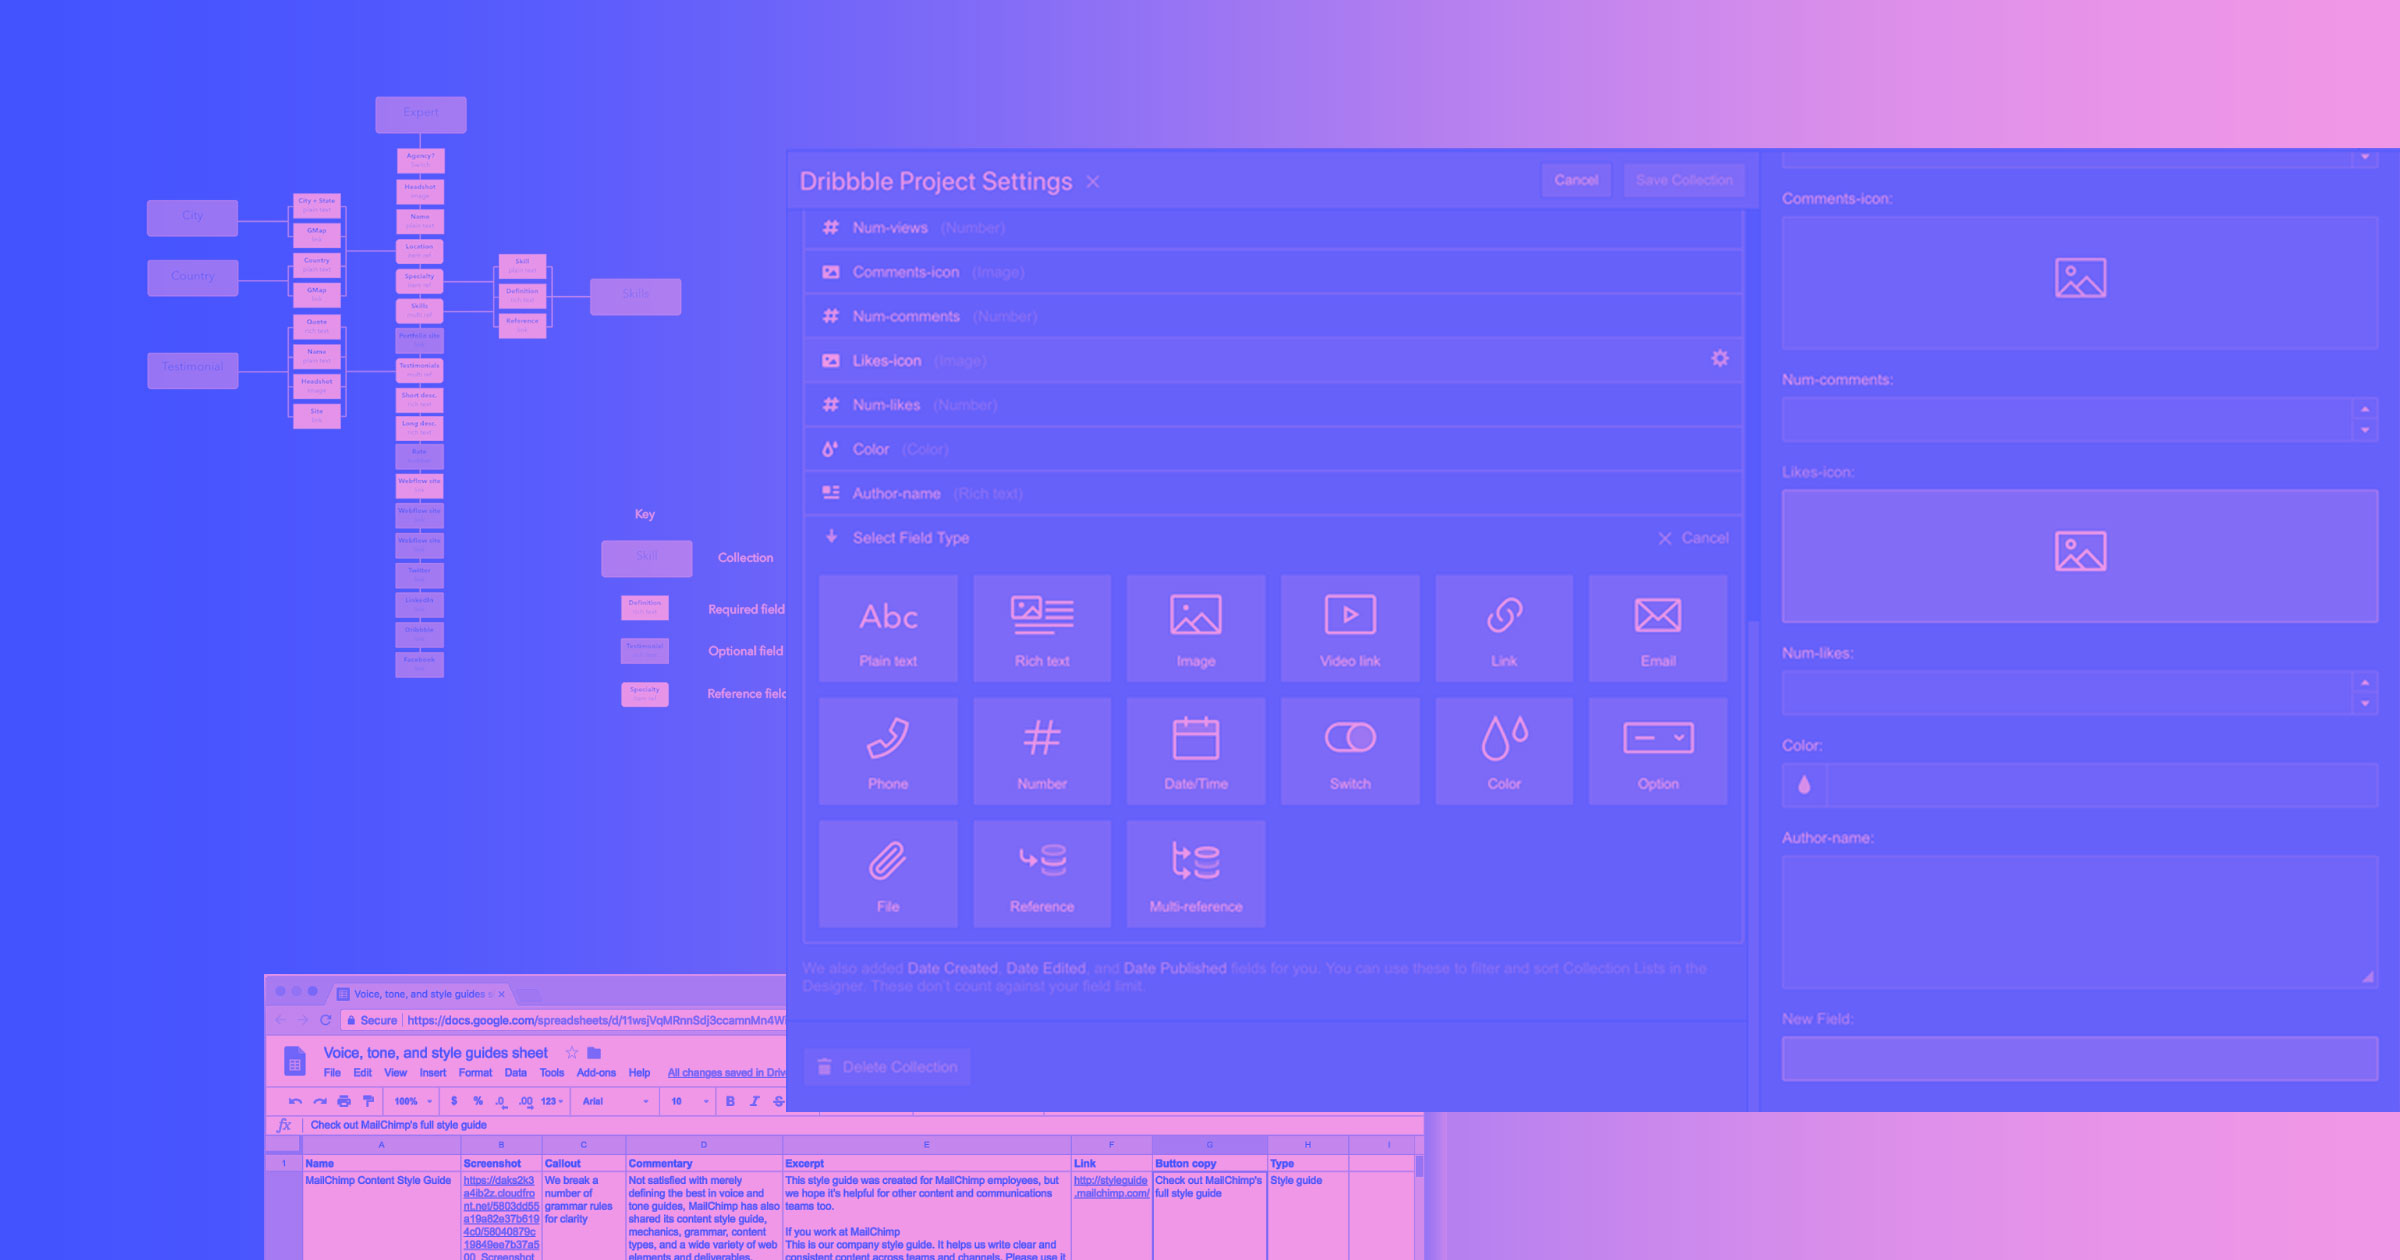
Defining your content model
If you’ve read the Webflow Blog before, you probably know we’re fans of content modeling. In essence, it’s the practice of defining the content types, relationships, and characteristics that will give a website shape before you start creating either content or the design.
One advantage of building a curation website is that the standard design language for such things is pretty well-established. These sites typically present content in a mostly textual list (Google), or an image-heavy grid (Pinterest).
Having identified these common design patterns for curation sites, you’re probably already thinking of the required content types. For each item in our Collection, we’ll want at least:
- Name
- Link
But you’ll probably want to add:
- Image
- Description
Depending on whether we want to just directly link to the item in question, or have a secondary page on our site that provides more detail (such as a critique, rating, review, etc.), we might add more fields to capture that content.
We may also need additional fields for metadata on the item. If you’re curating your favorite books on typography, for example, you could add:
- Author
- Publisher
- Publication date
- Price
- Page count
- Physical dimensions
- Fonts
And etcetera: it all depends on what you’re curating, what you’re highlighting within your collection, and what you want people to do on or get out of your site. (More on that in the Defining your feature set section below.)
Identify your design pattern
As I mentioned earlier (because I can’t think of displays patterns and content models separately), most curation sites follow one of two design patterns:
You can go the list route (h/t ancient epics like the Bible, the Iliad, and of course, Google). Or you can go the grid route (h/t newspapers and Pinterest). Or you can get real fancy and combine the two, giving the visitor the power to use their preferred layout with a toggle.
(Let’s be honest: this is also true for 99.9% of other site types.)
The vertical list
Generally speaking, a vertical list makes for a simpler, cleaner look that’s easy to consume. A vertical list also allows for both more items in less vertical space, and horizontal space for sidebars. Or just some good ole whitespace!
It’s also a more logical choice for:
- Highlighting sequencing or hierarchy, such as in a timeline or ranking
- Horizontal (landscape) imagery
- Items you have a lot of metadata on, and that you want to display in the index
- Encouraging quick decisions, such as on a search results page
You’ll need a strong typographic game and very clear language to make the most of this layout, because visitors will make decisions based solely on the text. (Though you can of course include images for visual interest.)
The grid
Again generalizing, the grid conduces to more visually rich, dense, and complicated looks. It’s especially suited to image-heavy experiences, especially when most images will be vertical (portrait).
That makes it a more logical choice for experiences where:
- Sequencing and hierarchy don’t matter
- Vertical (portrait) imagery dominate
- Metadata can be de-emphasized
- Prolonged browsing and deeper on-site engagement matter
Define your feature set
The next (and final) step in this planning phase is defining your feature set: what do you want people to do on your website?
It could just fulfill the essential function of a curation: informing people of the existence of these items, allowing them to dig deeper on their own. Alternatively, you could add some commentary, using content to frame how visitors think of the items in your Collection and how they interrelate. You could write reviews. Or you could go in the community direction and allow visitors to rate, upvote and/or downvote, write their own reviews, or combine all those functions.
It’s a question of balancing how much effort you want to put into your site and how much effect you want it to have. The more sophisticated the site gets, the more engaging it’s likely to be (assuming your collection is useful or interesting).
I won’t dig deep into adding further functionality, but here are a few tools you could use to achieve the above ideas:
- Disqus, for crowdsourcing reviews/comments
- jQuery Upvote, for upvotes
- Zapier, for structured user-generated content, like reviews


Get started for free
Create custom, scalable websites — without writing code. Start building in Webflow.
Gather your content into a spreadsheet
With your content model defined, you can confidently set up a spreadsheet that reflects that model, and the fields available in Webflow CMS — because we’re going to use this spreadsheet to both create and add items to our core Collection. (Thanks to our CSV import feature!)
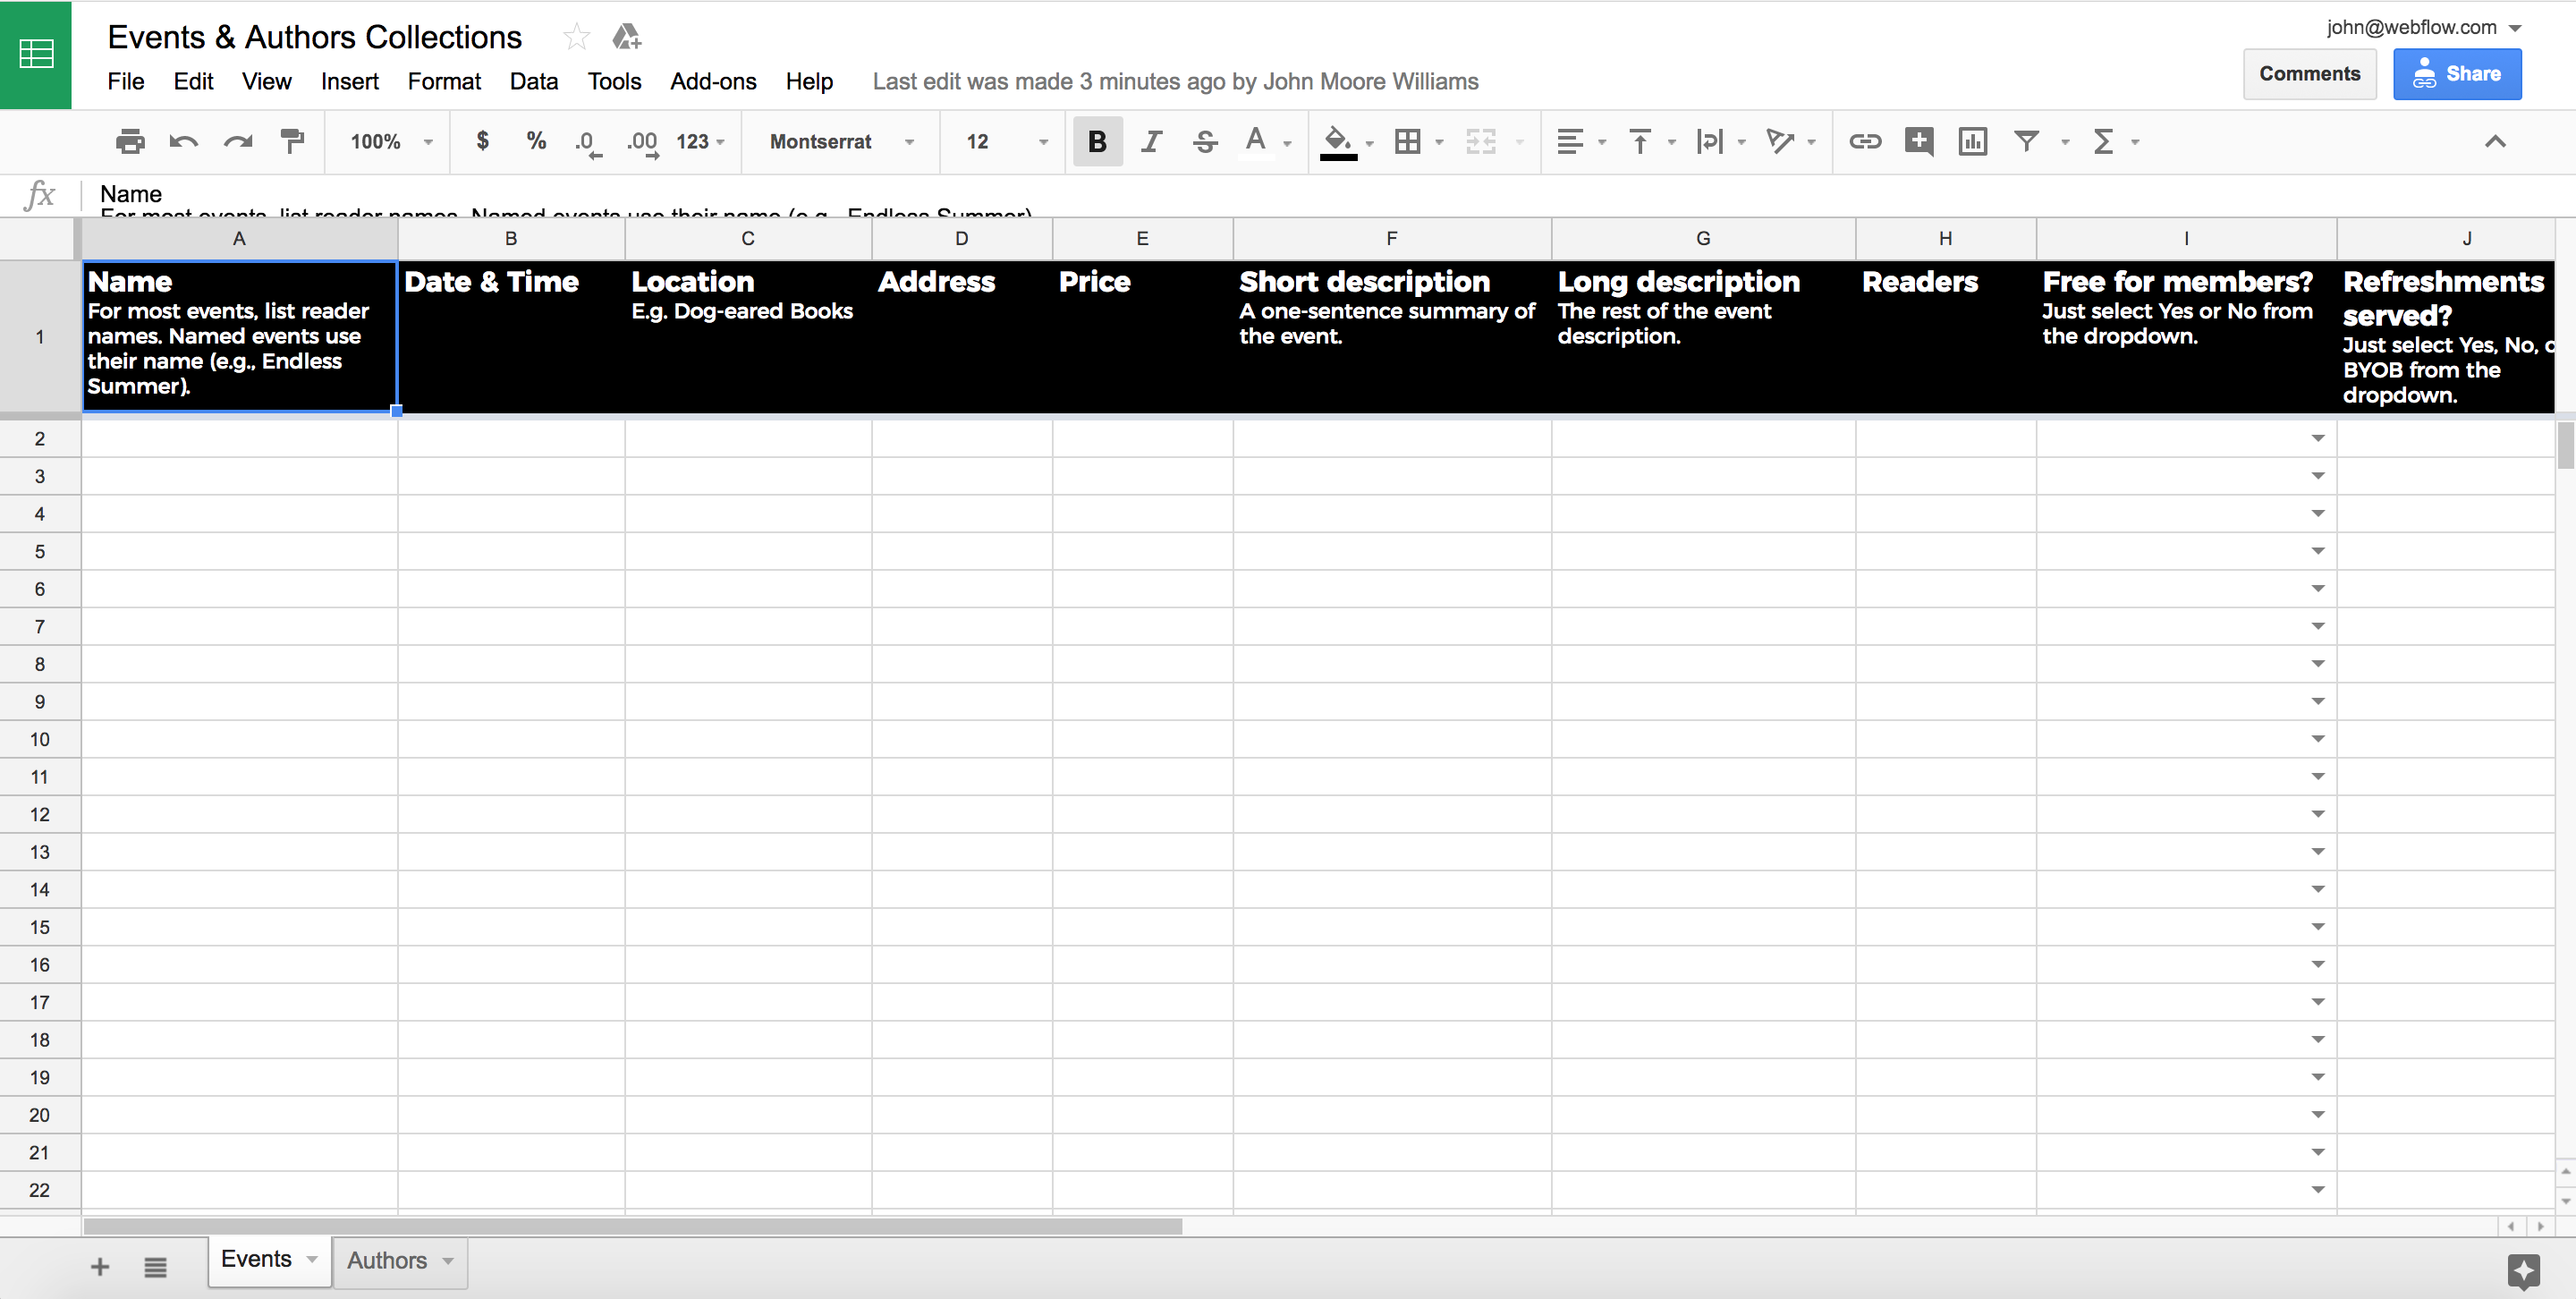
So fire up your spreadsheet tool of choice, be it Excel, Sheets, Airtable, or whatever, and add your header row. (Just make sure your tool allows export to CSV.)
Your header row should contain all the content “atoms” that combine to build the “molecule” described in your content model. If you’re importing a lot of items to the CMS, you might want to “freeze” your header row so it’s easy to reference while you add items.
Your header row can be horizontal (row) or vertical (column), but Webflow will assume the first row is the header, so that’s how I tend to do it.
Taking the basic model above in the Defining your content model section, you’ll want to add:
- Name
- Image (see below)
- Description
- Link
If any of your headers require further explanation, you can either add comments on the corresponding cells, or add them in a second row below the header labels. If you add them as comments, Webflow should ignore them completely. If you add them as a second row, you can just tell the CMS to not import them.
Keep in mind that spreadsheet tools also have lots of features that can help you maintain your content structure. Two of my favorites are:
- Limiting character count in a cell. You’ll often need text content to come under a certain character count, such as if you’re using a field to populate your meta title or description. Webflow CMS lets you do that in a very straightforward manner, but in sheets you’ll need to add a formula to each cell you want to limit. That formula looks like: =LEN(A1)<=155. That would limit the content of cell A1 to less than 155 characters, a good length for a meta description.
- Forcing specific types of answers. Sometimes, you’ll have fields that need a specific input, such as a yes, no, or maybe. To do this in Google Sheets, select the cell, then Data > Data validation, then select the criteria that best fits your content model.
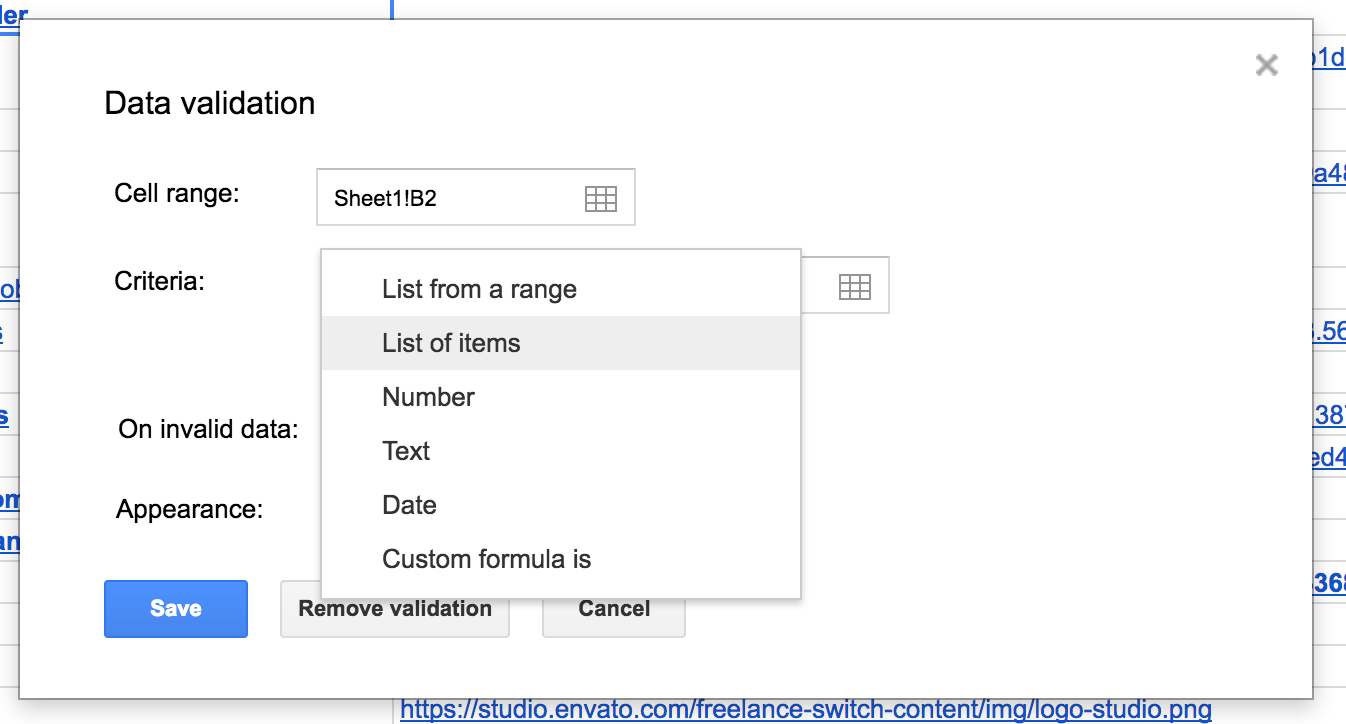
So for a field that requires yes, no, or maybe as an answer, select “List of items,” then enter “yes,no,maybe.”
Importing images to Webflow CMS via CSV import
Importing images to the current Webflow CMS is a little tricky. It won’t yet upload the images to your Asset Manager, so you’ll need to do one of three things:
- Download all the images you need to a single folder, then manually upload them to each Collection item, or
- Import the image URLs to the CMS as plain text fields. You’ll then add them to your design as embeds.
- Import the image URLs to the CMS as image fields. This is a stable and effective option, but depending on your content model, may require too many image fields.
Option 1 can be a little more labor-intensive, but it’s also the most robust and flexible. With Option 1 you won’t need to worry about the image URLs changing in the future, assuming they’re on an external URL.
If you still don’t like option 1, you can approach option 2 in 3 different ways:
- Grab image URLs from a stable place. For example, if you’re curating a collection of websites and displaying their logos, use the image URLs referenced by the logo instance in the navbar.
- Download all the images you need and upload them to another file management system. You can then copy the image’s URLs from there, using the plain text field + embed method mentioned above. You could use another website you own, or a Dropbox or Drive folder.
- Download all the images you need, then upload them to Webflow’s Asset Manager. You can then copy the image URLs from your Asset Manager instead of the source site or a public file folder. But at this point you might as well skip all the messing with image URLs and embeds and just add them to the Collection items directly!
So, again, while you’ve got options, I highly recommend taking the time to upload the images directly to the Collection items, unless you’re sure you can provide a stable URL to embed from. (Though I’ll cop right now to being lazy on my latest curation project.)
If you’re dead-set on using the URL-embed method, here’s what the custom code looks like in the embed:

Where the “logo link” is a dynamic reference to the plain text field of the same name in my Collection, which contains the image URLs from the logos on sites I’m curating. If I want the image to link to a destination, I’d just add that destination in the quotation marks after href.
Import your content to Webflow CMS
Okay, now that you’ve modeled your content, plus picked a design pattern and feature set, you’re finally ready to hop into Webflow.
Here’s a step-by-step breakdown:
Step 1: Prep your CSV
First, export your spreadsheet to CSV. If you’re using Sheets, just go to File > Download as > Comma-separated values (.csv, current sheet).

Your browser will then download the file, so you can save it wherever you’d like.
Step 2: Upload your CSV to Webflow CMS
With a CSV of content ready, you can import it to either a new or existing Collection. Before you upload your CSV, compare it to your Collection fields to make sure they match up, and make any necessary changes. You can always tell the CMS to not import any fields you don’t need.
Then, just follow the steps in the CMS!
Note: The CSV importer can only handle files below 4MB in size. If you have a massive sheet, split it up into as many tabs as you need, then export each tab as it’s own spreadsheet and import them one by one.
Step 3: Start designing your content
By now, you should have a shiny new Collection full of content you didn’t have to enter manually. Feels good, right?
Now go forth, and have fun designing! Oh, and if you’ve built any curation sites with Webflow CMS yourself, we’d love to see them!