


Build secure, subscription-based e-learning platforms with Webflow CMS and Vimeo's protected video delivery.
This guide covers how to build a fitness membership site in Webflow where only logged-in, paying members can access premium content like workouts, programs, and coach notes.
Webflow handles the design and hosting, while Auth0 manages login, Stripe handles subscriptions, and a lightweight serverless worker keeps membership status in sync via Stripe webhooks. Gating logic on the front-end checks both login and an active subscription flag before showing protected content.
Note: An alternative to the custom-built solution proposed in this guide is to use an off-the-shelf tool like Outseta or MemberStack. Though less customizable, Outseta gives you embedded auth, payments, gated content, CRM, email, and help-desk capabilities right inside Webflow Designer. Meanwhile, MemberStack offers flexible no-code gating and Stripe-powered membership control using data attributes—perfect for quick setups without a backend layer.
System architecture
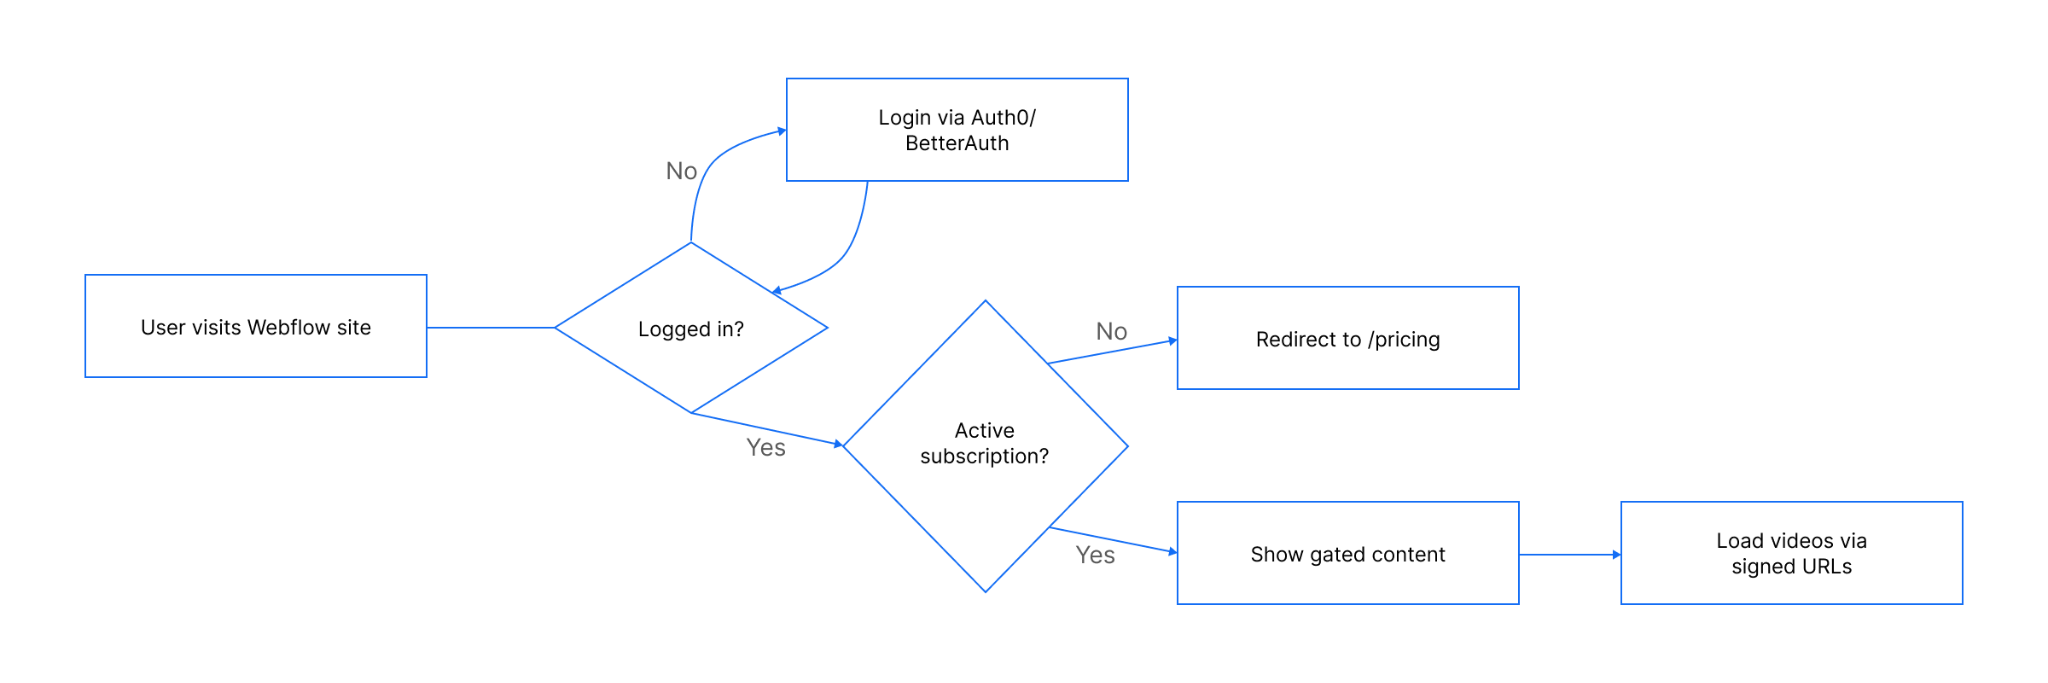
The architecture keeps Webflow for design and content delivery while delegating identity, billing, and subscription state to external services. A small worker bridges Stripe and your authentication layer, allowing the site to gate content based on subscription status.
- Webflow front-end – Hosts public pages (Home, Pricing, Login) and members-only pages (Workouts, Programs, Dashboard). Authentication and gating are run via custom JS embedded in the site.
- Authentication – Auth0 Authentication manages sign-up/login and issues JSON Web Tokens (JWTs). A custom active flag in the user profile or JWT claims indicates if a subscription is paid up.
- Billing – Stripe handles subscription products, recurring payments, payment Links for checkout, and provides a Customer Portal for self-service account management.
- Worker – A serverless function receives and verifies Stripe webhooks, such as checkout.session.completed or customer.subscription.updated. It also updates the active flag in the datastore and stores mappings like
user_id,stripe_customer_id, and subscription status. - Datastore (worker) – Optional store (Firestore, KV) for mapping users to Stripe customers and recording last processed event IDs for idempotency.
- Redirects & environments – Stripe success URL →
/dashboardwhile cancel URL → /pricing. Use separate Stripe keys, webhook endpoints, and datastore configs for development and production.
Authenticate users and track membership status
Before you can decide whether to show a workout or a paywall, you need to know two things: who the user is, and whether they’ve paid.
We use Auth0 Authentication for both. It issues a WT on login and can store an active flag in a custom claim or Firestore record. This keeps the access check local to the browser—fast and independent of Stripe’s API.
Start by loading the Auth0 SDK site-wide using Webflow’s custom code feature.
On the front-end, each protected page runs a check:
<script>
document.addEventListener("DOMContentLoaded", async () => {
  // Initialize Auth0 SPA client
  const auth0Client = await createAuth0Client({
    domain: "YOUR_DOMAIN",
    clientId: "YOUR_CLIENT_ID",
    authorizationParams: {
      redirect_uri: window.location.origin
    }
  });
</script>
From there:
- Login and logout – Provide a form or modal that calls
auth0Client.loginWithRedirect()for sign-in, andauth0Client.logout()to log out. Add “Log in,” “Log out,” and “Manage subscription” links in your nav. - Identifiers – Every user should have a uid, email, and, after their first purchase, a
stripe_customer_id. The active flag lives alongside those. - Mapping to Stripe – Let Stripe create the customer record during checkout. When your worker receives a checkout.session.completed event, write the customer ID back to the datastore profile.
- Email sync – If a user changes their email in the datastore, update Stripe too with the update customer API so the Customer Portal login works without hiccups.
On the front-end, each protected page runs a check:
let token;
  try {
    token = await auth0Client.getTokenSilently();
  } catch (err) {
    // No JWT → force login page
    window.location.href = "/login";
    return;
  }

  const payload = JSON.parse(atob(token.split(".")[1]));

  const isActive = payload["https://yourapp.com/active"];

  if (!token) {
    // Case 1: No JWT at all
    window.location.href = "/login";
  } else if (isActive === true) {
    // Case 2: Paid user → Allow page to load
    document.body.style.display = "block";
  } else {
    // Case 3: JWT exists but subscription inactive
    window.location.href = "/pricing";
  }
});
</script>- No JWT? Send them to /login.
- JWT present with active=true? Show content.
- JWT present but inactive? Send to /pricing.
If you want extra safety, add a “Refresh access” button that calls a worker endpoint to re-pull subscription status from Stripe and update claims.


Subscriptions with Stripe Payment Links and Portal
Stripe is the source of truth for subscription status. Your site never handles card details—it simply directs users to Stripe for payment and self-service.
Here’s the flow you’ll set up:
- Create a subscription Product in your Stripe Dashboard, like “Coaching Monthly,” with a recurring payment.
- Generate a Payment Link for that product. Set the success URL to
/dashboardand the cancel URL to/pricing. Append query parameters forprefilled_email,locked_prefilled_email=true, andclient_reference_id(set to the user's datastore uid). This makes checkout smoother and ensures your webhook knows which user to activate.
When users need to manage their plan, give them access to the Stripe Customer Portal. The no-code option sends an email with a one-time passcode; the API option lets your worker create a portal session directly, so logged-in users skip that step. Configure the portal to allow the actions you want—cancellations, plan changes, card updates—and brand it with your logo.
Webhooks are where the pieces connect:
- checkout.session.completed → mark active=true, store
stripe_customer_idin datastore. - customer.subscription.updated → toggle active based on Stripe status.
- customer.subscription.deleted → set
active=false. - invoice.payment_failed → mark inactive immediately or handle as a
past_duestate.
In this section, we’re only mapping the key events—later, in the workers section, we’ll walk through how to build the serverless function that listens to these webhooks and updates the datastore so your site reacts quickly without polling.
Enforce access rules for pages, elements, and media
With identity and billing in place, you can decide who sees what. The safest default is: hide everything until proven otherwise.
At the page level, run your auth + active check on page load. If the user fails, redirect them to /login or /pricing before any protected HTML becomes visible. This prevents casual snooping, though remember Webflow pages are static—the HTML is sent before your JavaScript runs—so keep sensitive assets (like videos) out of the page source.
For element-level control, you can structure public pages with teaser content and premium content side by side. Use classes or data- attributes to mark what should only be shown to active members, then toggle visibility in your script.
Media deserves extra attention. Host premium videos on a service that supports short-lived signed URLs—such as AWS CloudFront signed URLs or Firebase Storage with security rules. Only generate a URL after confirming the user’s active flag. This way, even if someone grabs the URL from the network tab, it won’t work for long.
Define your access states clearly:
- Active → full access
- Past due → block access or show an “update payment” prompt
- Canceled → block access entirely
Sync status with workers
The worker is the system’s translator. It listens to Stripe, updates the datastore, and makes sure both agree on who’s active.
Deploy it to a lightweight runtime like Webflow Cloud, Vercel Functions, or AWS Lambda. You’ll need:
- Secrets – Stripe webhook signing secret and datastore credentials in environment variables.
- Verification – Use
stripe.webhooks.constructEventto confirm signatures. - Mapping – Prefer
client_reference_idfrom the event to map to datastore uid; fall back to email if missing. - Updates – Use the Auth0 SDK to set the active flag to true in a custom claim or update your datastore. Store the
stripe_customer_idif it’s new. - Idempotency – Record processed event.id values to avoid double-updates.
- Performance – Respond 2xx quickly; do heavier processing asynchronously. Stripe retries on non-200 responses.
- /recheck endpoint – Optional endpoint the front-end can hit to refresh status on demand.
Conclusion and next steps
Monitor webhook deliveries in the Stripe Dashboard so you know if an event failed and needs fixing.
Simply put, keep Webflow for the UI, run auth and billing through managed services, and let a lightweight worker keep the active flag in sync.
Start in a dev environment with Stripe test mode, verifying the entire flow; login, checkout, portal access, and webhook updates, before going live. Default-hide member content and reveal it only after both the JWT and active checks pass.
For billing, Stripe Payment Links and the Customer Portal are fast to implement; you can always add usage-based products or multi-plan tiers later.
Operationally, keep an eye on webhook logs in Stripe Dashboard, handle failures promptly, and consider a “Refresh access” button in the dashboard for edge cases. Define a clear UX for past_due and canceled states so members know how to regain access.
Further reading:
- Auth0 custom claims for storing active flags.
- Stripe webhook quickstart for secure event handling.
- Protecting media with signed URLs or CloudFront signed URLs.


