


Embed UserVoice feedback widgets in Webflow using client-side JavaScript to collect ideas, votes, and surveys fast.
UserVoice provides customer feedback collection, idea voting, and product roadmap features through JavaScript widgets that integrate with Webflow sites.
This guide covers the widget integration pattern—the fastest path to embedding UserVoice feedback functionality in your Webflow site using client-side JavaScript. For custom implementations requiring server-side API access, CMS synchronization, or webhook integrations, see the companion guide: Build custom feedback portals with UserVoice API and Webflow.
What this integration enables
Embedding the UserVoice widget in Webflow allows visitors to submit feature requests, vote on ideas, and view product roadmaps without leaving your site. The widget approach requires minimal setup and works entirely client-side—no server infrastructure required.
Key capabilities:
- Floating feedback buttons or custom trigger elements
- Idea submission forms with customizable fields
- Voting interface for existing suggestions
- Satisfaction surveys and NPS collection
- Multi-language support through locale configuration
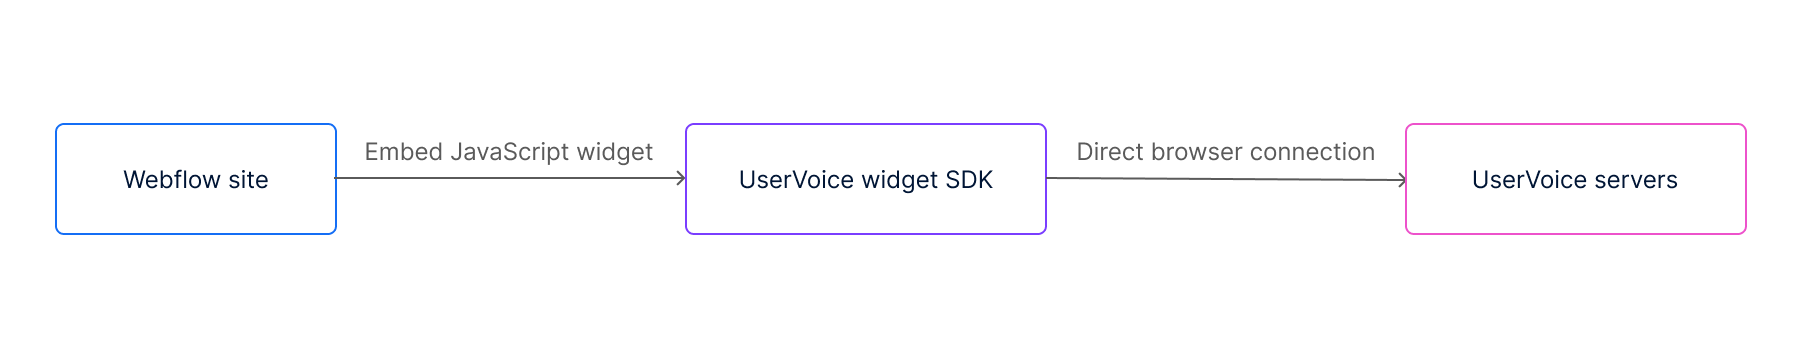
Architecture overview
The widget pattern uses the UserVoice JavaScript SDK embedded in Webflow's footer code via Site Settings. The widget operates in a pure client-side architecture, with the JavaScript SDK handling authentication and directly initiating API communication with UserVoice servers from the browser.
This pattern is ideal when you need:
- Quick implementation without backend development
- Standard feedback collection and voting functionality
- Minimal maintenance overhead
Limitations: The widget approach does not provide access to the UserVoice Admin API, which means you cannot programmatically create suggestions, sync data to Webflow CMS, or implement custom business logic. For those use cases, see the API integration guide.
Prerequisites
Before implementing the widget, you need accounts and credentials from both platforms.
Set up your UserVoice account
- Create a UserVoice account and set up a forum through the admin console settings
- Locate your widget key in Admin Console under Settings → Integrations → Widget
- Note your forum ID (visible in the forum URL or settings)
- Note your subdomain (the
yourcompanyportion ofyourcompany.uservoice.com)
Configure your Webflow workspace
- Ensure your workspace uses a plan that supports custom code (Core, Growth, Agency, Freelancer plans, or active site plan required)
- Verify you have permissions to edit Site Settings (required to add custom code)
Add the UserVoice widget to Webflow
Place the UserVoice JavaScript SDK in your Webflow site's footer code section.
Step 1: Access custom code settings
Navigate to Site Settings → Custom Code → Footer Code in your Webflow project.
Step 2: Add the initialization snippet
// UserVoice JavaScript SDK initialization
(function(){
  var uv=document.createElement('script');
  uv.type='text/javascript';
  uv.async=true;
  uv.src='//widget.uservoice.com/YOUR_ACCOUNT_KEY.js';
  var s=document.getElementsByTagName('script')[0];
  s.parentNode.insertBefore(uv,s)
})();

// Widget configuration
UserVoice.push(['set', {
  accent_color: '#458dd6',
  locale: 'en',
  forum_id: 209871,
  post_suggestion_enabled: true,
  strings: {
    post_suggestion_title: 'Post an idea'
  }
}]);

// Add floating trigger button
UserVoice.push(['addTrigger', {
  trigger_position: 'bottom-right',
  trigger_color: 'white',
  trigger_background_color: 'rgba(46, 49, 51, 0.6)',
  trigger_prevent_default_enabled: true,
  mode: 'post_idea',
  menu_enabled: true
}]);
Replace YOUR_ACCOUNT_KEY with your UserVoice widget key and forum_id with your target forum identifier.
Step 3: Publish your site
Save the custom code settings and publish your Webflow site to activate the widget.
Widget configuration options
Global settings
Pass these parameters to UserVoice.push(['set', {...}]):
Trigger settings
Pass these parameters to UserVoice.push(['addTrigger', {...}]):
Custom trigger elements
Instead of using the default floating button, you can trigger the widget from any element on your page.
HTML attribute method
Add the data-uv-trigger attribute to any clickable element:
<a href="#" data-uv-trigger>Share your feedback</a>JavaScript method
For advanced control, use the addTrigger method with a target element:
UserVoice.push(['addTrigger', {
  target: '#feedback-button',
  mode: 'post_idea'
}]);
This binds the widget to an element with id="feedback-button" in your Webflow design.
Widget styling
UserVoice provides customization through multiple methods:
- JavaScript configuration: Parameters documented above control colors, positioning, and behavior
- CSS customization: Target widget elements using body class targeting
- Branding options: Configure logos and colors in Customize Your Web Portal
- Locale settings: Multi-language support via Translation for the Widget
Note: Translation applies only to widget UI elements, not user-generated content or custom fields.
Verification and testing
After adding the widget code:
- Preview your site: Access Webflow's preview mode to verify the widget renders correctly
- Check for errors: Open your browser's developer console (F12) and look for JavaScript errors
- Test submission: Submit a test idea through the widget
- Verify in UserVoice: Confirm the test submission appears in your UserVoice Admin Console
- Publish and retest: Publish to your production domain and repeat testing
Domain configuration
The widget requires domain validation. Ensure your domain-restricted configurations include:
.webflow.io(staging/preview).canvas.webflow.com(canvas preview)- Your production domain
Troubleshooting
Additional resources
Custom code is considered an advanced modification, and Webflow support does not cover custom code troubleshooting.


