

Liquiflow
Connect Liquiflow, a Webflow-to-Shopify theme converter, with Webflow to transform your visual designs into production-ready Shopify 2.0 themes using custom HTML attributes.

What is Liquiflow: Liquiflow is a converter that connects your Webflow project to Shopify, generating fully-featured e-commerce themes. It converts Webflow designs into Shopify 2.0-compliant themes.
Add custom HTML attributes with the li- prefix to map design elements to Shopify Liquid variables, then export and convert. GitHub integration provides version control and deployment.
How to integrate Liquiflow with Webflow
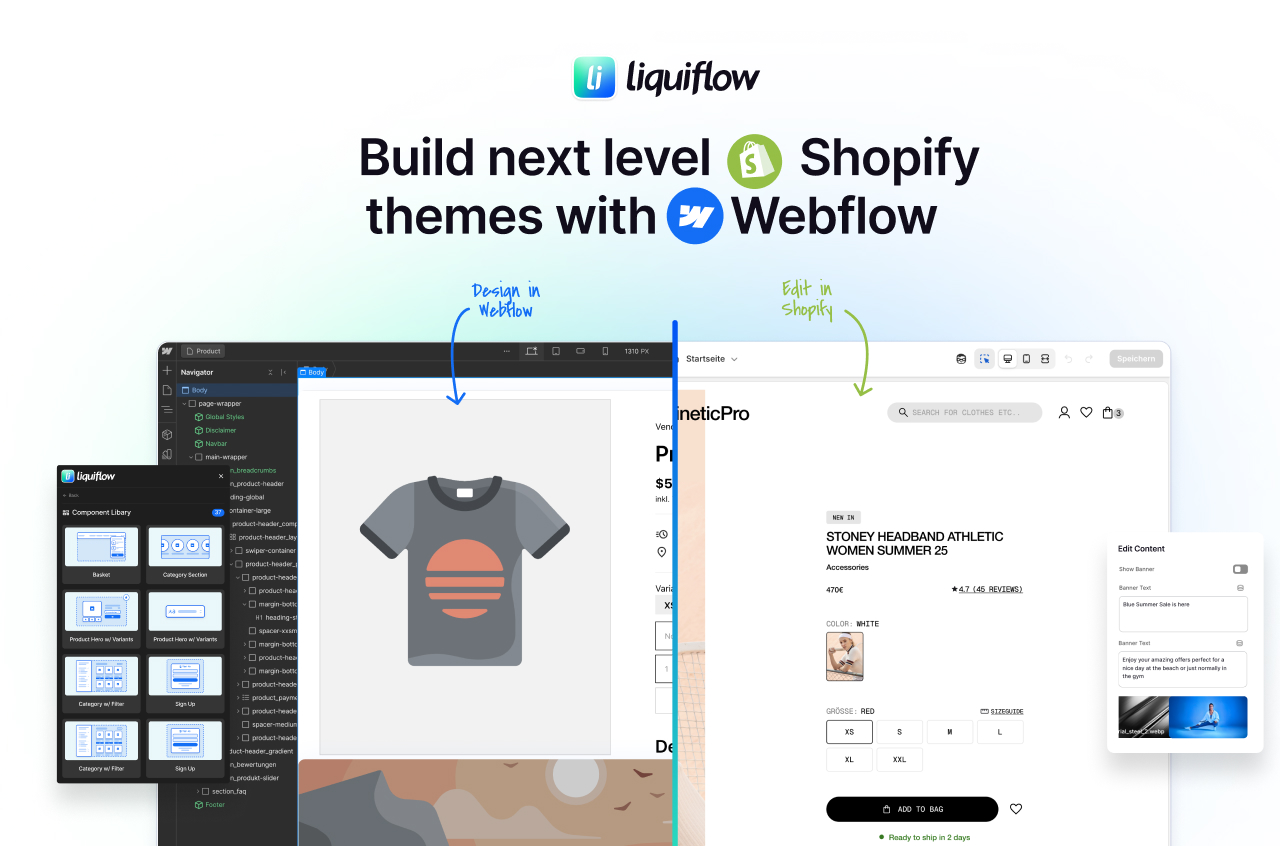
Liquiflow converts Webflow designs into Shopify 2.0 themes through a one-way conversion process. You design in Webflow using custom attributes to define Shopify functionality, then Liquiflow generates theme code.
The general workflow follows three steps:
- Install the Liquiflow app from the marketplace to access conversion tools
- Add custom attributes to Webflow elements to map them to Shopify data
- Use the Section Converter for individual sections, or set up GitHub workflows for automated deployment
For alternative Shopify integration approaches, including Shopify's Buy Button embeds and apps that sync Shopify data into Webflow CMS, see the main Shopify integration page.
Liquiflow is attribute-based: you don't write Liquid templates; instead, you configure attributes like li-object="product.title". Understanding Shopify's variable naming helps. Non-technical users should start with pre-built components rather than custom sections.
Install the Liquiflow app
Install the Liquiflow app from the Webflow Apps Marketplace to access the Section Converter, documentation, and conversion workflows. Design your Shopify theme in Webflow using custom attributes, then export for conversion.
The app gives you access to Liquiflow's component library directly within Webflow: 40+ prebuilt, conversion-ready elements covering common e-commerce patterns such as product galleries, variant selectors, cart functionality, and collection filtering.
Each component comes with the required li- attributes already configured, so you can copy, paste, and style rather than building attribute mappings from scratch.
If you're starting a new project, Liquiflow also provides a starter theme: a cloneable Webflow project with a CMS structure, essential e-commerce pages, and prebuilt Shopyflow components. It's a faster baseline than starting from a blank canvas, especially for teams new to the attribute system.
Add custom attributes in Webflow
Add Liquiflow's custom HTML attributes (li- prefix) to Webflow elements to define how your design maps to Shopify Liquid code. Configure these in Webflow's Element Settings panel.
The core li- attribute types include:
- li-object: Data binding to Shopify variables (product titles, prices, descriptions)
- li-if and li-unless: Conditional logic based on product availability or other conditions
- li-for: Loops for displaying product collections or variant options
- li-settings: Editable fields for store owners in Shopify's Theme Editor
- li-section: Wrapper attribute to define section boundaries
Build sections with the Section Converter
Convert individual Webflow sections into Shopify theme sections, including schema definitions, for Theme Editor integration. This works well for adding standalone sections to existing Shopify themes.
The Section Converter is useful when you're adding to an existing Shopify theme rather than building one from scratch. Design the section in Webflow, apply the relevant li- attributes to define editable fields and data bindings, then convert it.
The output is a standalone .liquid section file with its own schema, making the section's content editable directly in Shopify's Theme Editor; no app required after deployment.
Export and convert with GitHub workflows
Export your Webflow project and convert via Liquiflow's GitHub integration for version control and automated deployment.
Two-way sync applies to GitHub↔Shopify only, not Webflow↔Shopify. Design changes in Webflow require re-export and conversion. There's no continuous sync between Webflow and your Shopify store.
When you push a converted theme to GitHub, Shopify can connect directly to your repository and pull updates from a branch. This means that design changes follow a standard pull request review cycle: you export from Webflow, convert via Liquiflow, open a pull request, review the diff, and merge. The live store only updates when you're ready.
This also makes team collaboration practical.
Designers work in Webflow while developers review and manage the Shopify side through GitHub, without either workflow blocking the other. For client projects, it also gives you a clean audit trail of what changed and when.
What you can build with Liquiflow Webflow integration
Liquiflow transforms Webflow designs into fully functional Shopify 2.0 themes.
Here’s what’s possible:
- Custom Shopify themes with interactions: Build stores like Balcony Paris by converting Webflow designs with animations into production Shopify themes. Webflow interactions and GSAP animations are preserved in the converted theme.
- Multi-brand stores with complex catalogs: Create stores managing 200+ products like Bandwerk, featuring multi-level variant customization and dynamic filtering using li-for loops and conditional logic.
- Content-rich e-commerce experiences: Launch stores like Vioneers combining product catalogs with editorial content, blog functionality with custom tag filtering, and dynamic event calendars.
- B2B/B2C hybrid commerce platforms: Build stores like Workstatt featuring private B2B areas alongside public retail. Note: The theme handles the UI/UX; actual B2B business rules may require Shopify B2B configuration or apps.
Frequently asked questions
Select an element in Webflow and click the gear icon to open Element Settings. Scroll to Custom Attributes, click New Attribute, enter the attribute name with li- prefix (like li-object) and its value (like product.title), then save.
Large exports typically result from heavy image files. Delete images and use lightweight placeholders. Tag placeholders with li-settings:image to create Shopify image pickers, then add actual product images through Shopify's Theme Editor after deployment.
Yes. Webflow interactions convert to functional code in Shopify themes. Complex animations using GSAP or other JavaScript libraries also work. Test interactions in Webflow preview before conversion to verify expected behavior.
Liquiflow converts Webflow designs into Shopify theme files. You get a .zip theme to upload to Shopify and run your store entirely on Shopify's infrastructure. Other approaches include Shopify's Buy Button, which embeds products in Webflow pages, and apps like Shopyflow, which sync Shopify data into the Webflow CMS. See the main Shopify integration page for all available options.
Description
Liquiflow converts Webflow designs into Shopify 2.0-compliant themes. Add custom HTML attributes with the li- prefix to map design elements to Shopify Liquid variables, then export and convert. GitHub integration provides version control and deployment.
This integration page is provided for informational and convenience purposes only.

Shopify
Ecommerce solution that allows you to organize products, customize a storefront & accept payments.

PayPal Shopping Cart
Connect PayPal Shopping Cart with Webflow to add multi-item purchase functionality and hosted cart management.

Looop
Connect Looop with Webflow to sync Shopify products into Webflow CMS and build headless e-commerce storefronts with full checkout functionality
AstroIC
Connect AstroIC with Webflow Ecommerce via OAuth to generate invoices and manage product catalogs in bulk for your ecommerce store.
Smootify
Connect Smootify with Webflow to build custom Shopify storefronts without exporting code.
ShipStation
Connect ShipStation with Webflow to sync orders, print shipping labels, and update tracking information.
Revidflow
Connect Revidflow to your Webflow e-commerce store to automate review collection and display customer feedback.
Shopyflow
Connect Shopyflow, a Shopify-to-Webflow bridge, with Webflow to build custom Shopify storefronts using visual design tools.
Shipping IO
Connect Shipping IO with Webflow to automate multi-carrier shipping workflows through custom API integration.
Related integrations
Get started for free
Try Webflow for as long as you like with our free Starter plan. Purchase a paid Site plan to publish, host, and unlock additional features.
