


Build authentication-protected membership platforms using Supabase's PostgreSQL backend with Row Level Security and Webflow's visual frontend.
Supabase provides PostgreSQL-backed authentication and database services that integrate with Webflow through client-side JavaScript. This combination supports OAuth providers, granular access control through Row Level Security, and real-time data synchronization for membership platforms.
This guide covers the steps to build a membership platform using Supabase as your backend with Webflow as your frontend.
Integration architecture overview
The Webflow-Supabase integration uses client-side JavaScript and enforces database-level security via Row-Level Security policies, rather than relying on API key concealment. Security occurs at the database layer, not by hiding API keys.
The integration architecture follows this flow:
Data flows between platforms as JSON. Webflow sends authentication requests and receives JWT tokens from Supabase Auth. Database queries return JSON responses that respect RLS policies.
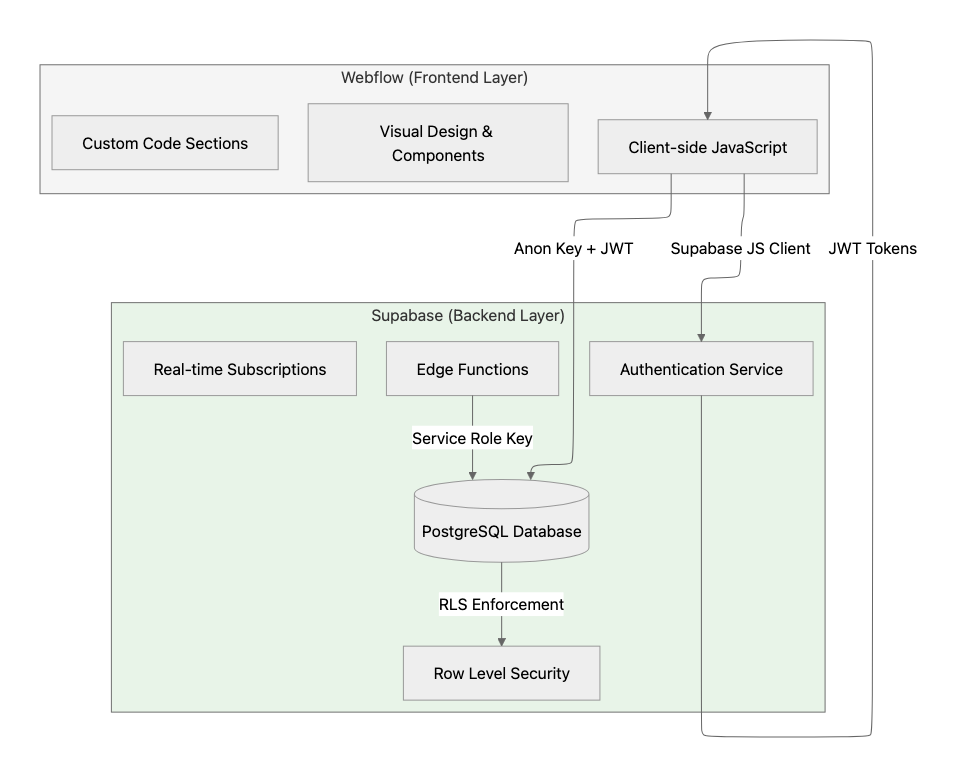
The anon key is safe for client-side use. RLS policies control what data each user can access.
Key integration components:
- Supabase JavaScript client initialized with your project URL and anon key
- Supabase Auth handles authentication and returns JWT tokens
- Row-level security policies enforce access control at the database level
- Edge Functions execute privileged operations with the service role key
Prerequisites and account setup
Before implementing the integration, you need accounts on both platforms and your Supabase project credentials.
At a high level, you'll need:
- A Webflow account with custom code support
- A Supabase project (create via dashboard or CLI)
- Your Supabase project URL and anon key from Project Settings > API
Your Supabase project provides two API keys:
Never expose the service role key in Webflow custom code or client-side JavaScript. Use it only in Edge Functions or external backend services.
Step 1: Initialize the Supabase client in Webflow
The Supabase JavaScript client loads via CDN and initializes with your project credentials.
At a high level, you'll:
- Add the Supabase CDN script to your site-wide custom code
- Initialize the client with your project URL and anon key
- Configure session persistence and automatic token refresh
Add this code to Site Settings > Custom Code > Head:
<script src="https://cdn.jsdelivr.net/npm/@supabase/supabase-js@2"></script>
<script>
  const supabaseClient = supabase.createClient(
    'https://your-project.supabase.co',
    'your-anon-key',
    {
      auth: {
        persistSession: true,
        autoRefreshToken: true,
        detectSessionInUrl: true
      }
    }
  );
</script>
Sessions persist in localStorage by default, and tokens refresh automatically. See the Client Initialization Documentation for additional configuration options.
Step 2: Implement authentication flows
Supabase Auth supports multiple authentication methods, including email/password, OAuth providers, and passwordless magic links.
At a high level, you'll:
- Use
signInWithPassword()for email/password authentication - Use
signInWithOAuth()for social login with Google, GitHub, and other providers - Use
signInWithOtp()for passwordless magic link authentication - Monitor state changes with
onAuthStateChange()
OAuth providers are configured in your Supabase dashboard under Authentication > Providers. See the Social Login Guide for provider-specific setup.
Monitor authentication state
Use the auth state listener to respond to login and logout events:
supabaseClient.auth.onAuthStateChange((event, session) => {
  if (event === 'SIGNED_IN') updateUIForAuthenticatedUser(session.user);
  if (event === 'SIGNED_OUT') updateUIForGuest();
});
This listener runs across all browser tabs and fires when sessions are confirmed or re-established.
Step 3: Configure database schema for memberships
Membership platforms require a profiles table linked to Supabase's auth.users table for storing user data.
At a high level, you'll:
- Create a profiles table with a foreign key reference to auth.users
- Set up database triggers for automatic profile creation
- Optionally integrate Stripe data using the Stripe foreign data wrapper
Create a profiles table
Create the profiles table with the following schema:
CREATE TABLE public.profiles (
  id UUID NOT NULL REFERENCES auth.users ON DELETE CASCADE,
  first_name TEXT,
  last_name TEXT,
  avatar_url TEXT,
  updated_at TIMESTAMP WITH TIME ZONE DEFAULT NOW(),
  PRIMARY KEY(id)
);

ALTER TABLE public.profiles ENABLE ROW LEVEL SECURITY;
The ON DELETE CASCADE constraint ensures automatic profile cleanup when users are removed.
Automate profile creation with triggers
Create a trigger that automatically generates a profile when a new user signs up:
CREATE FUNCTION public.handle_new_user()
RETURNS TRIGGER LANGUAGE plpgsql SECURITY DEFINER SET search_path = ''
AS $$
BEGIN
  INSERT INTO public.profiles(id, first_name, last_name)
  VALUES (NEW.id, NEW.raw_user_meta_data->>'first_name', NEW.raw_user_meta_data->>'last_name');
  RETURN NEW;
END;
$$;

CREATE TRIGGER on_auth_user_created
  AFTER INSERT ON auth.users
  FOR EACH ROW EXECUTE PROCEDURE public.handle_new_user();
This trigger automatically creates a profile record when a new user signs up.
Step 4: Implement Row Level Security policies
Row-level security policies are the primary security mechanism for Webflow-Supabase integrations. RLS provides database-level protection even when the anon key is exposed in client-side code.
At a high level, you'll:
- Enable RLS on all tables using
ALTER TABLE - Create policies using
auth.uid()to scope data access - Follow performance best practices by indexing policy columns
Profile access policies
Create policies that allow users to view and update their own profile data:
CREATE POLICY "User can see their own profile only."
ON profiles FOR SELECT
USING ((SELECT auth.uid()) = id);

CREATE POLICY "Users can update their own profile."
ON profiles FOR UPDATE TO authenticated
USING ((SELECT auth.uid()) = id)
WITH CHECK ((SELECT auth.uid()) = id);

CREATE INDEX idx_profiles_user_id ON public.profiles(id);
The auth.uid() function returns the authenticated user's UUID from the JWT token. The USING clause determines row visibility, and WITH CHECK validates data modifications.


Step 5: Protect pages and gate content
Protected pages require client-side JavaScript to check authentication state and redirect unauthorized users. RLS provides the database-level security layer.
At a high level, you'll:
- Use
getUser()to validate authentication (preferred over getSession for security) - Redirect unauthenticated users to login
- Control element visibility based on membership tier
Add this code to protected pages in Site Settings > Custom Code > Before </body>:
async function protectPage() {
  const { data: { user }, error } = await supabaseClient.auth.getUser();
  if (error || !user) {
    sessionStorage.setItem('redirectAfterLogin', window.location.pathname);
    window.location.href = '/login';
    return;
  }
  document.body.classList.add('user-authenticated');
}
protectPage();
For tier-based content, add data-tier attributes to elements and use JavaScript to show/hide based on the user's membership level fetched from Supabase.
Step 6: Handle real-time membership updates
Real-time database subscriptions enable instant UI updates when membership data changes. Supabase uses Postgres Changes to push updates to connected clients.
At a high level, you'll:
- Subscribe to table changes using Postgres Changes
- Filter subscriptions by user ID for scoped updates
- Update UI in response to payload events
Set up a real-time subscription with this code:
function setupMembershipSubscription(userId) {
  const channel = supabaseClient
    .channel('membership-updates')
    .on('postgres_changes', {
      event: 'UPDATE',
      schema: 'public',
      table: 'user_subscriptions',
      filter: `user_id=eq.${userId}`
    }, payload => {
      updateMembershipUI(payload.new.subscription_status);
    })
    .subscribe();
}
Real-time subscriptions comply with RLS policies, so users receive only events for rows they're authorized to access.
Step 7: Use Edge Functions for privileged operations
Operations requiring elevated privileges must run in Edge Functions rather than client-side JavaScript.
At a high level, you'll:
- Create functions using the Supabase CLI
- Access user context through the Authorization header
- Invoke functions from Webflow using supabase.functions.invoke()
Common use cases include webhook processing, administrative actions, and payment integrations.
Create an Edge Function with this structure:
// Edge Function example
import { createClient } from '@supabase/supabase-js'

Deno.serve(async (req) => {
  const authHeader = req.headers.get('Authorization')!
  const supabaseClient = createClient(
    Deno.env.get('SUPABASE_URL') ?? '',
    Deno.env.get('SUPABASE_ANON_KEY') ?? '',
    { global: { headers: { Authorization: authHeader } } }
  )

  const { data: { user }, error } = await supabaseClient.auth.getUser()
  if (error || !user) {
    return new Response(JSON.stringify({ error: 'Unauthorized' }), { status: 401 })
  }
  // Process authenticated request
})
See the Edge Functions documentation for deployment and invocation details.
Step 8: Verify your integration
Test each component independently before combining them in production.
At a high level, you'll:
- Verify authentication flows complete without HTTP errors
- Confirm RLS policies correctly restrict data access by comparing auth.uid() against user-scoped identifiers
- Test that protected pages redirect unauthenticated users
- Validate real-time subscriptions trigger events when database rows change
- Ensure Edge Functions execute with proper authorization
Use the Supabase Database Linter to identify tables missing RLS policies.
Troubleshoot common issues
Common integration challenges include authentication errors, CORS configuration, and RLS policy management.
Authentication errors: The error codes documentation lists common errors, including invalid_credentials, email_exists, and rate limit errors.
CORS errors: Edge Functions require explicit CORS header configuration. Avoid wildcard '*' origins in production.
RLS policy failures: The error 42501 (insufficient_privilege) indicates an RLS policy denial. Debug using PostgREST error codes.
Rate limiting: Supabase applies rate limits to authentication endpoints. See the rate limits documentation for current thresholds.
Production security and scaling requirements
Production membership platforms require comprehensive security and performance configurations.
At a high level, you'll:
- Enable RLS on all exposed tables per the Going into Production guide
- Require SSL connections and apply network restrictions
- Separate environments between development and production per Managing Environments
- Index database columns used in RLS policies for performance


