

As our codebase evolves, we sometimes need to modify hundreds or thousands of components to follow new patterns, add new functionality, or clean up legacy code.
These refactors can be tedious, time consuming, and error prone. To mitigate these problems, we often use codemods to handle our large-scale refactors.
In this blog post, we’ll walk you through what codemods are, why you should use them, and how we’ve successfully used them at Webflow.
What are codemods?
“Codemod” is an abbreviation for “code modification.” So, a codemod is just a script that you can run to modify code in your codebase.
At its simplest, a codemod could be a straightforward “search and replace” to rename functions. Frontend engineers who started with React 15 or earlier may remember when a few class component lifecycle methods were deprecated in React 16.3. The React team recommended that you rename methods like componentWillMount to UNSAFE_componentWillMount so that they would still work in future major versions of React. You could easily make this change with a “search and replace” in your IDE, but the React team also wrote a codemod for you that you could run instead. This codemod ran through your codebase and made the changes for you.
Codemods can do more than just rename things though. You could also use codemods to change import paths, change syntax use (like moving from regular functions to arrow functions, or vice versa), or sort the order of variables in a file.
You can even think of ESLint (with the --fix flag) and Prettier as using codemods, because both of those are tools that modify your code according to whatever rules you’ve configured. The main difference between ESLint and Prettier and a codemod script is that ESLint and Prettier are generally run as part of your continuous integration (CI) process, so they’re a constant part of your development lifecycle and get run on every commit or pull request. Codemods, on the other hand, are typically scripts that you invoke manually and run just once, and then you don’t need them anymore after that.
Why codemods?
So why would you want to use a codemod? After all, everything that we’ve described above is also something that you could do by hand without the use of an automated tool. You could just refactor all the code yourself and call it good.
Codemods can be helpful for several reasons.
Maybe you’re working in not just one monorepo, but hundreds of repos, and the changes need to be made in each one. And maybe you won’t be the only person making the changes, and you need to enlist the help of dozens of other engineers. Writing a codemod that other engineers can use greatly simplifies the task for them. Now you don’t have to explain and re-explain what steps need to be taken and what changes need to be made. Instead, you can have each engineer run the codemod in their assigned repos, and the codemod will take care of the heavy lifting for them.
Or, what if there are multiple steps needed for this refactor? Let’s imagine it’s not just a “search and replace”, but rather you need to add an import for a new component, remove the import for the old component, replace any instances where the old component was used to now reference the new component, and also adjust some of the props that have different names and different values. That’s a lot of steps, and there’s room for error to miss something, especially if you have to do this in hundreds of files. We are human after all.
Finally, even simple “search and replace” tasks can be deceptively complex. Maybe you need to replace OldComponent with NewComponent. You could do a global search for OldComponent and replace it with NewComponent for every instance found. But what if OldComponent is a default export from a file, and someone imported it under a different name? Or what if it’s a named export, but someone aliased it in their import to use a new name? What if there happens to be another component called OldComponent, but the naming is just a coincidence, and that component shouldn’t be changed?
As you can see, refactors can be tedious, they can be error prone, they can involve multiple steps, and they can involve multiple people. Wouldn’t it be nice if we could automate part of this process to make it easier for everyone involved?
A word of caution
Before we go further, just to be clear, it can take time to write a codemod! The tradeoff to consider is how long it would take you to write the codemod vs. just doing the refactors manually. Take into consideration how many places you need to modify, how many steps there are, how error prone the refactor might be, and how many other people will need to be involved.
If it’s a small refactor that’s fairly straightforward, and you’re the only engineer working on it, it may be best to not use a codemod in this scenario.

Example use case
Alright, enough background and theory! Let’s look at an actual example.
At Webflow Conf 2023, we unveiled a brand new UI for our Designer and Dashboard product surfaces. All of the UI changes were behind a feature flag so that we could easily toggle between the old UI and the new UI during testing and just flip the switch to turn it on for the big release.
To facilitate this, we wrote a higher order component (HoC) called pickComponent that allowed us to swap between the old and new components in the UI.
A contrived example might look something like this:
// Input component definition
const InputD1 = emotionStyled('input')({
  padding: '$2 $5',
});

const InputD2 = emotionStyled('input')({
  padding: '$1 $5',
});

const Input = pickComponent(InputD1, InputD2);

// Input component usage
const CommercePriceInput = (props) => {
  // additional component setup here

  return <Input {...props} />;
};
In the code snippet above, we have an Input component with both an old version (InputD1) and a new version (InputD2). The pickComponent HoC contains some logic to render InputD1 when the feature flag is off and to render InputD2 when the feature flag is on. Then, anywhere this component is used in the app, it can be referenced as just Input. This way the feature flag logic and toggling behavior is contained within the single instance of the component and not spread out in dozens of different callsites where the component is used.
After Webflow Conf 2023 and the release of the new UI, it was time for us to clean up the legacy code. We no longer needed to use the pickComponent HoC, and we didn’t need the old component definitions. So, that code snippet above could be cleaned up to be:
// Input component definition
const Input = emotionStyled('input')({
  padding: '$1 $5',
});

// Input component usage
const CommercePriceInput = (props) => {
  // additional component setup here

  return <Input {...props} />;
};
Make sense? Now imagine this, but in hundreds of places. That was a lot of cleanup to do!
How do we clean up all this code without causing regressions in our app and without dying of boredom? We turned this into a fun challenge – what if we could write a codemod to do the work for us?
We decided to use jscodeshift, which is “a toolkit for running codemods over multiple JavaScript or TypeScript files.”
Unit tests
One benefit of using jscodeshift is that it’s possible to write unit tests to test your codemod. To do this, you create test fixtures of your input and expected output. You can create as many test fixtures as you’d like so that you’re confident your codemod will work as expected for a variety of use cases. Then, the tests simply take the input, execute the codemod, and compare the actual output to the expected output. If the outputs match, the test passes; if the outputs don’t match, the test fails.
For engineers who love test-driven development (TDD), a lightbulb may be going off in your head right now – this is a perfect time to use TDD! We can first write a bunch of inputs and expected outputs and then write our codemod to make the tests pass – and that’s exactly what we did.
We ended up writing 21 test cases for this pickComponent cleanup codemod. We’ve already shown you one example in the two code snippets above. Let’s look at a couple more.
Example input 2:
const HintD2 = emotionStyled(HintButton)({
  height: '16px',
});

const Hint = pickComponent(HintButton, HintD2);

const BranchConflictsContent = () => {
  return (
    <div>
      <Hint hint="Hint text here" />
    </div>
  );
};

export default BranchConflictsContent;
Example output 2:
const Hint = emotionStyled(HintButton)({
  height: '16px',
});

const BranchConflictsContent = () => {
  return (
    <div>
      <Hint hint="Hint text here" />
    </div>
  );
};

export default BranchConflictsContent;
Example input 3:
const SectionLabelContainerD1 = styled(FlexRow)(({theme: {gutters}}) => ({
  paddingRight: gutters.x8,
}));

const SectionLabelContainer = pickComponent(SectionLabelContainerD1, FlexRow);

const StyledIslandD1 = styledDiv(
  ({isFirst, isLast, nextIsExpanded, expanded, theme: {colors}}) => ({
    borderTop: !isFirst && expanded && `1px solid ${colors.borderDeep}`,
    borderBottom:
      isLast || nextIsExpanded ? null : `1px solid ${colors.borderDeep}`,
  })
);

const StyledIsland = pickComponent(StyledIslandD1, 'div');
Example output 3:
// @SPRING_CLEANING: D2 cleanup. Consolidate component usage.
const SectionLabelContainer = FlexRow;

// @SPRING_CLEANING: D2 cleanup. Consolidate component usage.
const StyledIsland = 'div';
After we defined all of those test fixtures for our inputs and outputs, we ran them in a test file like this:
const defineTest = require('jscodeshift/dist/testUtils').defineTest;

describe('Codemod', () => {
  const tests = [
    'example1',
    'example2',
    // ...example3 through example20
    'example21',
  ];

  tests.forEach((test) => {
    describe(test, () => {
      defineTest(
        __dirname,
        'pickComponentCleanup',
        {},
        `pickComponentCleanup/${test}`
      );
    });
  });
});
The defineTest method comes from jscodeshift, and the arguments you provide tell it where to find the codemod to run and the inputs and outputs to test.
AST explorer
At this point, we had a barebones codemod in place along with failing tests for various code samples we’d need to handle. Now it was time to actually write the codemod!
In order to write a codemod, it’s helpful to have a basic understanding of how they work. Codemods don’t just work directly on the input code that you give it. First they convert your input code into an abstract syntax tree (AST), which is an abstract representation of your code based on the syntax and tokens used. The codemod then traverses the AST and makes modifications to the nodes in the tree. Finally, the codemod compiles the AST back into the normal JavaScript or TypeScript that we’re used to writing and working with.
The AST isn’t a concept most engineers encounter on a daily basis outside of working on codemods or compilers. To help you understand what an AST looks like, you can check out the AST explorer, which is a free online tool that allows you to paste code into the left side and then display that code as an AST on the right side. You can also write codemods directly in this explorer to see the output it creates.
The AST explorer effectively creates a playground you can use to experiment with making changes to your codemod. Let’s look at an example:
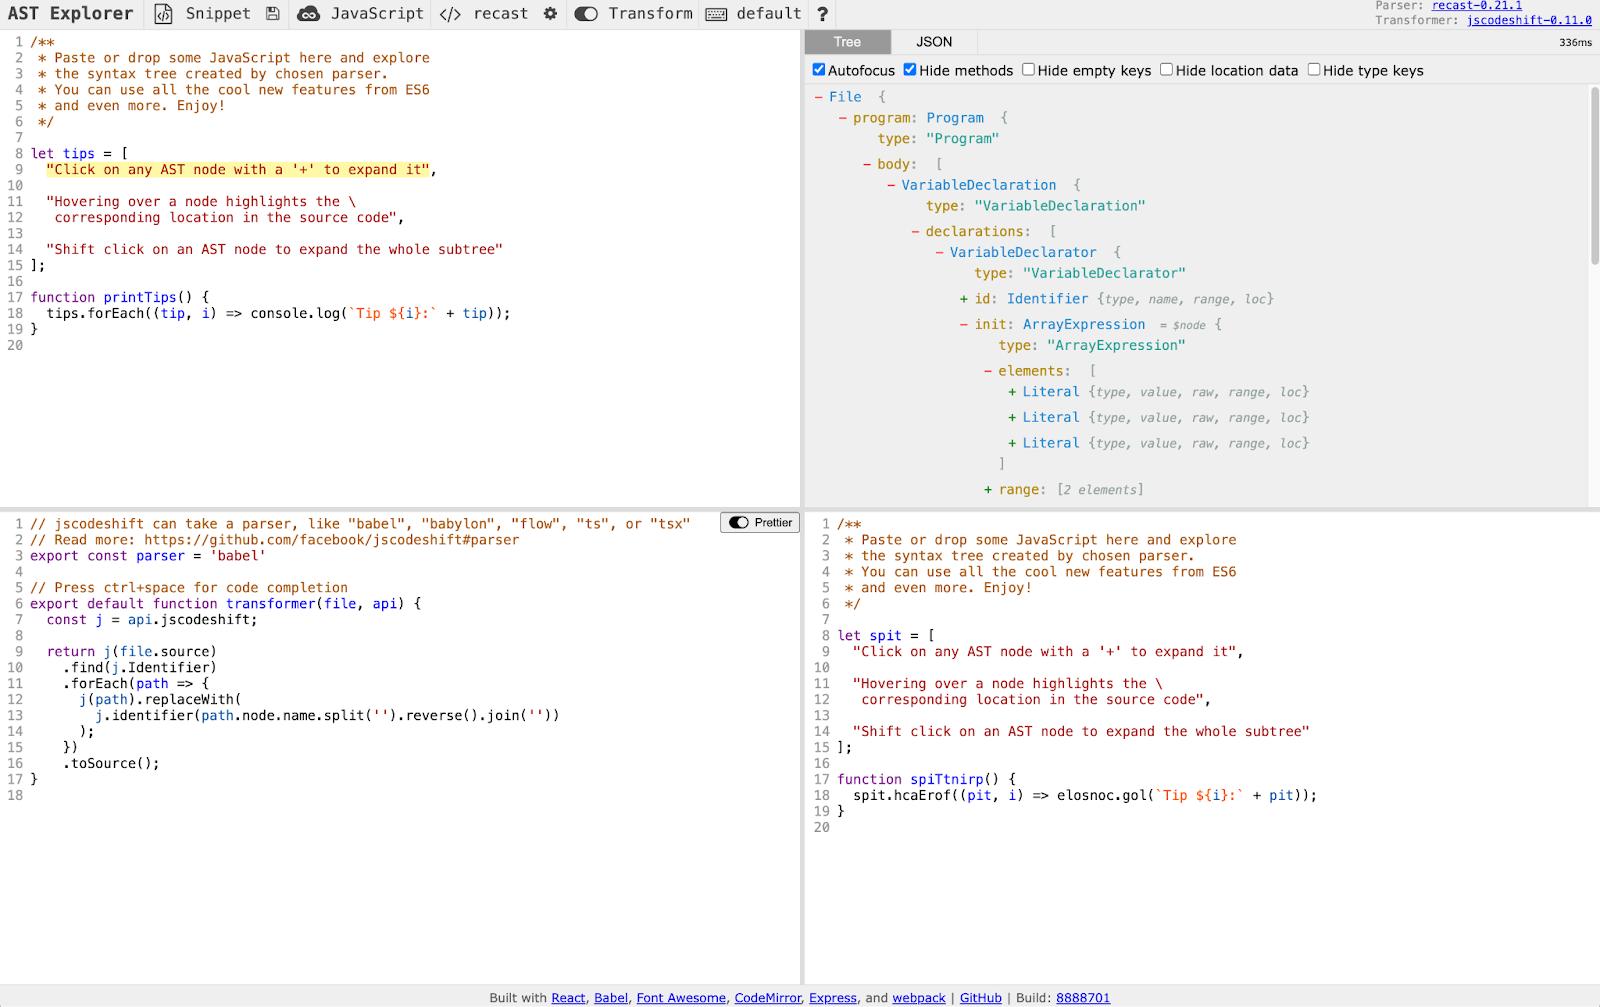
In the top-left corner, we have our input code. It contains an array called tips, and a function called printTips.
In the top-right corner, we see the AST for this code. As you hover over parts of the tree on the right, you’ll see the relevant code on the left be highlighted. In the AST, you’ll see keywords like VariableDeclaration, ArrayExpression, Literal, FunctionDeclaration, Identifier, and more.
In the bottom-left corner, we see an example codemod that reverses the names of any functions or variables in the code. The input code is transformed into an AST on line 9, the AST is traversed and modified on lines 10-15, and then the AST is converted back into output code on line 16.
In the bottom-right corner, we see the output code that the codemod creates. Since this codemod reverses the function and variable names, we see that tips has become spit, and printTips has become spiTtnirp. Even built-in functions like forEach and console.log were reversed!
Now, if you were writing your own codemod, you could paste in your input code, check out what that looks like as an AST, and then begin to write your codemod until the output matches what you want it to be.
This is exactly what we did at Webflow. We took our failing unit tests from before, pasted one of the input examples into the AST explorer, wrote the codemod to get the correct output, and then repeated with our second input example. The codemod continued to grow in size and complexity, and our unit tests ensured that we didn’t break previous test cases that we had solved for earlier. It was a fun game of experimentation and TDD!
Results
So, how did everything shake out? For this UI reskin cleanup, we wrote two codemods – one for our pickComponent HoC that we’ve previously discussed, and one for a hook called useIsD2 that was a hook for checking if the feature flag was on or off, often used in conditional logic. It took about a week to write these two codemods.
We ran these codemods on most of our codebase shortly after Webflow Conf 2023, and the updates went smoothly. There were various other parts of our codebase that hadn’t migrated to the new UI yet, so we couldn’t clean up everything just yet and had to save some for later. In fact, it wasn’t until November 2024 that everything was officially on the new UI and we could finish the cleanup. At that point we ran the codemods again on the remainder of the codebase, and they worked flawlessly. Having those codemods available to use a year later saved a lot of time! Perhaps most excitingly, in that year between the first and second run, we had migrated our entire codebase from Flow to TypeScript, and the original codemods happily worked again with us only needing to specify that the parser was now tsx and not flow.
In the end, the codemods modified over 20,000 lines of code, and we were able to merge and deploy the changes without any major visual regressions. That’s a big win!
Codemods aren’t the answer for everything, but they’re definitely a useful tool to have in your toolbox, especially as your repo, engineering organization, and codebase complexity grow.
Thanks for reading, and happy coding!


We’re hiring!
We’re looking for product and engineering talent to join us on our mission to bring development superpowers to everyone.