Building landing pages can be a long, drawn-out process involving multiple people in multiple departments. Let’s take a look how to make it as easy as filling out a form.
Some of the fastest-growing companies in the world have found huge success in building personalized landing pages for conversion rate optimization, SEO, and other marketing campaigns. But the cost of producing these landing pages can quickly add up and diminish the return on your investment.
Companies like Intercom have even created custom, internal tools to build landing pages at scale. But you don’t need to use valuable engineering resources to build those tools. Or those pages.
In this guide, I’ll show you how to build a landing page design system that empowers you to quickly (in seconds!) and easily publish as many variations as you want of a custom landing page.
And I’ll show you how to do it without using an ugly landing-page builder and without a pre-styled template (or with, if you prefer) like everyone else.
But how do you build this engine? With dynamic landing page design using a CMS. Or in this case — Webflow CMS.
And it only takes 6 steps:
- Design your content: Choose the elements on the page
- Create your Collections: Create a database in Webflow CMS that your pages will pull assets from
- Create your Collection items: Create your Collection items — that is, your landing pages
- Design your landing page: Design the actual page that will pull content from your Collection
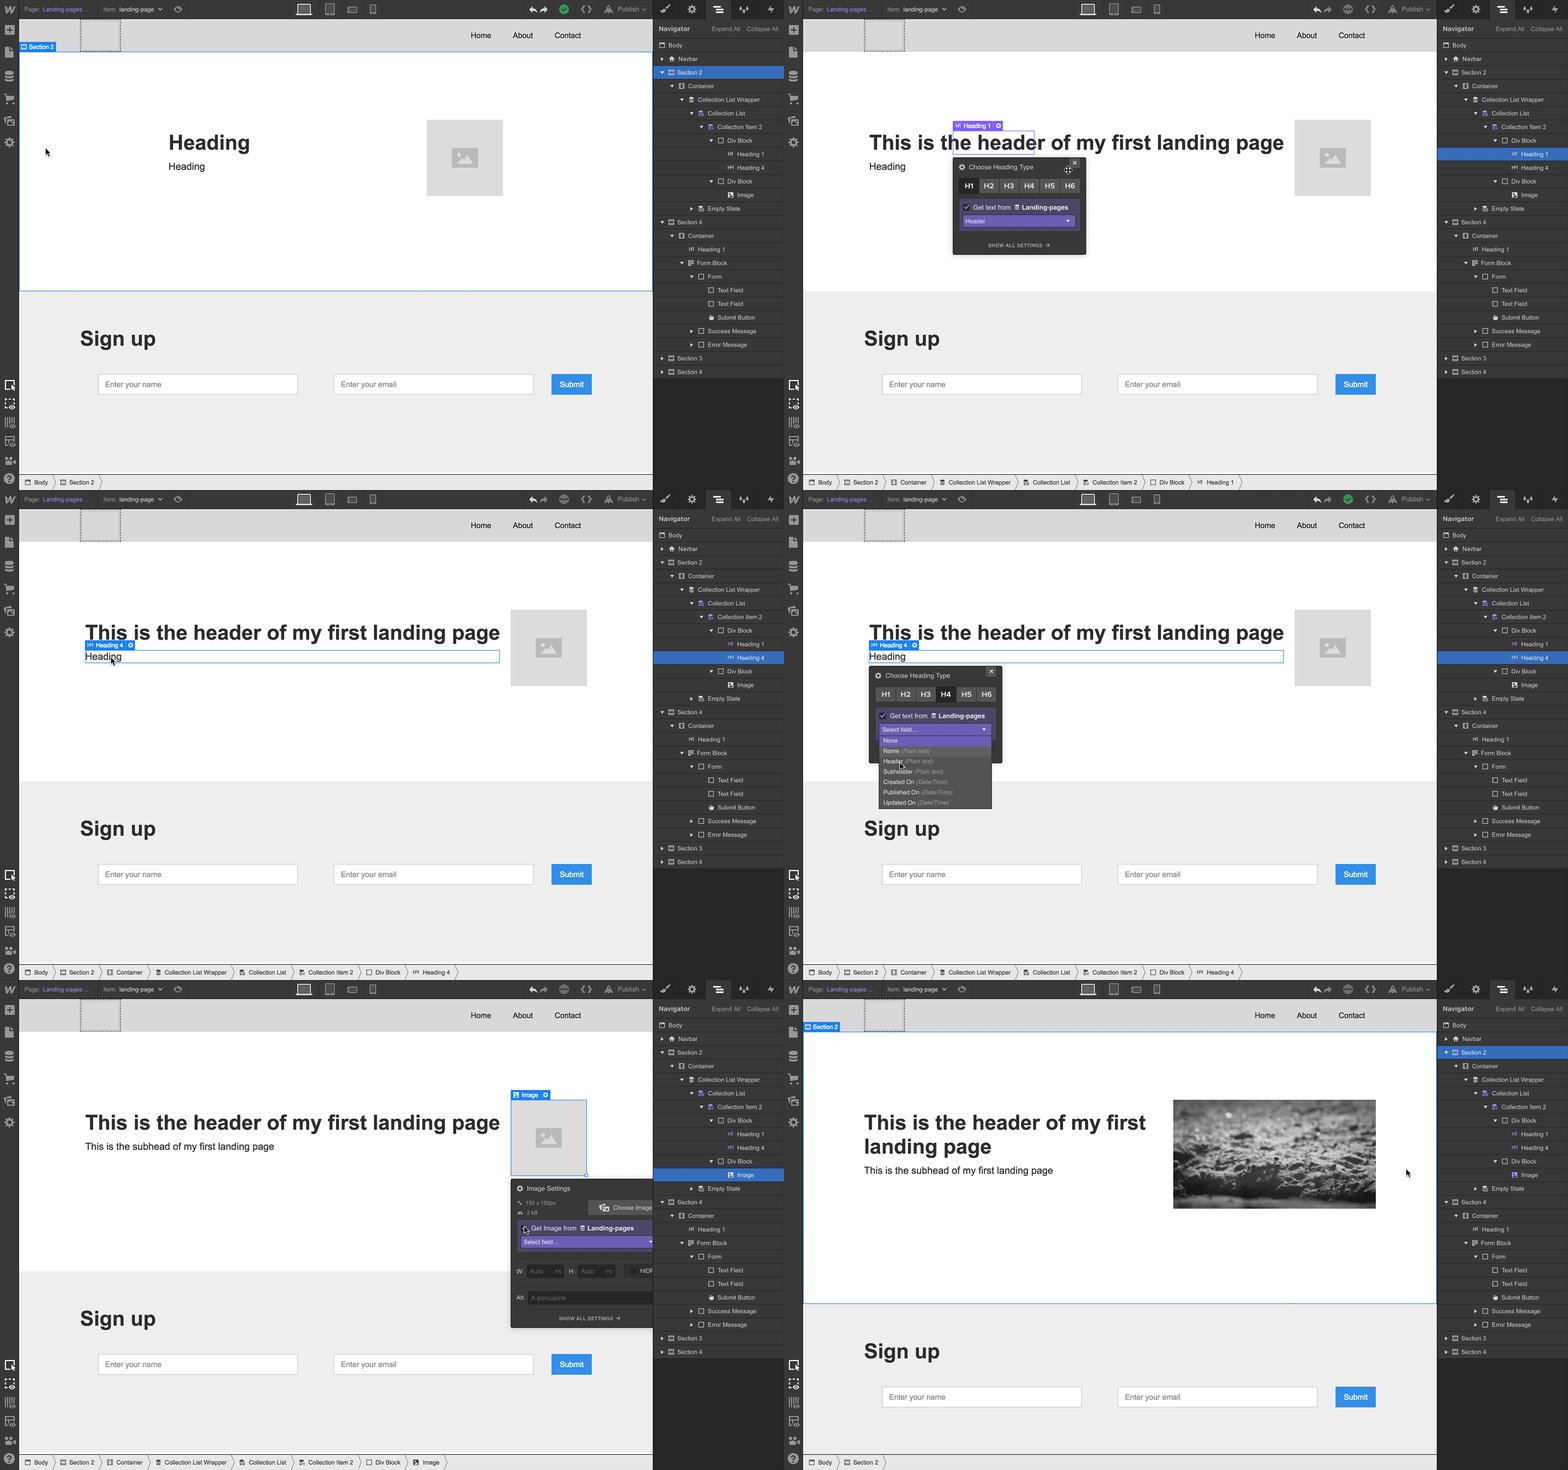
- Connect your Collection fields: Map elements on the page to fields in the Collection
- Publish your site: Push your pages live to the web with a few clicks
To help you along, I built a landing page system template that you can clone and make your own, but you’re also welcome to start from scratch!
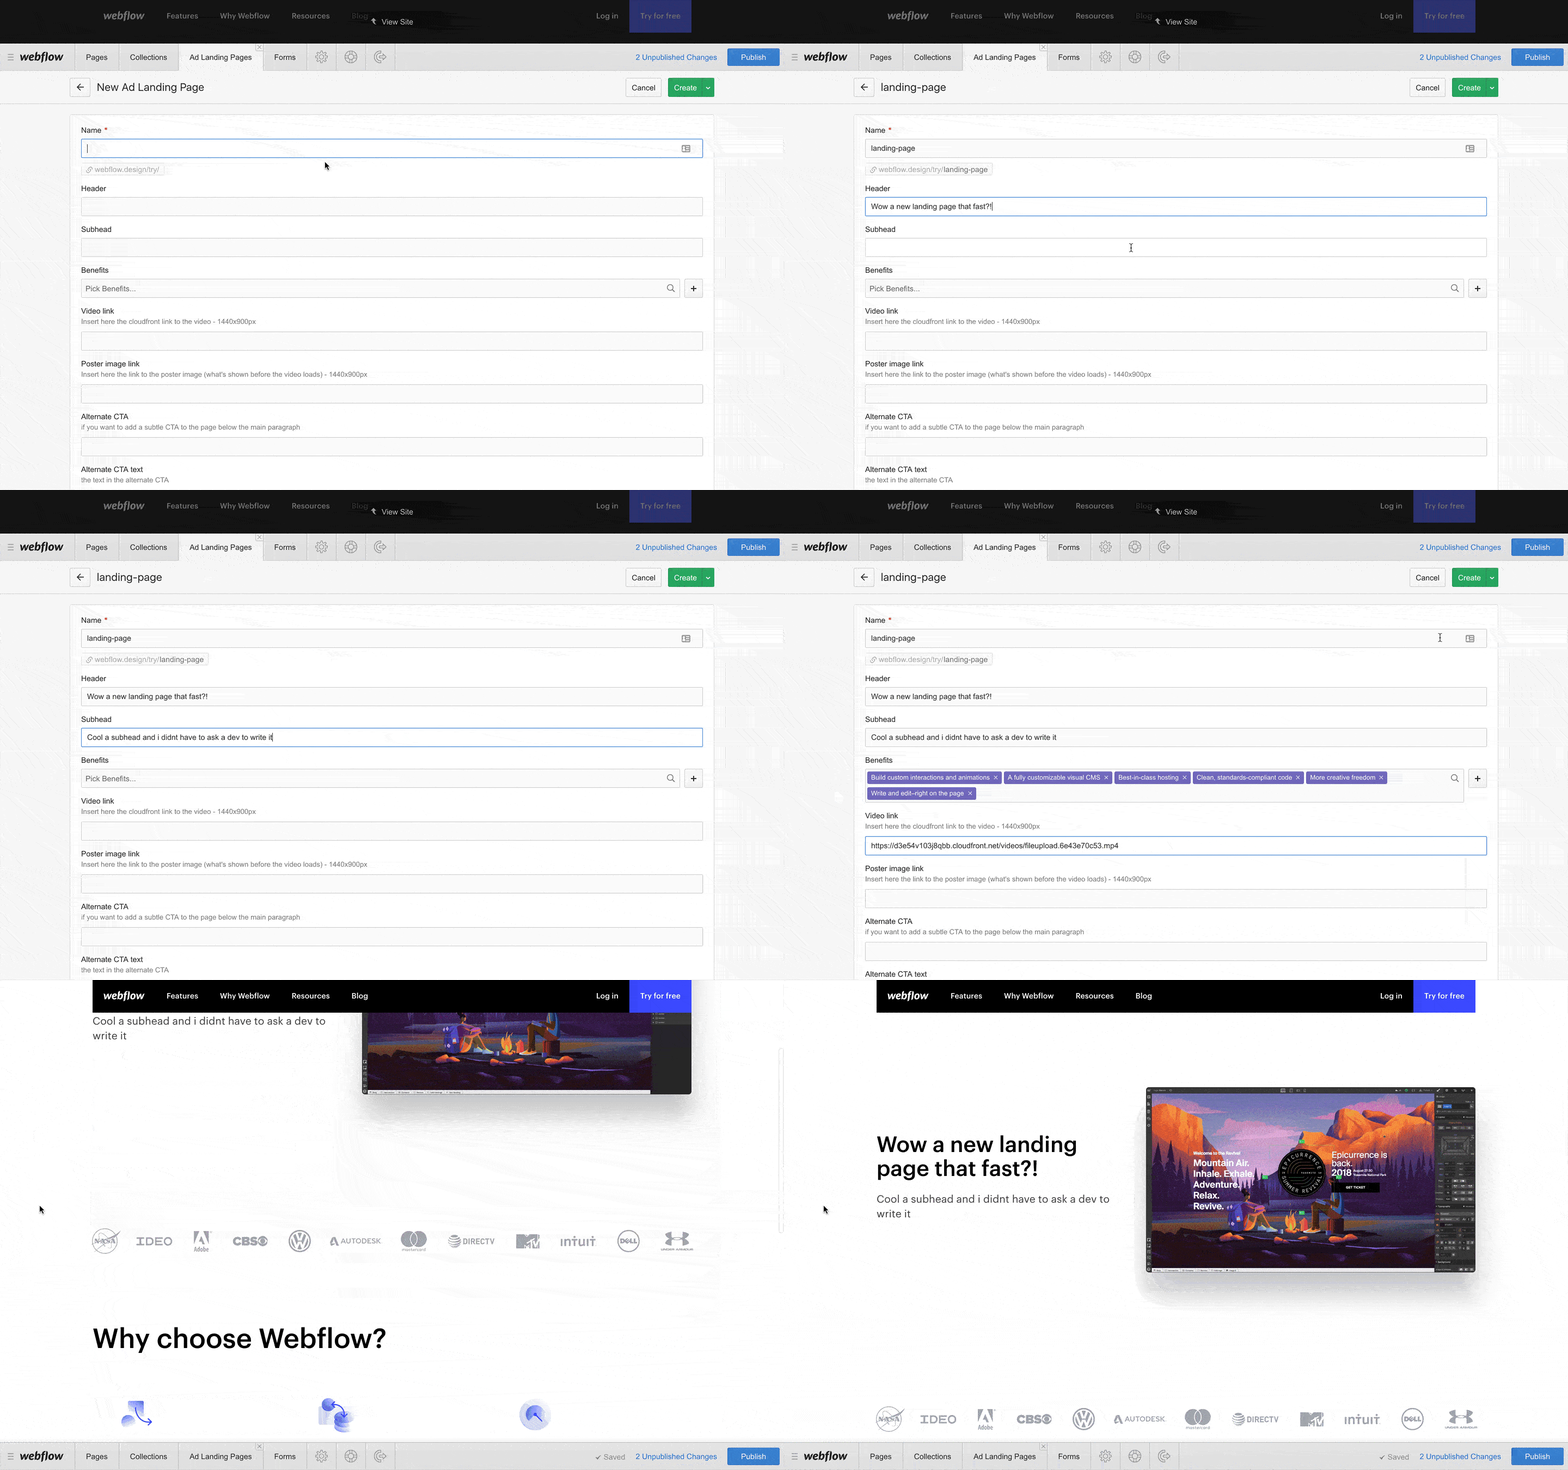
Holy macaroni — I just made a landing page in the span of this GIF!
Step 1. Design your content
Here, you’ll select the content elements you’ll need to drive conversions. These will map to a database that will store page copy, images, videos, etc.
For this, we’ll lean on a few of the standard elements we discussed in our article on how to design a high-converting landing page.
- Navigation: While common wisdom holds you shouldn’t include navigation on your landing pages, I think it’s debatable. I haven’t seen one consistently outperform the other.
- Hero section: The hero typically holds your headline, subhead, and an image or video — all focused on telling the visitor what your company/product is. This should be benefit-focused, not feature-focused.
- Call to action: You want this to be as simple as possible to reduce friction.
- Overview/solutions: Dig a little deeper to tell people what your product does and how it solves the problem your customer is facing. This should also be benefit-focused — not feature-focused.
- Features: Describe the key aspects of your product that help solve that problem.
- Second signup form: I’ve found having another signup form at the bottom can increase conversion rates for certain pages.
This may not seem like much content, but given that decision-making time increases as you add complexity (Hick’s law), many marketers have found it more effective to bring these landing pages down to the essential information.
Note: None of these elements are mandatory — you should add, remove, and tweak based on what makes sense for your business. And what performs, naturally.
Step 2. Create your Collections in Webflow CMS
Alright, now we come to the engine that makes this whole system purr — Webflow CMS (content management system). This stores the assets (page copy, images, video, etc.) that your landing pages will pull from.
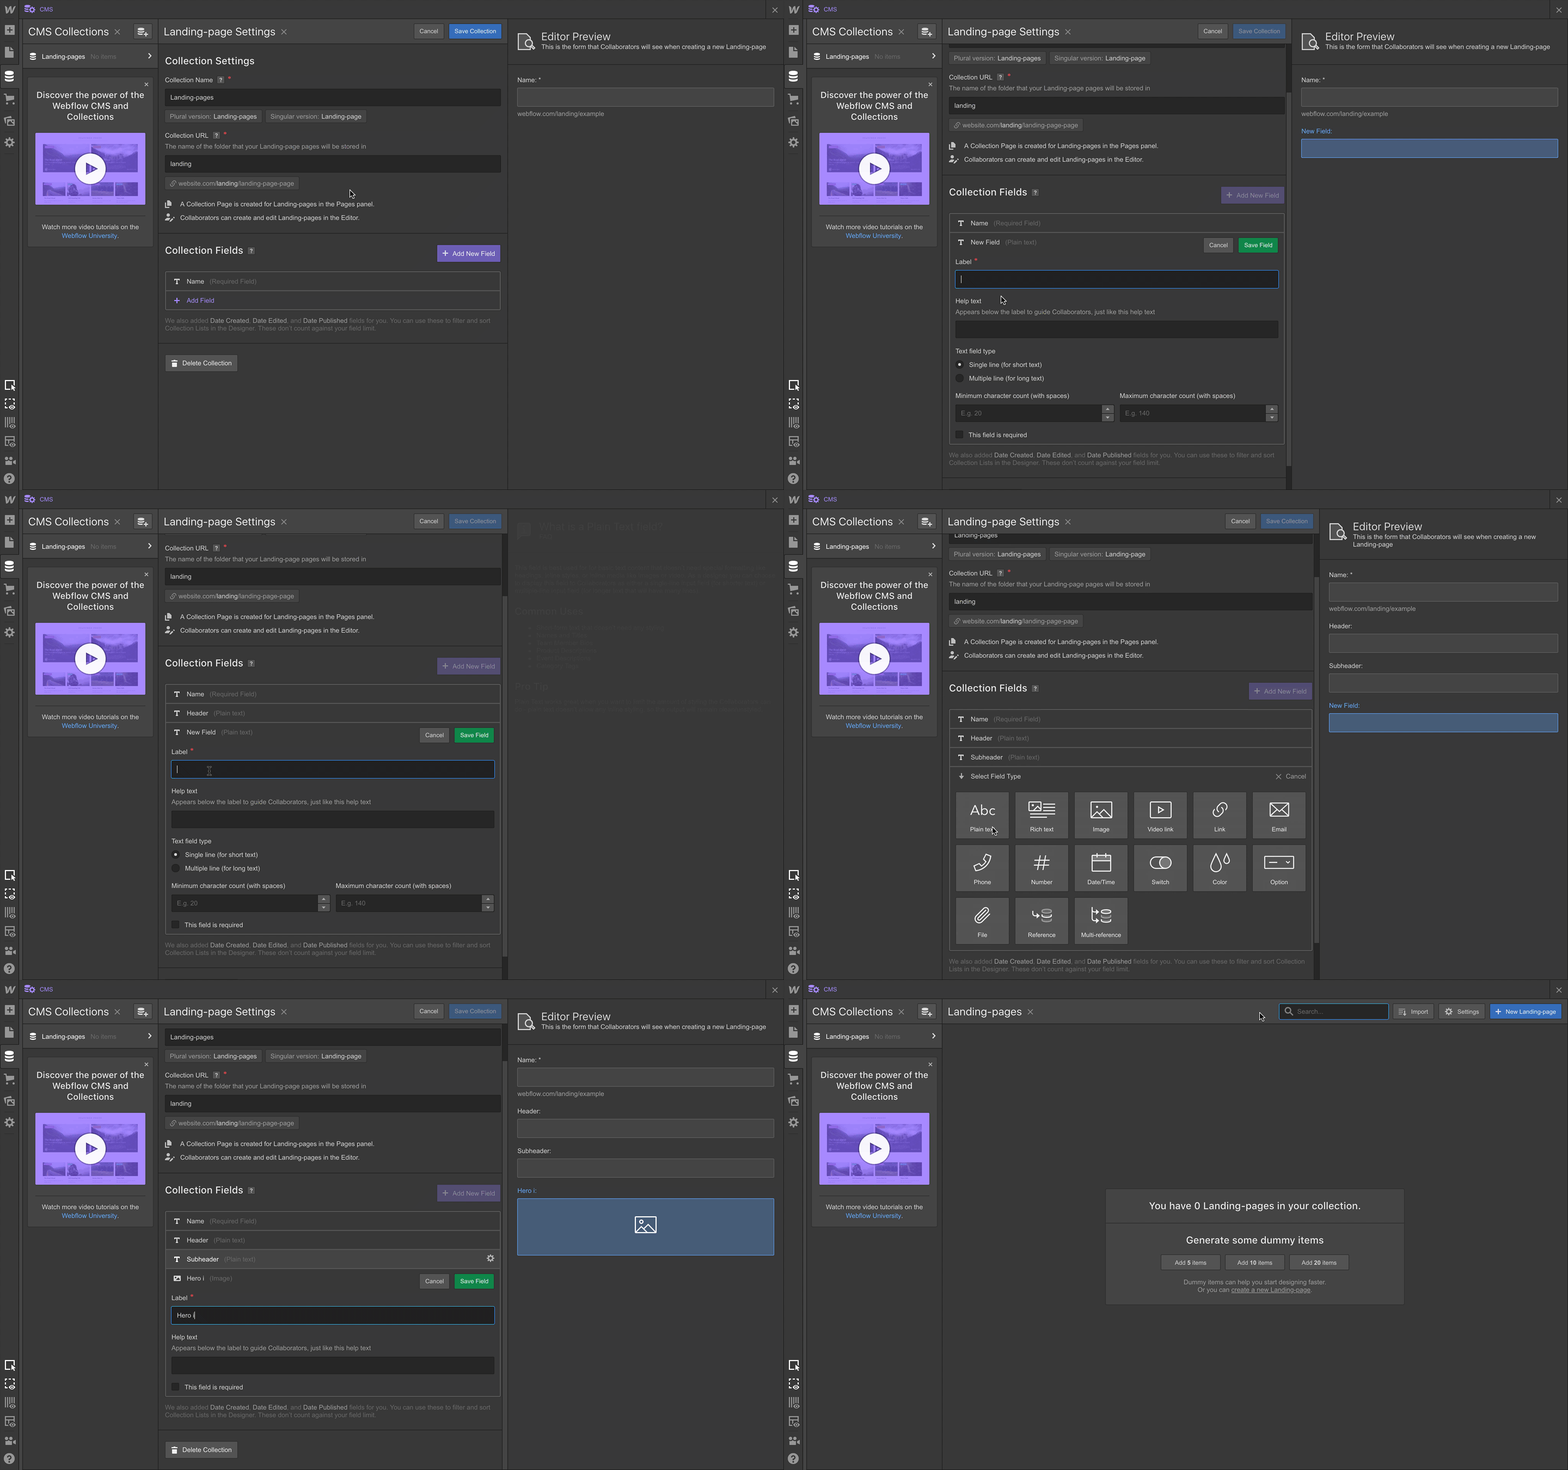
To get started, jump into Webflow, open the CMS panel, click create Collection, and name it “Landing pages.”

Now create a field that corresponds to the content type for each of the content elements we outlined above and save your Collection.
The fields we used in the template are:
- Header (plain text field)
- Sub-header (plain text field)
- Hero image/video (image field)
- Button text (plain text field)
- Button link (link field)
- Form title (plain text field)
- Form button text (plain text field)
- Features (multi-reference field)
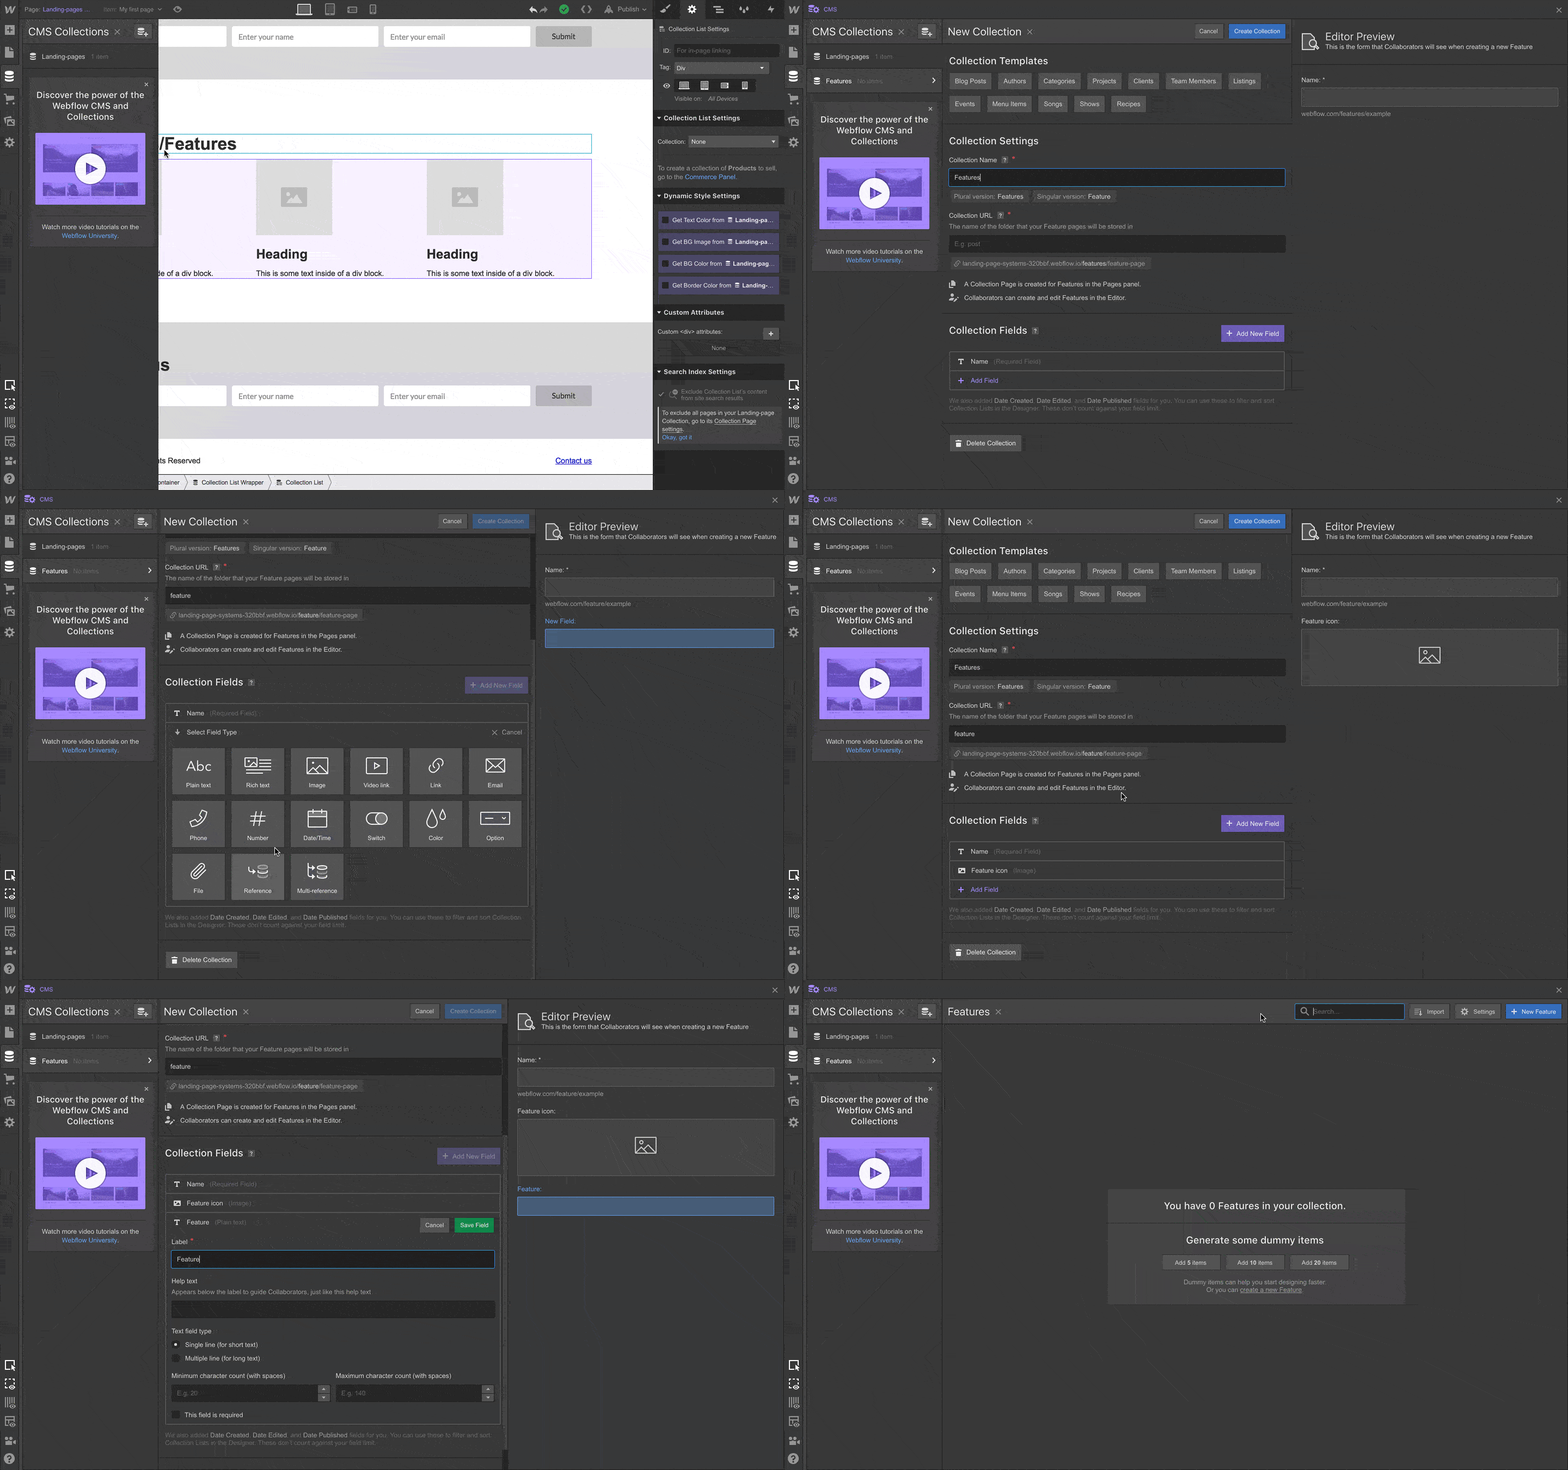
If you want the features you display on each page to vary based on target audience, you can use the CMS to create those as well. To do that, you’ll need to create another Collection called “Features” with the following fields:
- Feature name (plain text field)
- Feature icon (image field)
- Feature description (rich text field)
Note that the fields you use for your features may vary, but these provide a great starting point.
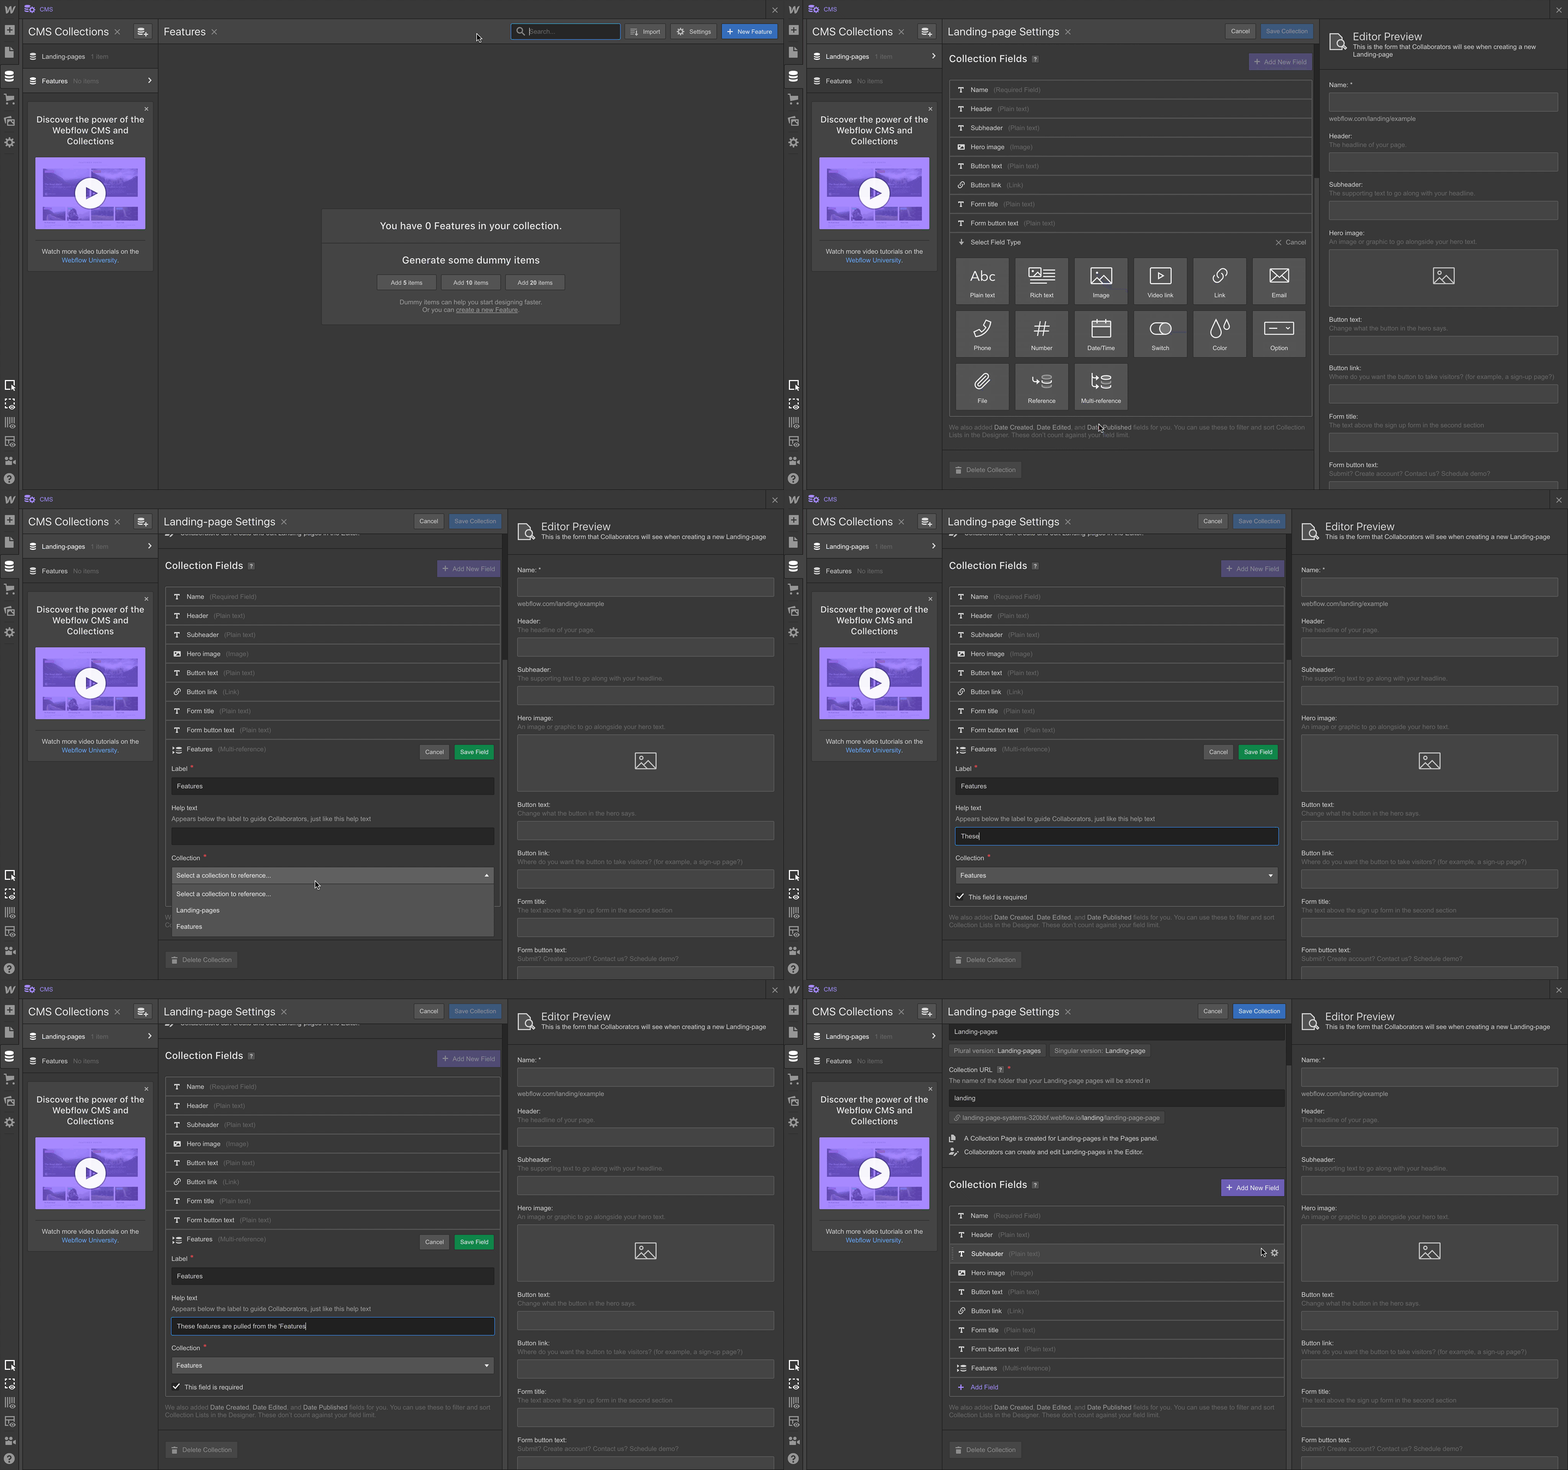
Now that you have your Features Collection, you need to connect it to your Landing pages Collection:
- Open the Collection panel
- Click the gear icon to the right of the “Landing pages” to open the Collection’s settings
- Add a new field
- Select multi-reference as the field type
- Select the Features Collection as the source
- Save
Once you’ve done this, you’ll be able to select any features you’ve added as items in your Features Collection when making a new landing page.


The modern web design process
Discover the processes and tools behind high-performing websites in this free ebook.
Step 3. Create your Collection items
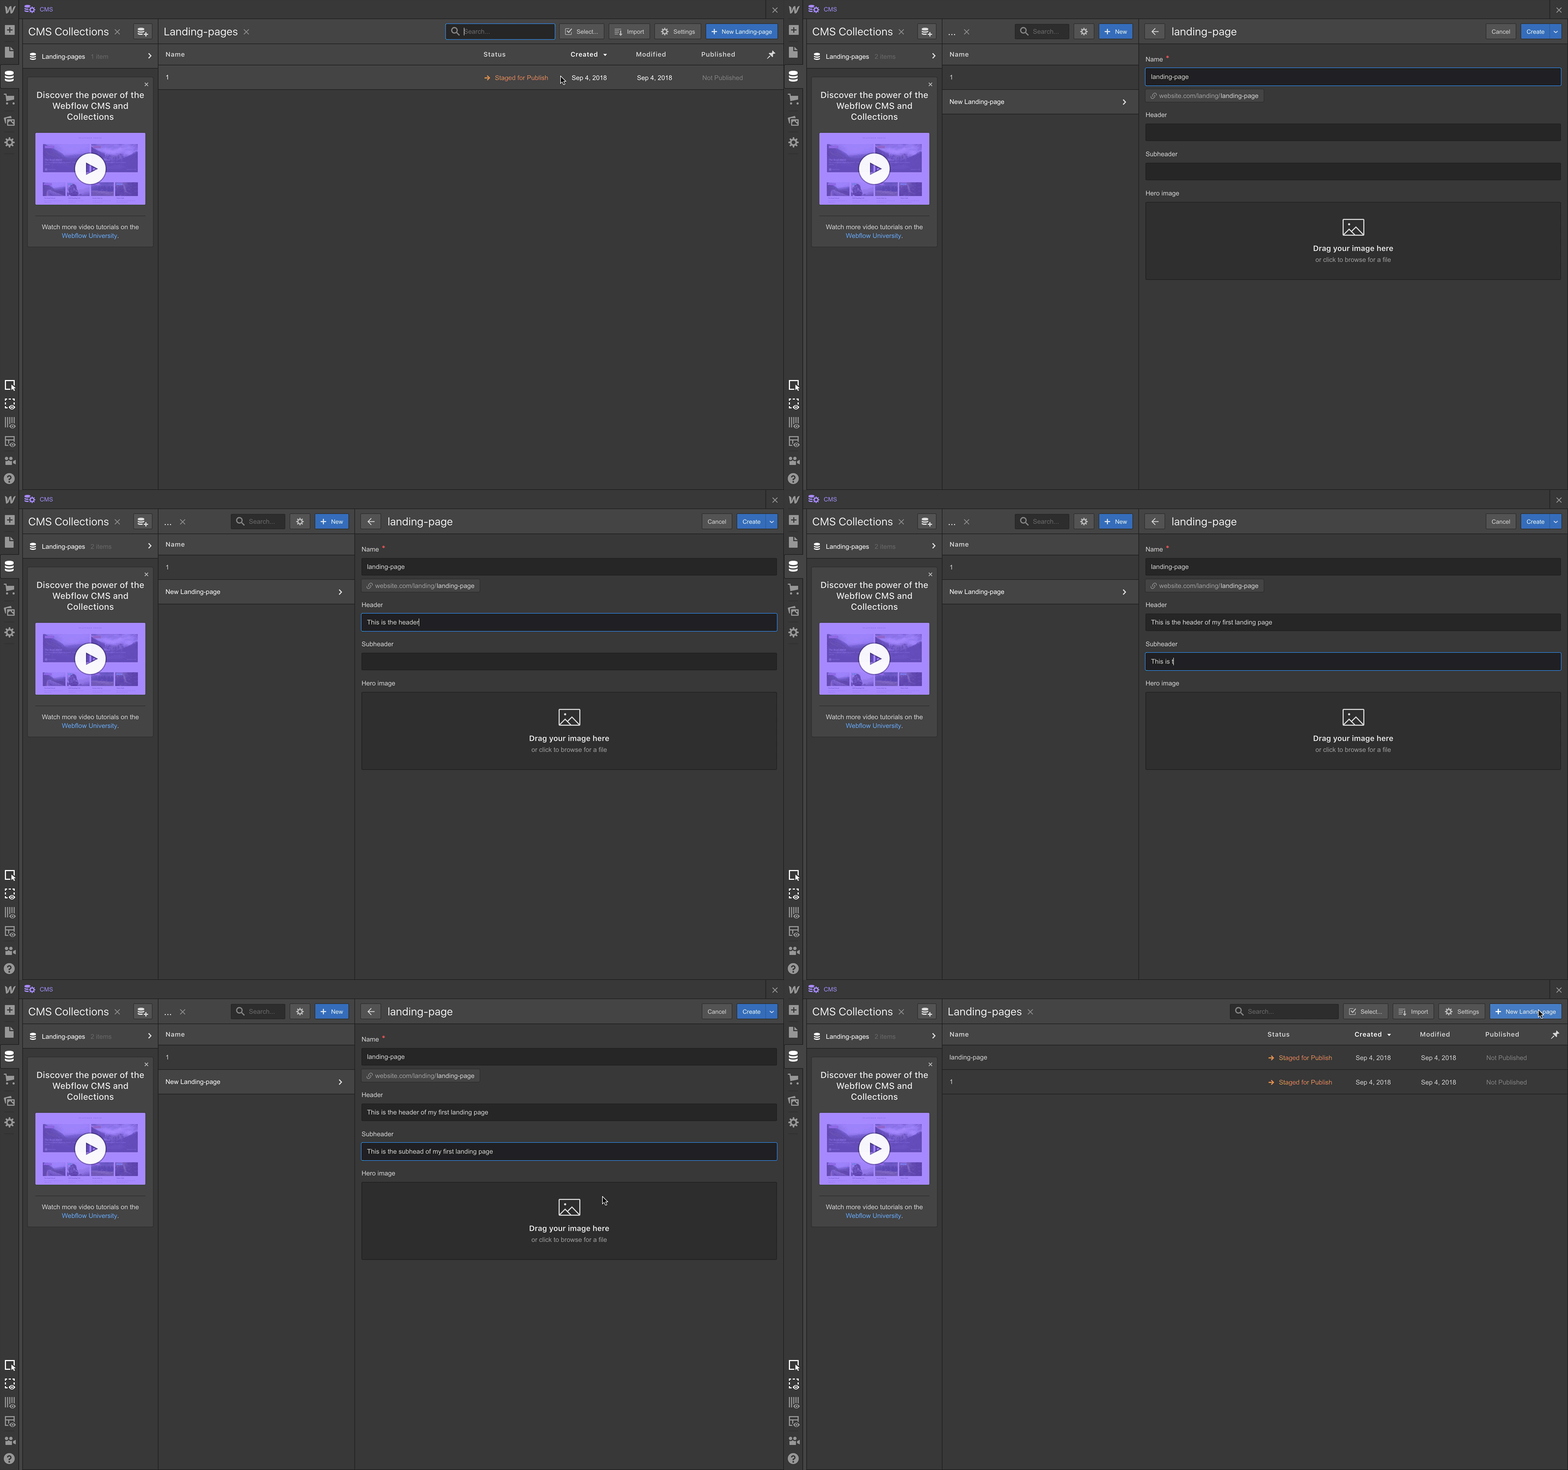
Now comes the part you’ll do for each landing page you want to make: create your Collection items.
- Open your Collection in the Collections panel
- Click New landing page
- Add content for each Collection field
Step 4. Design your landing page
Now comes the familiar part: designing the actual landing page. Most of you will want a designer to do this for you. The good news is, they’ll only have to do it once and what they design will actually work. They won’t need to hand it off to a developer first — Webflow will write real code in the background as they design.
If you don’t have design resources, you have a few options:
- Use a template
- Clone a UI kit (or any cloneable Webflow site) to copy and paste pre-designed elements into your final page
- Hire a Webflow Expert
At this stage, don’t worry about the specific copy and images. Just style the page the way you want based on the elements of your Collection.
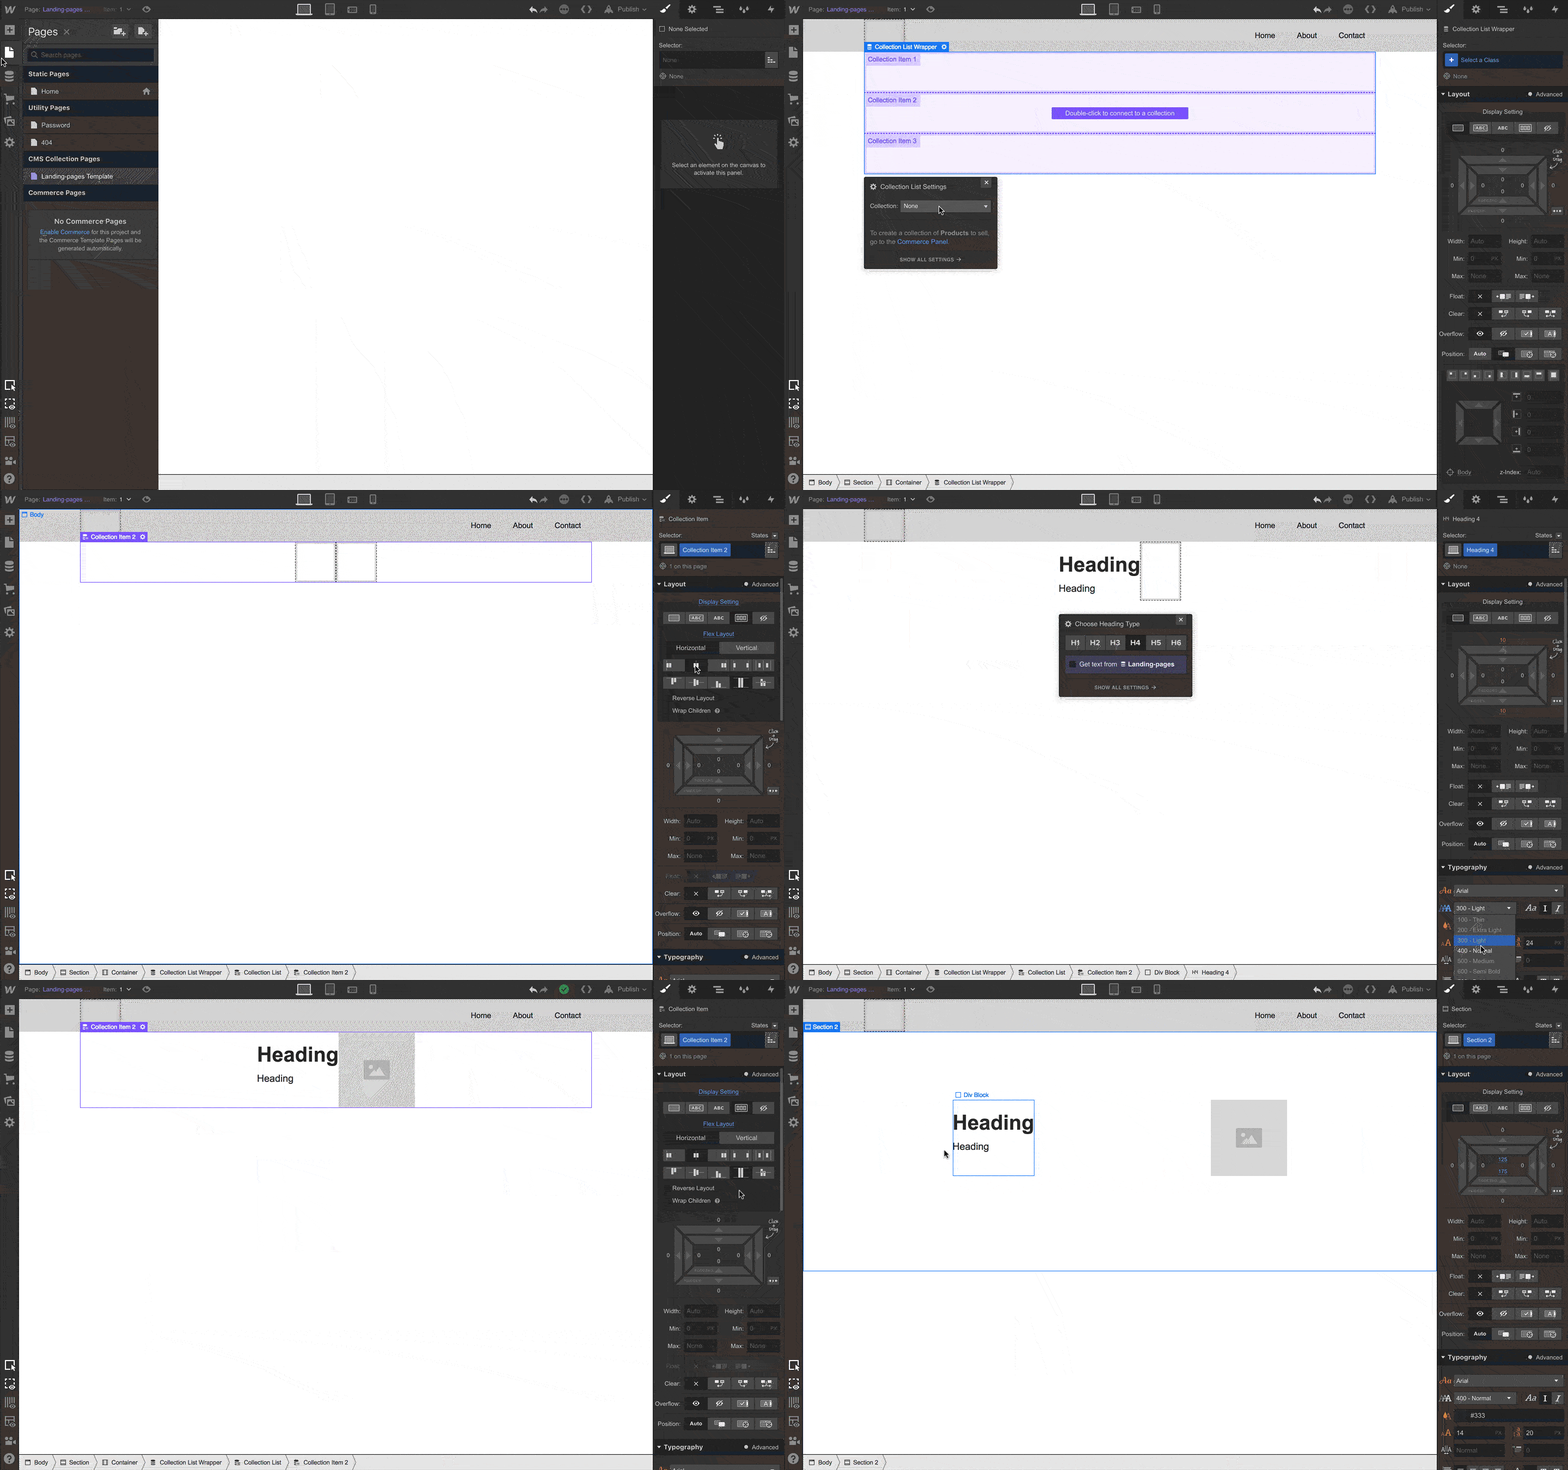
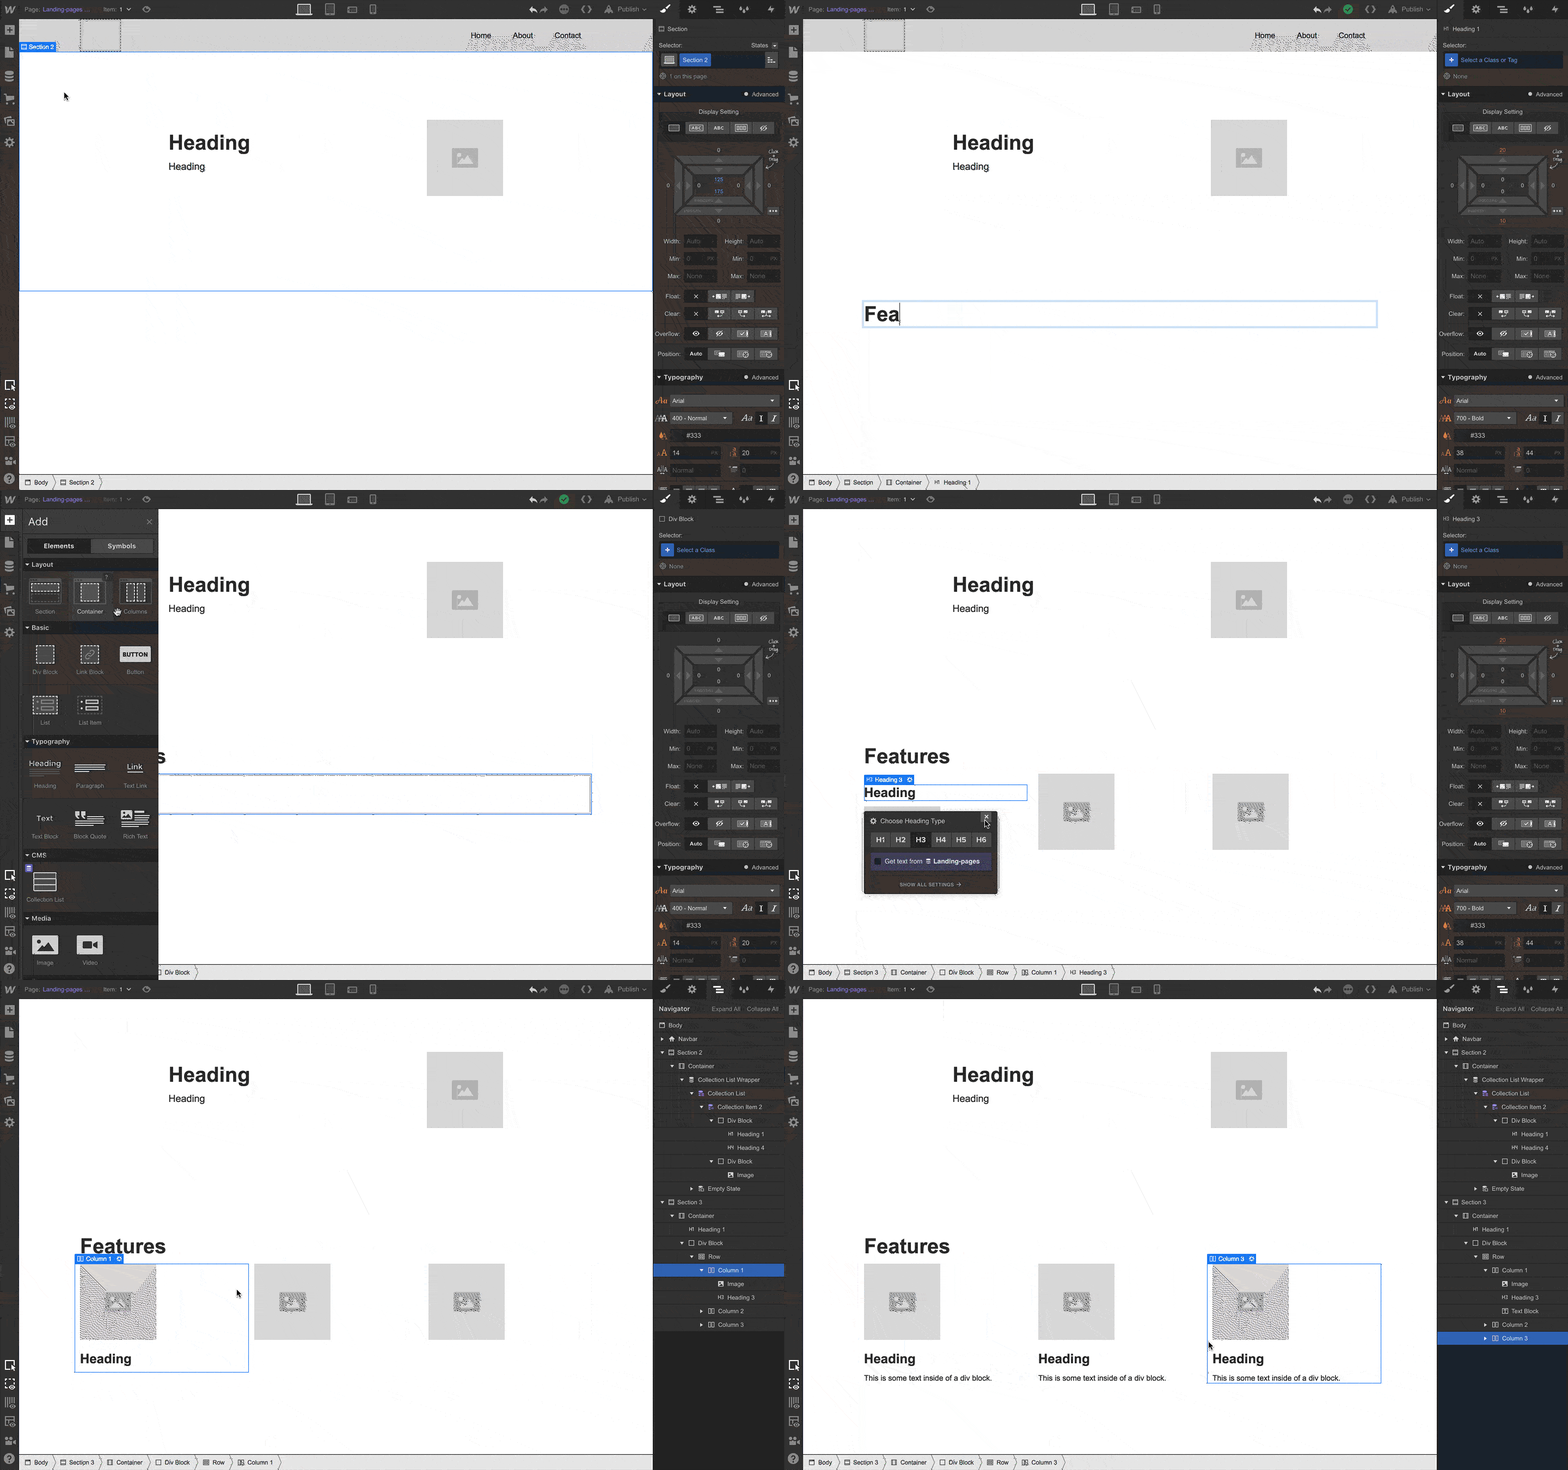
ICYMI: I made a cloneable, unstyled landing page system template here.
Step 5. Connect your Collection fields to your design elements
Here’s where the magic starts to happen: connecting your page elements to the CMS Collection you built earlier. This is how your pages know where to get the content you create in the CMS.
Step 6. Publish your site
Now to push your pages live. Click publish. That’s it. Now visit your page.

From here, creating a new landing page is as easy as creating a new Collection item.
Check out all the marketing integrations we have for you to hook up your forms, run ads, integrate analytics, run email campaigns, and much more.
Here’s that cloneable landing page system template one more time to help you get started faster.
You can build it for free on a webflow.io subdomain — and add hosting when you're ready to get these live on your own domain.
Happy publishing!
Thanks to Adam Tanguay, Barrett Johnson, Soso Sazesh, Reid Benson, Shannon Fisher, and especially John Moore-Williams for helping with this post.

Build websites that get results.
Build visually, publish instantly, and scale safely and quickly — without writing a line of code. All with Webflow's website experience platform.


