


Learn how to add reCAPTCHA spam protection to Webflow forms and block automated bots.
Form spam is a persistent problem for any public-facing site. Bots scan for unprotected forms and flood them with fake submissions, filling inboxes with gibberish, skewing lead data, and wasting the time of anyone who has to sort through it.
Google's reCAPTCHA solves this through a native integration. I've implemented it across many sites, and the spam reduction is consistent. Real users check a box labeled "I'm not a robot," complete an image challenge if Google suspects bot behavior, and then submit normally.
This guide shows you how to add reCAPTCHA spam protection to Webflow forms using Webflow's native integration. No third-party services, no custom backend setup, just Google's free tool and Webflow's built-in support.
4 approaches to block spam in Webflow forms
Webflow provides four spam prevention methods: reCAPTCHA, Cloudflare Turnstile, spam filtering, and honeypot techniques. Each has specific use cases, and understanding the tradeoffs helps you choose the right protection layer:
When reCAPTCHA is the right choice:
- Your forms are already receiving consistent spam (more than 5-10 fake submissions per week)
- You've enabled spam filtering, and it's not catching everything
- You need immediate, aggressive protection without custom development time
- Your users understand and expect to see CAPTCHA challenges.
I use reCAPTCHA when spam volume justifies the added friction of a visible checkbox. For high-traffic contact forms, demo request forms, or any page that's already been targeted by bots, the checkbox becomes a necessary filter. Users understand what it's for, and the 2-3 second delay is acceptable compared to sorting through spam.
What do you need to add reCAPTCHA spam protection to Webflow forms?
Before implementing reCAPTCHA, verify your Webflow project meets these requirements.
Active Webflow site with forms
At least one published form on your site. reCAPTCHA applies site-wide once enabled, so every form needs a reCAPTCHA element; otherwise, submissions will fail. I've seen this catch developers off guard; they enable reCAPTCHA, add it to their contact form, and suddenly their newsletter signup breaks because they forgot to add the element there.
Google account for reCAPTCHA registration
Free Google account to access the reCAPTCHA Admin Console. You'll register your site and generate two API keys:
- A Site Key (public, embedded in your forms)
- A Secret Key (private, stored in Webflow's settings)
If you're managing a client site, use a Google account you control long-term, not a personal Gmail you might lose access to. reCAPTCHA keys are tied to the account that generated them, and rotating them later means updating both the Admin Console and Webflow settings simultaneously.
Either a dedicated agency Google account or the client's own Google account is a clean option.
Published domain or staging subdomain
Custom domain (like example.com) or Webflow staging subdomain (like yoursite.webflow.io) where you'll test reCAPTCHA. Google needs to validate the domain, which takes up to 30 minutes after registration.
Testing in Webflow's Designer preview mode won't work; reCAPTCHA only functions on published sites.
Webflow plan that allows custom code (for mobile optimization)
While basic reCAPTCHA works on any Webflow plan, making it mobile-responsive requires adding a custom attribute. If you want the compact mobile view, you'll need a plan that supports custom attributes and code injection.
5 steps to add reCAPTCHA spam protection to Webflow forms
The native Webflow implementation handles reCAPTCHA v2 (checkbox version) through built-in elements and site settings. This method requires no custom code for basic functionality and validates submissions on the server side through Webflow's form handler.
Step #1: Register your site with Google reCAPTCHA
Navigate to the Google reCAPTCHA Admin Console and sign in with your Google account. If you've registered sites before, click the plus icon (+) to add a new one.
If this is your first time, Google may drop you directly into the registration form.
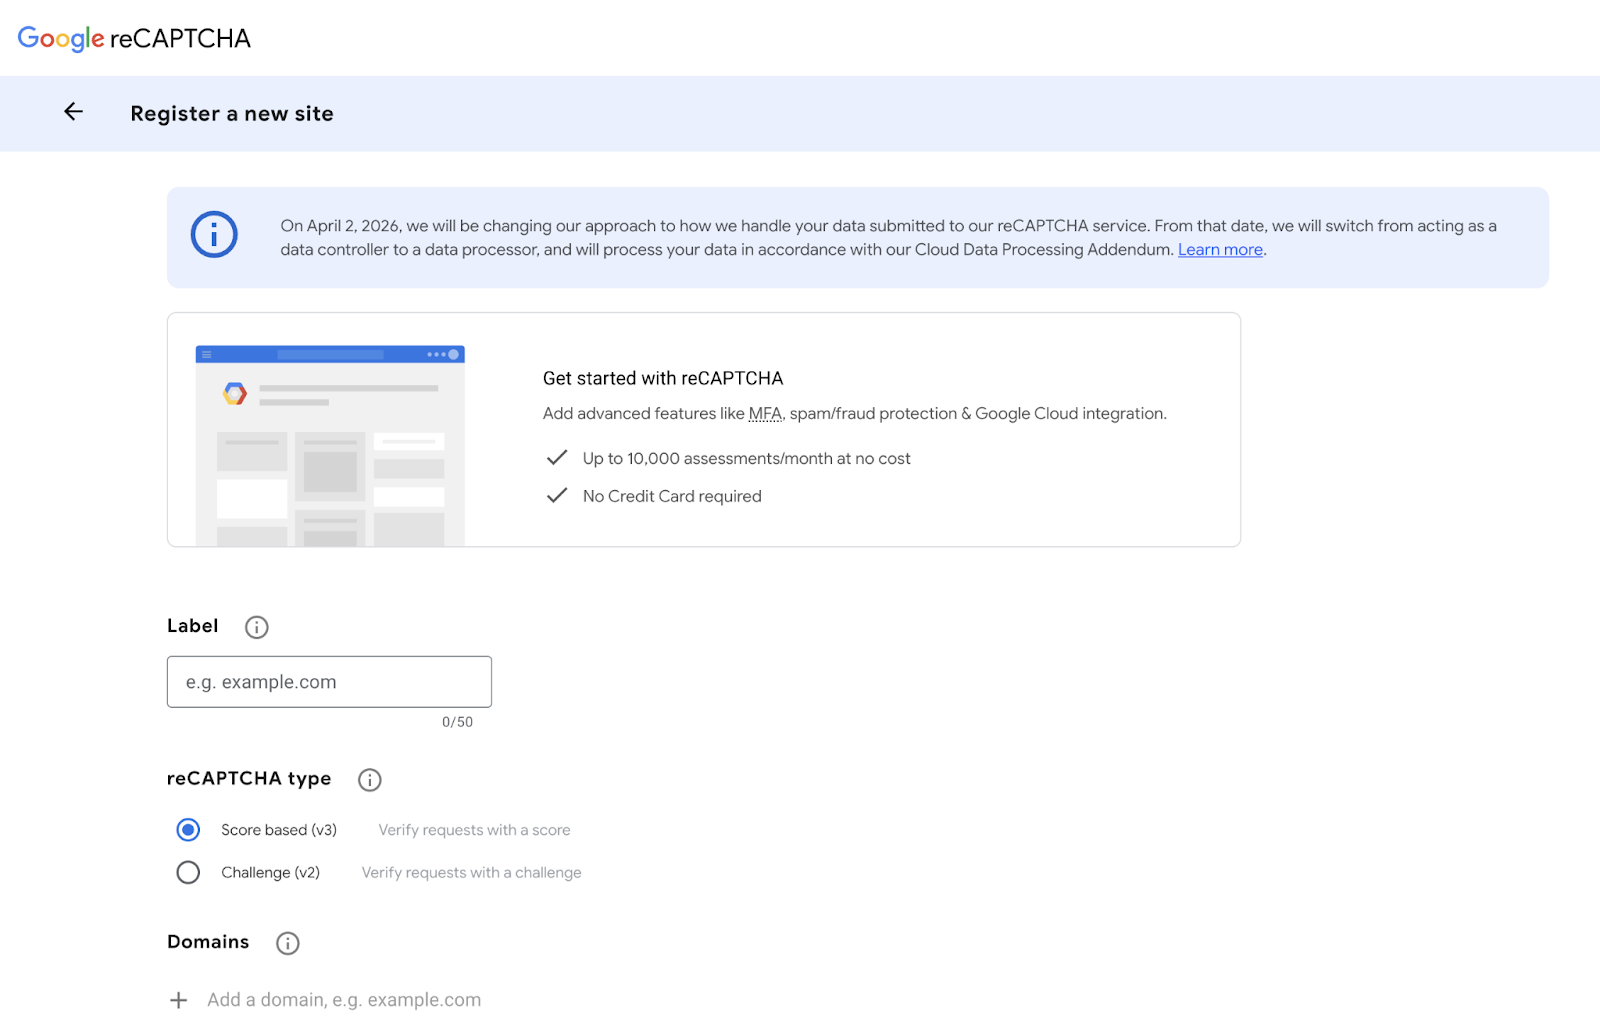
Enter a recognizable name like "YourCompany Contact Forms" or "ClientName Webflow Site." This label is only visible to you in the reCAPTCHA dashboard.
Select reCAPTCHA type
Choose "reCAPTCHA v2" and specifically the "I'm not a robot" Checkbox option. Webflow's native integration only supports v2 checkbox; do not select v3 or invisible v2. If you accidentally choose v3, the keys won't work, and you'll see "Invalid site key" errors in your Webflow forms.
I've debugged this mistake at least a dozen times. A developer registers for v3 because it sounds more advanced, pastes the keys into Webflow, and spends an hour troubleshooting before realizing Webflow explicitly requires v2 checkbox keys.
Add your domains
Enter every domain where you'll use reCAPTCHA. This includes:
- Your custom domain:
example.com - Webflow staging subdomain:
yoursite.webflow.io - Any additional custom domains connected to this site
Google automatically includes first-level subdomains. If you add example.com, Google also registers subdomain.example.com. Enter one domain per line. Don't include http:// or https:// — just the bare domain.
Then, accept the terms and submit. Check the reCAPTCHA Terms of Service box and click Submit. Google generates two keys immediately.
You'll see two keys displayed:
- Site Key: Public key that gets embedded in your HTML
- Secret Key: Private key that Webflow uses for server-side validation
Keep this browser tab open. You'll paste these keys into Webflow in Step 2. The keys are case-sensitive and often long (40+ characters), so copy and paste exactly; don't retype them.
Finally, wait for the domain registration. Google's documentation states that domain validation can take up to 30 minutes. In practice, most domains validate within 5 minutes, but I've seen delays of up to 20 minutes during high-traffic periods. If you test immediately and see domain errors, wait and try again.
Step #2: Enable reCAPTCHA validation in Webflow site settings
Open your Webflow project and click the settings gear icon in the left sidebar. Navigate to Site Settings → Apps & Integrations.

Then, locate reCAPTCHA validation settings. Scroll to the "Cloudflare Turnstile spam protection" section. Below that, you'll find "reCAPTCHA validation" with two input fields: reCAPTCHA v2 Site Key and reCAPTCHA v2 Secret Key.
Paste your API keys.
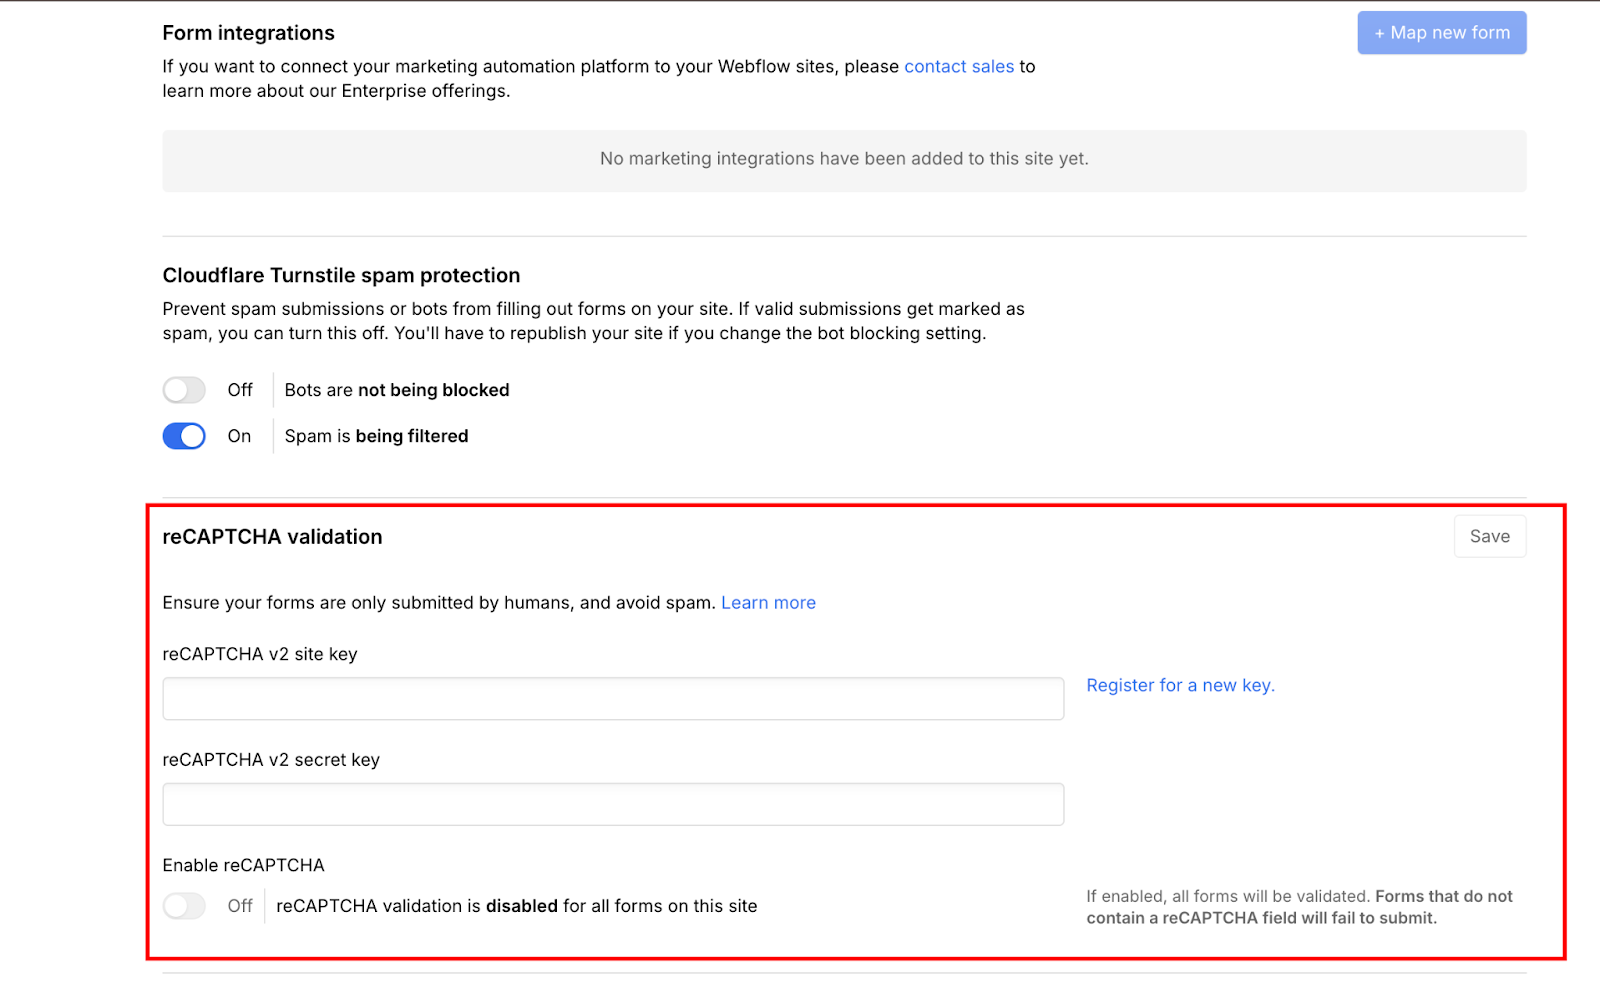
Enable validation
Check the box next to "Enable reCAPTCHA validation." Read the warning carefully: "Enabling reCAPTCHA will enforce validation for all forms on your site. Any forms that do not have a reCAPTCHA element will fail to submit."
This is the part that catches people. The moment you save these settings, every form on your site must have the reCAPTCHA element, or it won't accept submissions. If you have multiple forms (contact, newsletter, demo request), you need to add the element to all of them before enabling validation.
Click "Save" in Site Settings. The validation is now active site-wide. Don't republish yet. First, add the reCAPTCHA element to your forms in Step 3.
Step #3: Add the reCAPTCHA element to each form
Open the Webflow Designer and navigate to a page with a form. Select the form block you want to protect.
Add reCAPTCHA element
Open the Add Panel (plus icon on the left sidebar). Scroll to the bottom, where you'll see the Forms section. Drag the "reCAPTCHA" element into your form and place it above the submit button.

The element appears as a placeholder box in the Designer. You won't see the actual "I'm not a robot" checkbox until you publish the site; reCAPTCHA only renders on live pages, not in Designer preview.
Position the element
I place reCAPTCHA directly above the submit button so users see it as the final step before submitting. Some designs put it between form fields, but this creates confusion about submission flow.
Repeat for all forms
Navigate to every page with a form and add the reCAPTCHA element. This includes:
- Contact forms
- Newsletter signups
- Demo request forms
- Application forms
- Any custom forms using Webflow's native form element
If you forget even one form, it will break when users try to submit. I maintain a checklist of all forms during this step to avoid missing any.
Step #4: Publish your site and test reCAPTCHA functionality
Click "Publish" in the top right corner of the Designer. Select "Publish to selected domains" and confirm.
Open your published site in a new browser tab (not the Designer preview). Navigate to a form with reCAPTCHA.
You should see the reCAPTCHA checkbox appear with "I'm not a robot" text and Google's reCAPTCHA badge. If you don't see the checkbox, clear your browser cache or test in an incognito window.
Step #5: Optimize reCAPTCHA for mobile devices
The default reCAPTCHA renders at 304 pixels wide, which overflows on phones with narrower screens. The compact version reduces width to 164 pixels, fitting comfortably on all mobile devices.
Select your reCAPTCHA element
In the Designer, click on the reCAPTCHA element you added to your form. Open the Settings panel on the right sidebar.
Add custom attribute
Scroll to "Custom Attributes" and click the plus icon to add a new attribute.
- Name:
data-size - Value:
compact
This attribute tells Google to render the compact version. The change only applies to the published site; you won't see it in the Designer.
Publish your site and test on an actual mobile device or browser developer tools. The reCAPTCHA checkbox should fit within your form width without horizontal scrolling.
What causes reCAPTCHA to fail on Webflow forms? Tips to troubleshoot common errors
I've debugged reCAPTCHA implementations on dozens of Webflow sites. These are the most common errors and how to fix them.
"Error: Invalid site key"
This error displays in the reCAPTCHA element box on your published form. It means the Site Key in your Webflow settings doesn't match Google's records.
Causes:
- You pasted the wrong key (Secret Key instead of Site Key)
- Keys include extra spaces from copy-paste
- You're using reCAPTCHA v3 keys instead of v2
- Keys are mistyped (they're case-sensitive)
Fix: Go to your Google reCAPTCHA dashboard and verify that you're viewing a v2 ("I'm not a robot") registration. Copy the Site Key again, making sure to select the entire string. Paste it into a plain text editor first to check for trailing spaces.
Then paste the clean key into Webflow Site Settings → Apps & Integrations → reCAPTCHA v2 Site Key field. Save and republish.
If the error persists after confirming the key is correct, delete both keys from Webflow, then go to Google's reCAPTCHA console to generate new keys and paste them into Webflow.
"ERROR for site owner: Invalid domain for site key"
This means your published domain isn't registered in Google's reCAPTCHA settings for this key.
Causes:
- You registered
example.com, but you're testing onstaging.example.com(subdomains beyond the first level aren't auto-registered) - You're testing on
yoursite.webflow.io, but didn't include it in the domain list - You updated your custom domain and forgot to add it to reCAPTCHA
- Domain registration is still processing (can take up to 30 minutes)
Fix: Open your Google reCAPTCHA Admin Console and click the settings gear next to your site registration. Check the Domains section. Add the exact domain where you're seeing the error — include staging subdomains, Webflow's .webflow.io domain, and any custom domains. Save changes and wait 5-10 minutes for Google to update its validation servers.
Don't include https:// or trailing slashes. Just the bare domain: yoursite.webflow.io or example.com.
reCAPTCHA checkbox doesn't appear on published site
The form renders normally, but the reCAPTCHA element shows as empty space or doesn't appear at all.
Causes:
- reCAPTCHA validation isn't enabled in Site Settings
- You're testing in Designer preview mode (reCAPTCHA only works on published sites)
- Browser cache is showing the old version of the page
- JavaScript errors on the page are blocking the reCAPTCHA script
Fix: First, verify you enabled reCAPTCHA validation in Site Settings → Apps & Integrations. If the toggle is off, the element won't render even though you added it to your form.
Second, make sure you're viewing your published site (yoursite.webflow.io or your custom domain), not the Designer preview. Click "Publish" if you haven't already.
Third, hard refresh the page (Cmd+Shift+R on Mac, Ctrl+Shift+R on Windows) or test in an incognito window to bypass cache.
Fourth, open your browser's developer console (F12) and check for JavaScript errors. Look for red error messages that mention "recaptcha" or "grecaptcha." If you see errors, check if custom code on your site conflicts with Google's reCAPTCHA script.


Forms without reCAPTCHA element fail to submit
You enabled reCAPTCHA validation in Site Settings but forgot to add the element to every form. Now some forms won't accept submissions.
Fix: This is a site-wide setting. Once enabled, validation applies to all forms. Open the Designer and visit every page with a form. Add the reCAPTCHA element to each one. Publish. Test each form individually to confirm they all work.
I create a spreadsheet listing every form on the site before enabling validation. This checklist prevents the "oh no, the newsletter signup is broken" moment three days after launch.
reCAPTCHA shows error in incognito, but works in normal browser
This indicates a cache issue. The browser cached a version of the page before you enabled reCAPTCHA, and incognito mode forced it to load fresh resources.
Fix: Clear your browser cache completely. Close all browser windows. Reopen and test again. If it works now, the issue was cached resources. Your site visitors won't experience this problem because they're loading the page fresh.
What to build next with Webflow forms
reCAPTCHA handles spam, but protected forms are only one piece of the workflow. Once submissions are clean, the next question is where they go.
For teams using tools like HubSpot, Zapier, or Airtable alongside Webflow forms, the Webflow integrations library covers the connection patterns — how to route submissions, trigger automations, and sync data without custom backend work.
For more complex form behaviors like multi-step flows, conditional logic, or real-time validation, Webflow's code components let you build reusable form elements that go beyond what native Webflow forms support out of the box.


