


Webflow’s mission is to bring development superpowers to everyone.
This includes everyone from a solopreneur building their agency, to a Fortune 500 marketing team shipping to millions of people, and everyone in between. We plan to achieve this in multiple ways, but one very important method is to expand the capabilities of our App ecosystem. That’s why in August of 2023 we launched our new developer platform to enable our community to build Apps that can be used by every Webflow customer.
One piece of our developer platform is our Designer APIs that power Designer Extension Apps. Designer APIs allow developers to directly interact with the Webflow canvas by managing elements, styles, page metadata, and more. These APIs need to be exposed in a secure way, while allowing developers to feel the same power as our Designer. To bring this idea to reality, we needed to come up with a way to concisely and powerfully allow developers to interact with the internal logic of our frontend architecture — the Webflow Designer.
Seamless App integration
To ensure we maintain a secure connection between the client (a third-party developer’s App) and the host (the Webflow Designer), we needed a way for developers to build an App in their IDE of choice but launch it in the Designer with access to all APIs. When thinking of a frontend SDK, typically developers would install it via npm or reference a JavaScript bundle via CDN that exposes various global methods. This works great for some use cases, but we wanted the ability to immediately ship new APIs or bug fixes without needing to publish a new npm package and forcing developers to install it. We landed on an architecture to securely serve Apps that have all of the latest and greatest Designer APIs available immediately as they are shipped. It works like this:
- Build: A developer builds their App as a single page application, bringing along their choice of technology (React, Vue, JavaScript, etc.)
- Bundle: We published a CLI tool to allow developers to run a single command to bundle their App and upload it to Webflow. There’s also a command that can be used when developing an App on localhost.
- Launch: Apps in the Designer are injected into an iframe. Before their entry point (
index.html) is rendered, we first inject our own Designer API JavaScript bundle into theheadof their HTML. This exposes all of the Designer APIs to the App and allows the latest version of each API to be available as soon as it launches. - Secure: The App is hosted on a separate domain from the Webflow Designer to help mitigate cross-site scripting (XSS) attacks. Additionally, we have set up a content security policy to ensure the App is only loaded where we expect.
App ⇔ Webflow communication
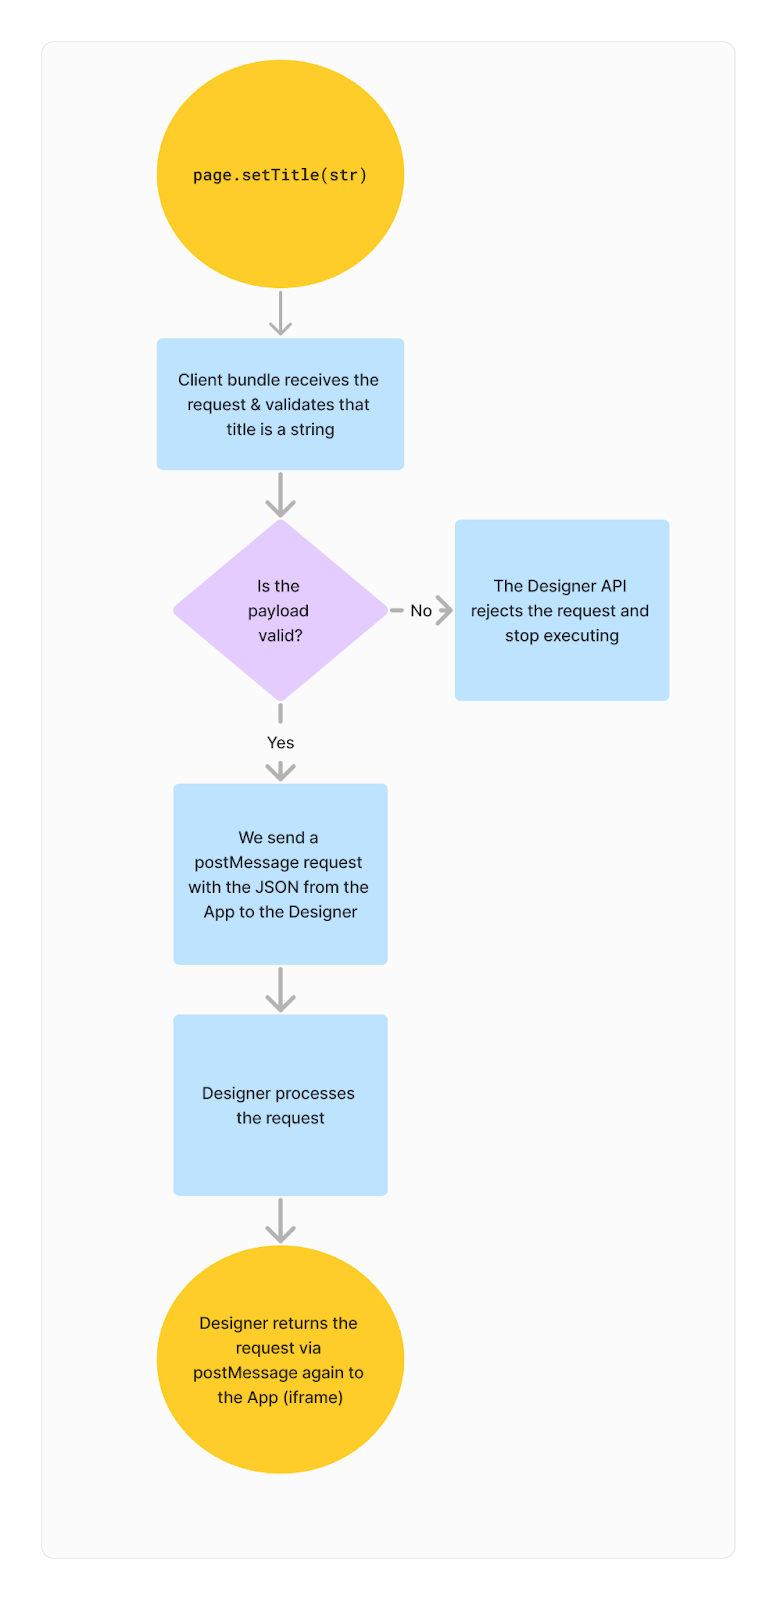
Once an App is launched and we inject our JavaScript bundle into it, we need a way to communicate between the iframe (the App) and the host (the Webflow Designer). For this, we use window.postMessage (MDN docs) along with an internal JSON-RPC library to send JSON between the two sources. We need to ensure the payload sent from the App is valid, so we have an intermediary layer that validates the JSON payload. Here’s an example of what happens when you set the title of a page using page.setTitle():
Processing the request
The central logic of Designer APIs lives within the Webflow Designer codebase, referred to as the “host”. Internally, we use a Flux architecture to manage state across the entire application. Therefore many of the Designer APIs are augmenting state or dispatching a Flux action. A high-level example of how we process a request would be this example below for updating the title of a page:
// logic in the "host" (Webflow Designer codebase)
designerApiResponder(setPageTitle, (state, payload) => {
  const {pageId, title} = payload;
  const page = state.PagesStore.getById(pageId);
  if (!page) return {status:'Error', value: 'ResourceMissing'};
  const updatedState = {
    ...state,
    PagesStore: updatePageTitle(pageId, title),
  };
  return [
    {status: 'Success', value: null},
    updatedState
  ];
});
The above code can be broken down into these components:
- We set up a “responder” that listens for the
setPageTitleAPI to be executed. - Once the API has been executed (and we have already validated the payload), we get the page by id from the
PagesStore.- If we don’t find the page, we return an error response that the client handles.
- We then merge in the updated state to the
PagesStore.- Internally we are listening for state updates and syncing data to the server if changes are detected.
- Finally, we return a tuple (an array with two items).
- The first item in the array is the response we want to return to the client. In the above example, we return
nullfor this API. - The second item is the updated state. We have a Flux reducer that grabs this second array item and merges it with the primary state of the Webflow Designer.
- The first item in the array is the response we want to return to the client. In the above example, we return
The host handles both fetching and updating state, depending on the API being executed. Internally we have a queue of requests to ensure we keep track of the successes and failures for each API so that we can return the appropriate response for the executed API. The host responds with a status as well as the response data so that the client knows if we should throw an exception or return the response. Each API has a defined response (we publish some TypeScript types to help with this). If the response is an error, we have a list of possible error “causes” that a developer can read to determine what went wrong. Here’s an example of handling an error:
try {
  const style = await webflow.createStyle('Heading');
  await style.setProperty('someIncorrectProp', '10px');
} catch (error) {
  const tag = error.cause.tag;
  const message = error.message;
  if (tag === 'InvalidStyleProperty') {
    alert('Invalid style property used');
  }
  console.log(message);
}
We’re just getting started
Apps throughout the Webflow ecosystem grow stronger and more impressive by using Designer APIs. We continue to expand the capabilities of Designer APIs and strive to bring much of the power of the Designer into the hands of developers. Since launching our APIs, developers have created powerful Apps that have increased the productivity of their users and made previously complex tasks easier. There are Apps on the marketplace that bring the power of AI into the Webflow Designer, help build complex SVGs by dragging and dropping a file, and so much more.
We keep developer experience, performance, and security top of mind as we iterate. We believe that by enabling developers to create new and effective Apps, we’re bringing development superpowers to everyone. Stay tuned for part two of this series where we dive into optimizing the performance of various Designer APIs and how we’re working to make the experience faster and easier to use for developers.