


For a long time, I wanted to add this kind of functionality to my Webflow site. I would check forums and scour the internet looking for solutions. Finally, last year I decided I was going to implement this functionality into a new site I was working on. Period. I was going to find a way.
I’ll admit it. I have addictions. Sweet tea? Check. Videos of dogs doing cute things on Instagram? Check. Love? Well, you know how the song goes. But one of my long-time addictions has been Product Hunt.
I love that site, and there isn’t a day that goes by that I don’t check it out. When you think about it, many things make that site special, from a technical standpoint, are actually quite simple. You click on a button, and you add a vote. There’s login and comment functionality, sure, but at its core, this site is about upvoting things.
I spent long hours consuming sugar, reading API documentation, and sending test submissions to Zapier. I almost admitted defeat, and then I reached out to Waldo from the Customer Support Team. Waldo knew I needed some help with the API and he pointed me to the fantastic Bartosz Kustra. Bart is on the Webflow QA team and helped me figure out how to make this happen. It included a lot of custom code both in Webflow and in Zapier, but in the end, I won the war.
Then, when Webflow Ecommerce support was added to Zapier, the team also added something that went by mostly unnoticed: Update live item.
This is the functionality you need to update your Collections using Zapier’s Zaps. This makes it even easier to create your very own upvote system.
So how do you do it? Let’s get started!
Creating your own upvote system in Webflow
The first thing that you need to do is to create a Webflow project and add a CMS collection and some items.
What that collection contains is up to you, but you’ll need a couple of fields to make your upvote system work:
- A number field to hold how many votes your item has
- A plain text field to keep your item IDs (you could use other field types, like number, but plain text is more flexible — after all, IDs may include letters!)
Now that you have that set up, head to your project settings and go to the integrations tab. Scroll down until you get to the section titled “API Access.”
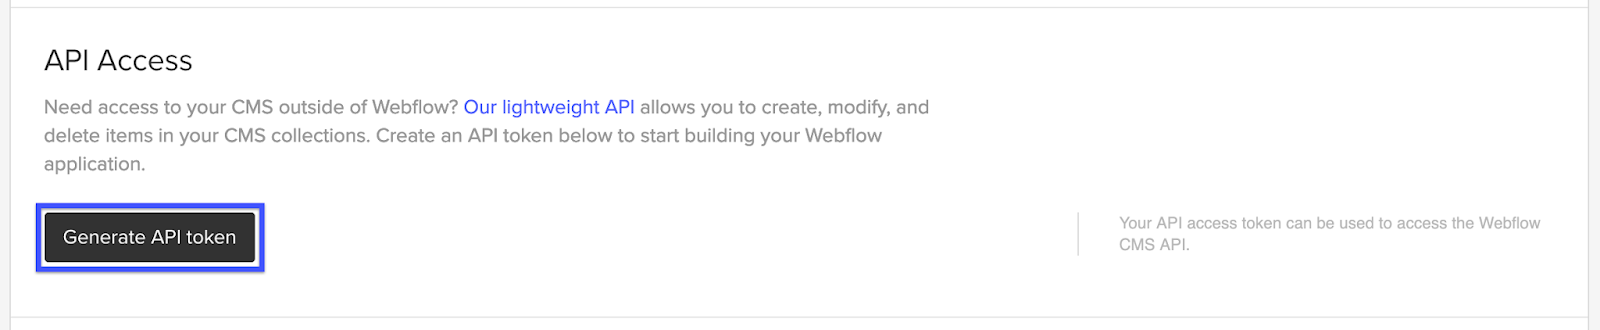
Now, generate an API token, and copy it. You’ll want to keep that API token someplace safe, as it’s essentially a password to read and write to your site’s database (that is, it's collections).
Next, you’re going to have to use an app called Postman.
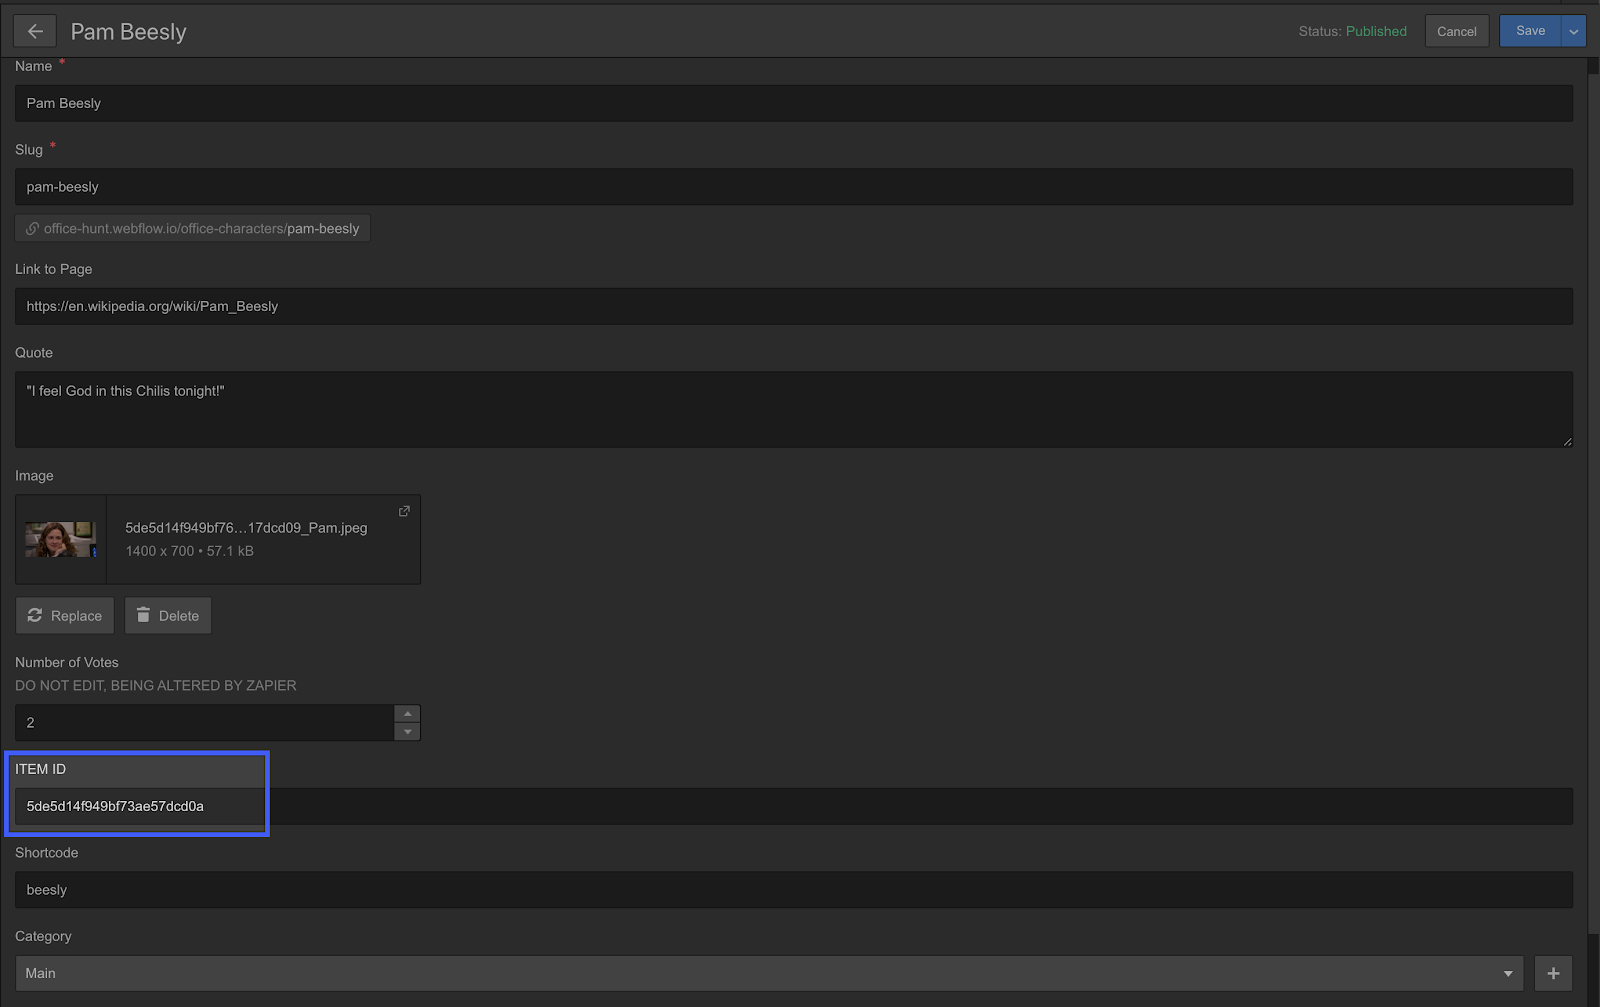
Using Postman to get Webflow item ID's for Zapier
While you’re grabbing the ID’s for your items, you’ll also want to nab the ID for your collection as well.
Now that you have your item IDs, go back through our collection and add those IDs to the aforementioned text field. This ID is what makes Zapier’s live update work with Webflow CMS.
Alternatively, you can use a method like this from the legendary Matthew Munger. In the video below, he shows you how to use Integromat to update the collection ID’s in bulk.
Once you’ve added those items, it’s time to talk about how to structure your site. Mine looks something like this:

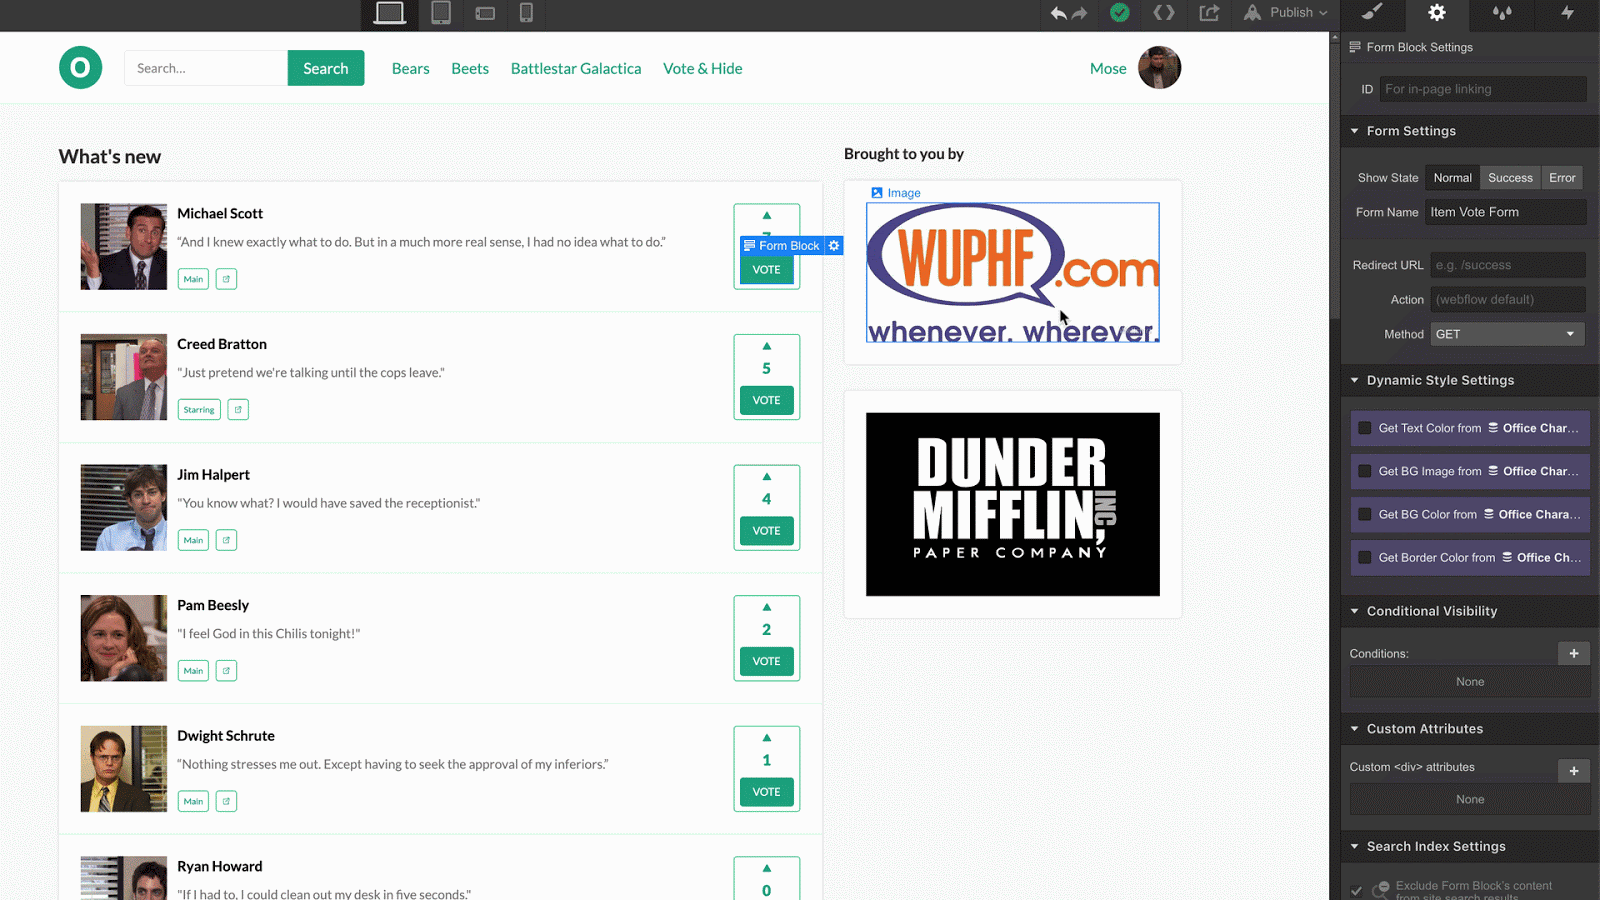
This is my collection list of items people are voting for. The list is sorted by the field that contains the number of votes. I put my list on the homepage of my site.
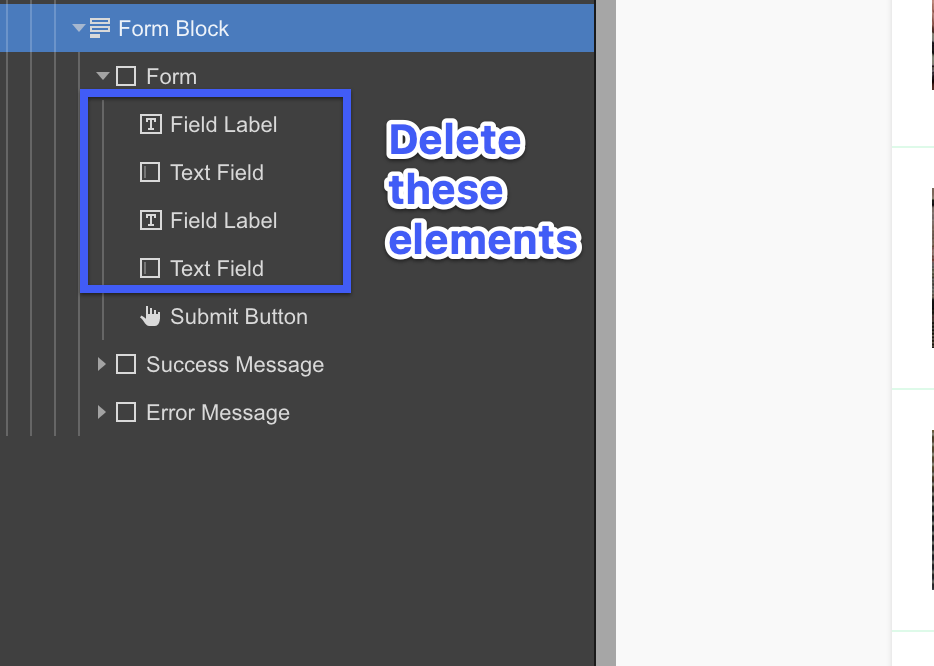
In order to make this work, you’re going to need to add in a button users can click on to vote. But one thing to keep in mind is that you’ll be using form submissions as a Zapier trigger. So instead of adding a button, add a form into the collection item.
The default form from Webflow contains two fields — name and email. There is also a label for each field. You’ll delete everything inside of the form block except for the submit button.
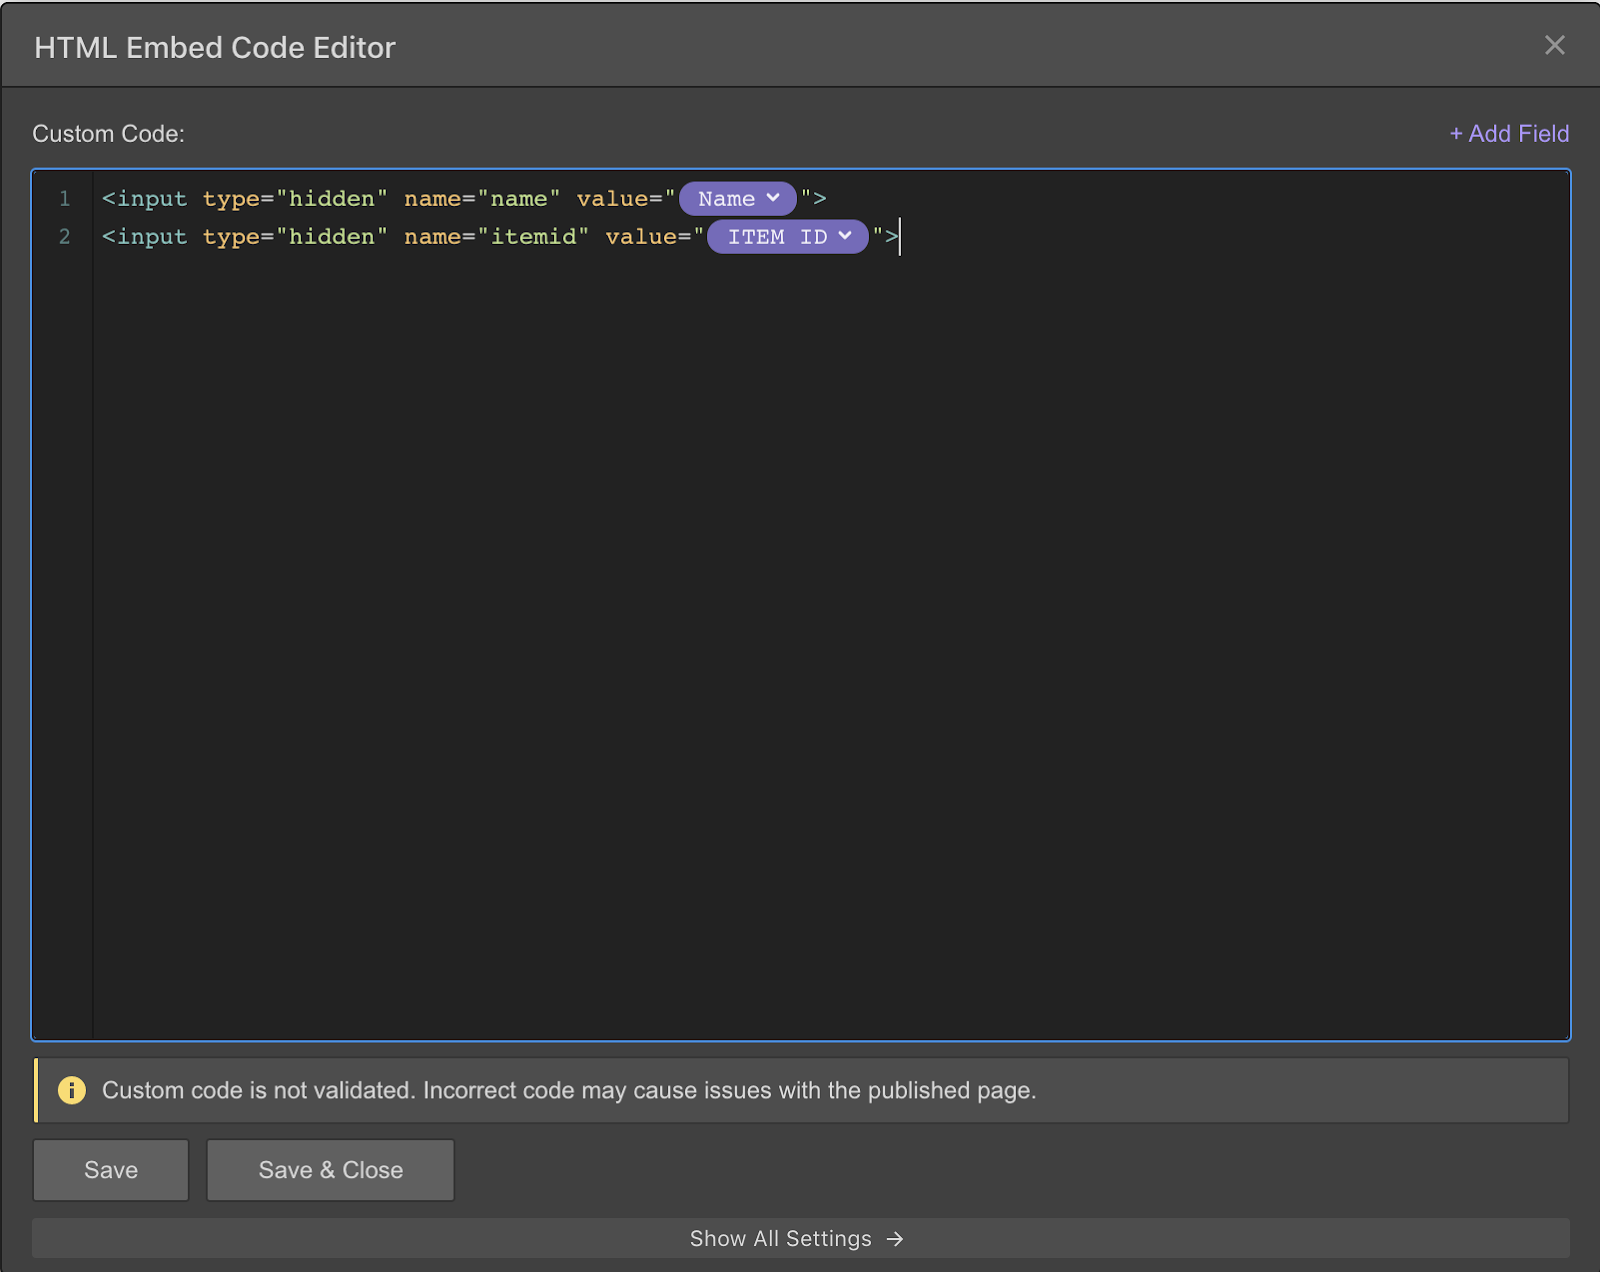
Now, place an HTML embed element into that Form Wrapper at the same level as the Submit Button:
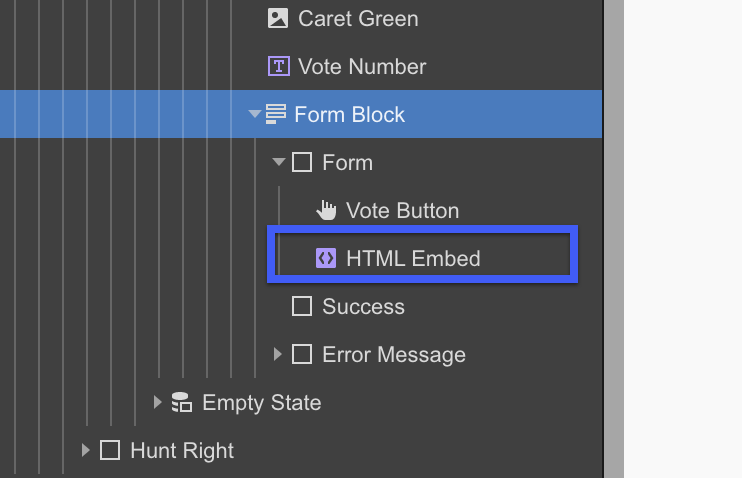
In this embed element, add in some code for the inputs. Here’s a screenshot of my code. Notice that I’m passing the dynamic data from the collection through the form as values. That means when the form submits, the data from the collection is available to use in Zapier.
You can grab this code to use in your own projects here:
<input type="hidden" name="Item ID" value="YOURCOLLECTIONINFOHERE">
<input type="hidden" name="Item Name" value="YOURCOLLECTIONINFOHERE">
The form is passing through two values that Zapier will need to make this work. The first is the item ID that we mentioned earlier. The second is the name of the collection item.
When I first started building this, I thought I would just pass through the number of votes from the collection too. But after some thinking and testing, I found out that it was a flawed method.
The problem with that approach is that if I visit the page and the current count is 10 votes and is loaded into the form, and I then walk away for the browser the rest of the day, other people will have added votes while I was away. And when I return to my machine where I loaded the page yesterday and vote, I am removing votes from a product.
So the answer to this question was to use some more advanced Zapier features to make this work. But, before we get to work in Zapier, we’ll need to name our form, publish our project, and then submit the form on one of the collection items one time so Zapier has the data that we need.
Now that you’ve accomplished that, head on over to Zapier to make this work.
Prefer to watch this tutorial?
Build completely custom, production-ready websites — or ultra-high-fidelity prototypes — without writing a line of code. Only with Webflow.
Build completely custom, production-ready websites — or ultra-high-fidelity prototypes — without writing a line of code. Only with Webflow.
Connecting with Zapier
Create a new Zap and make it’s trigger a Webflow form submission.
Here you’ll select your site and the form you submitted before hopping into Zapier. The next step is where it gets a little more advanced, but it’s the magic behind making this work. Use the Webhooks by Zapier tool. And for the action, choose GET.

What you want to get is the number of votes the item has when a user clicks the vote button. To do that, you can use some code from the Webflow Developers site. Specifically, you’re going to use the call to get a single item.
Webflow has sample calls for the API out to the side of the documentation and you can copy the address to get a single item.
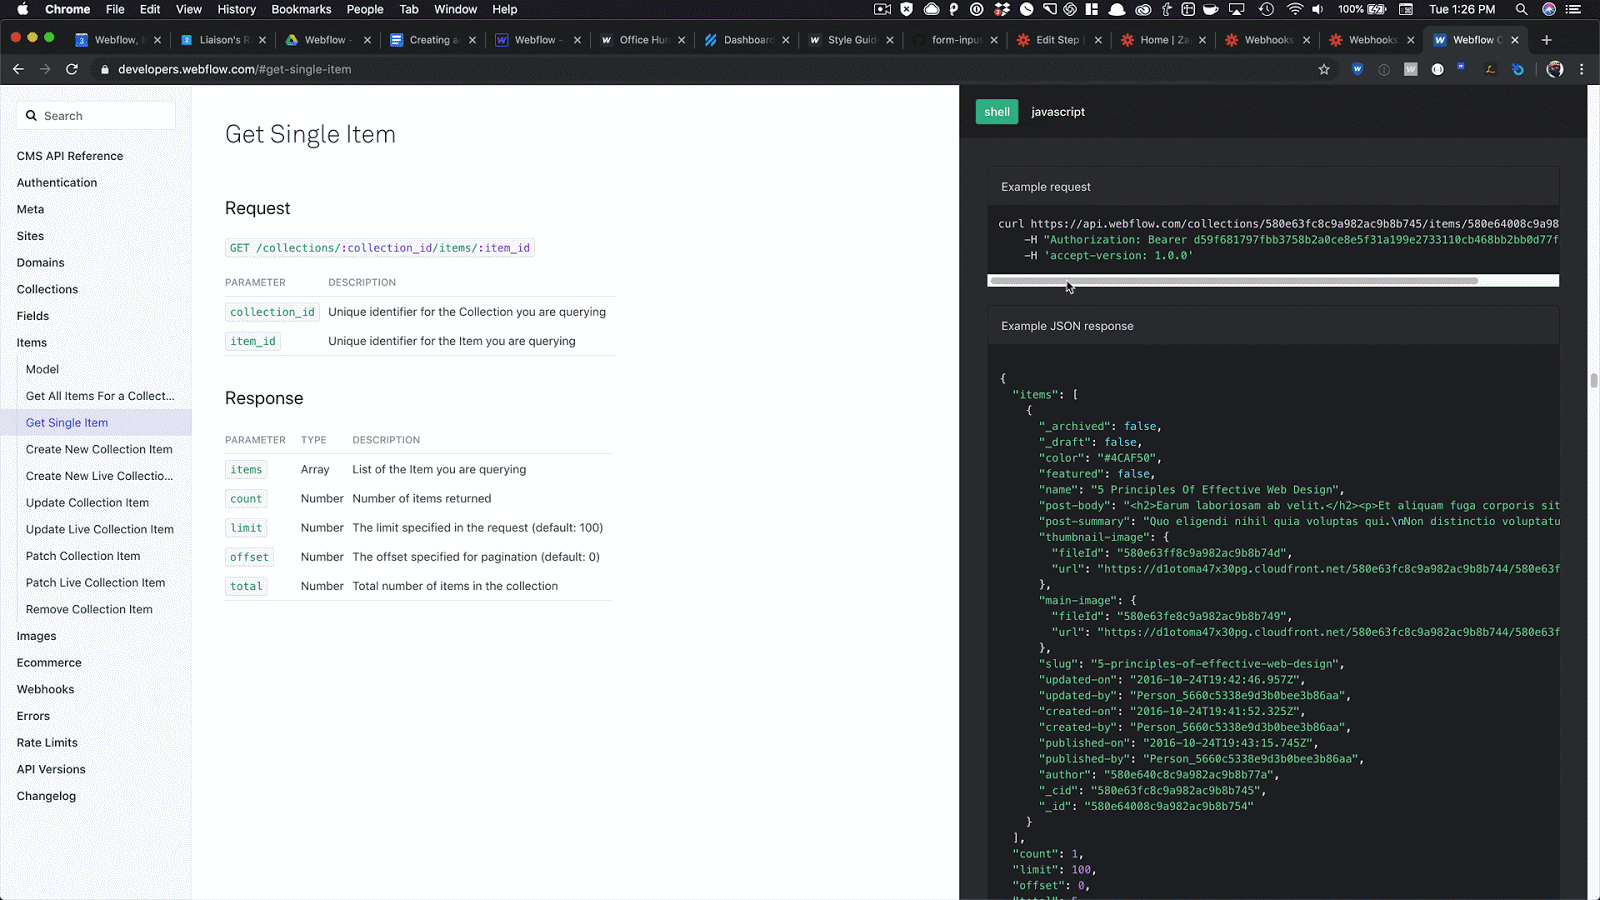
Next, paste this address into the URL box for the GET template in Zapier. And you’re going to make a couple of changes. That first set of numbers you’ll come across is the ID for your collection. Replace that with the collection ID we grabbed when using Postman earlier.
That second set of numbers is the item ID, and you can add that dynamically from the form submission trigger in step 1.
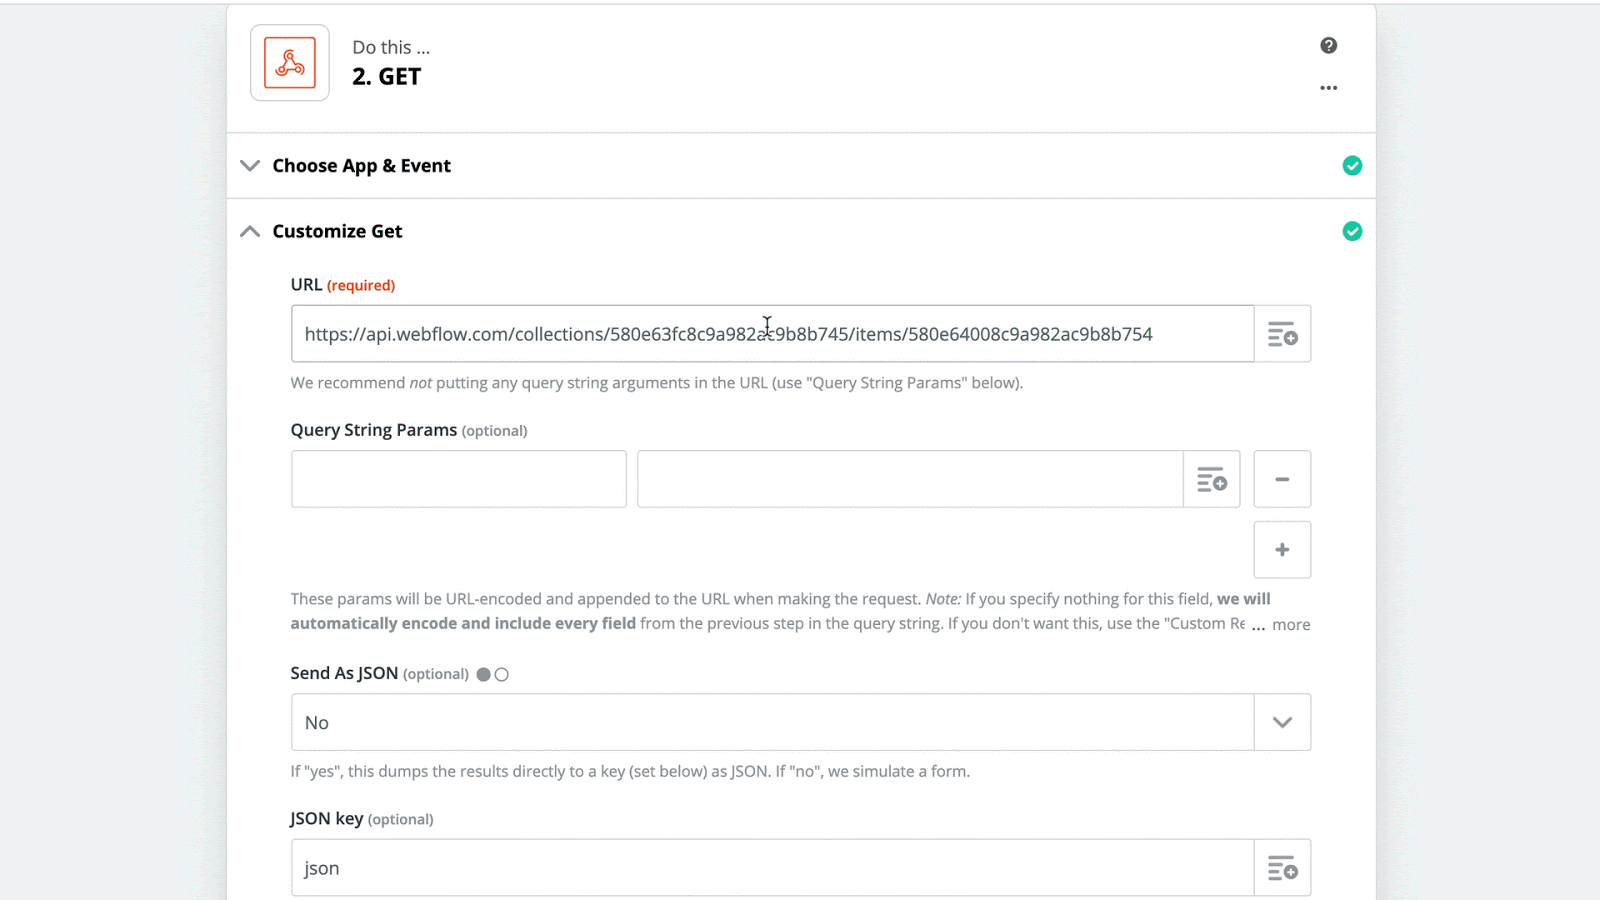
The rest of this Customize GET screen you can leave as is until you get to the bottom and the section labeled “Headers.” In this section, add accept-version as a header and its value should be 1.0.0. The second header to add will be Authorization and its value should be “Bearer” followed by a space and your API key. Here’s a look at how mine is setup.

Test this step and keep moving forward. So far, you’ve grabbed the form submission, and with that GET you grabbed the number of votes the item currently has. Next, you need to add 1 to that number. To do this, use the Zapier Formatter tool.
For the event, choose “Numbers.” Use the add operation from the select box. In the first field, add in the number of votes the item currently has from our GET action in step number two. And then add another field and type in the number 1.
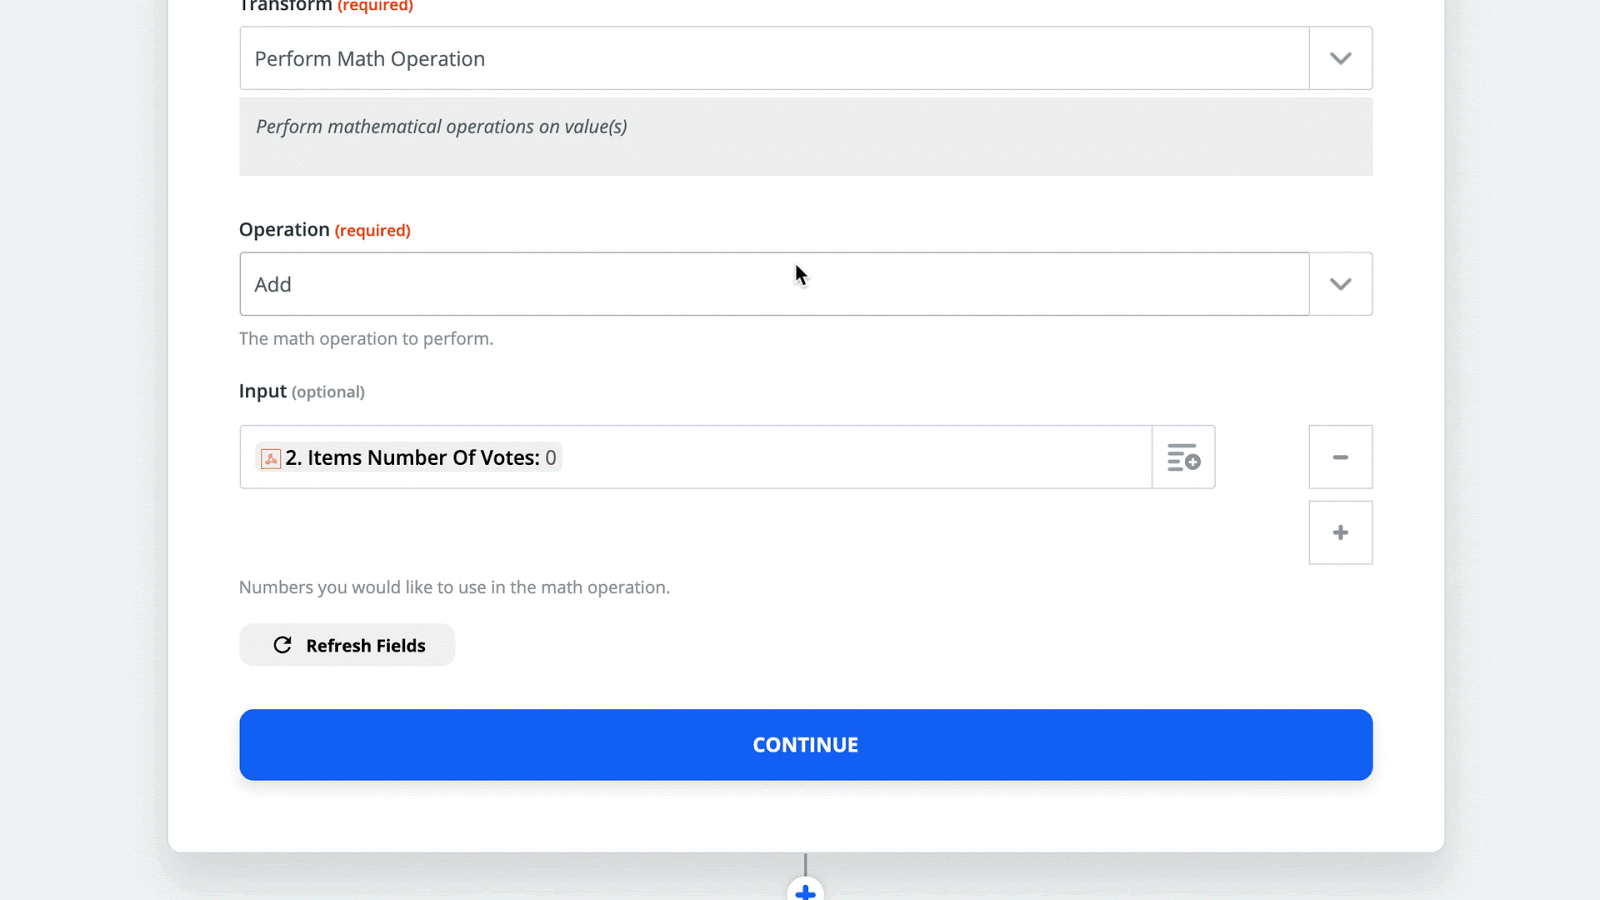
Now, when you continue, Zapier will add the current number of votes with the vote our user just added! Huzzah! My first-grade math teacher would be proud?
Ok, now onto the fourth and final step. Now you want to use that all-important update live item Zap from Webflow. Make sure you choose “Update Live Item” here and not just “Update Item.”
The first will update the item and publish it. The second option will just update the item and you’ll have to log in and publish the site for people to be able to see the changes. And that won’t work in this case.
Select the same site you were using, and the collection as well. Once you have that, fill out the form.

Make sure archived and draft are set to “no,” then click continue and send a test to Webflow.
Once your test goes through, turn on your Zap, and you’re good to go! You have an upvote system built in Webflow. Now, jump back to Webflow and add in the final touches.
When people vote, you want them to know that something is happening. To do this, style the success state of your form so that it’s the same size as your button. Then add a loading GIF to it so when the user submits they're being told that an action is taking place.
Then, in the before body custom code section of the page or site, you’ll add one more script:
<script>
Webflow.push(function() {
$(document).on('submit', 'form', function() {
// Refresh page after 3000 milliseconds
setTimeout(function() { location.reload(true); }, 2000);
});
});
</script>
Republish the site. Now when someone votes:
- They see the form submit
- They are shown a GIF so they know something is happening in the background
- In Zapier, their vote is being added
- And the page refreshes after 3 seconds and shows their vote has been added
One thing you will notice about this setup here is that a user could vote over and over for the same item since we don’t have a login system. I didn’t want to get too detailed in this blog post, but in my real-world version of this, I added custom code to my home page to set an item in local storage when the user clicked on the vote button. Once that item was added, I hid the button from them. They could visit other browsers or devices or clear their cache. But if I wanted a system that bulletproof I probably won’t be using Webflow as a solution.
You can use this for an upvote system, or for other things as well. You could recreate that clap feature that you see on Medium articles, count the number of times someone shared your article on social media, or create your own poll.
If you would like to see how I built this, you can clone the project here.
I can’t wait to see how you take this concept and go make amazing things!


