Have you ever noticed that your computer slows down after two years? The same thing happens to all websites.
Even Webflow sites can slow down as you add more custom scripts, fonts, animations, and general “bloat.”
Website speed affects many things, including user experience, conversation rates, and even your website’s Google rankings. For example, a study from 2022 found that the highest-converting ecommerce websites have load times between 0 and 2 seconds — with conversion rates dropping steadily for each additional second of loading time.
Plus, Google’s 2021 Core Web Vitals algorithm update included website speed amongst ranking factors, meaning slower load times could push your content further down in search results.
Solid site performance is crucial and the platform you choose to build on can make maintaining that performance easier or harder. As a marketer, web designer, developer, and entrepreneur, I’ve built countless sites on countless platforms. After experimenting with different options, I’ve found Webflow to be the best solution for delivering (and maintaining) great site performance.
If you’re already familiar with Webflow’s site performance benefits, skip ahead to the tips for supercharging performance.
How Webflow delivers the best site performance
When it was time for my latest venture, DoorLoop, I was looking for a CMS platform that would make my life easier and prevent me from spending hundreds of hours dealing with outdated themes and plugins, malware, security, and server issues.
What attracted me to Webflow was the ability to create hundreds of landing pages in 1 click by importing a Google Sheet using CMS collections, the ease of use working with the Designer, automated backups, and of course, the extensive collection of free templates in the cloneable showcase.
Webflow was also one of the only options built with speed in mind thanks to Webflow’s blazing fast hosting and selling points such as:
- No code bloat. Webflow’s code is extremely clean and well-optimized.
- No excessive add-ons. Webflow doesn’t offer plugins that add hundreds of lines of code to a website. There are no long CSS stylesheets or any render-blocking JavaScript to worry about. If you run a speed test on a blank Webflow webpage, you get a 100% score every time. This is remarkable, as even blank pages on competing platforms hardly score above 85%.
- Turbocharged servers. Webflow handles all of its hosting with a Tier 1 content delivery network: Amazon Cloudfront and fastly. This eliminates any issues and headaches with managing and maintaining your own servers, downtime, or high server costs.
These elements combine to deliver a website builder that’s created with not just developers, but with the end-user experience in mind. Webflow’s approach to web building was promising, and so far, the platform has definitely delivered.


Build websites that get results.
Build visually, publish instantly, and scale safely and quickly — without writing a line of code. All with Webflow's website experience platform.
How to maintain optimal site performance as the website grows
To continuously deliver the fastest, most effective user experience possible, a lot of A/B testing and hands-on research is needed. Lucky for you, we’ve spent hundreds of hours figuring this out, and we’re sharing it all here.
1. Avoid third-party scripts
Any third-party scripts, chatbots, and tracking scripts will take a major toll on your performance score; LCP and FID all increase dramatically with render-blocking scripts. The key to preventing this from happening is preventing all scripts from loading right away.
This allows you to make your page load faster for speed tests without impacting user experience. In the seconds it’ll take them to engage with any chatbots or third-party scripts on your website, they’ll be fully loaded.
2. Delay scripts with Google Tag Manager
If you aren’t familiar with Google Tag Manager, it’s definitely worth learning about. It allows you to upload and manage tags from across the web for multiple purposes, including:
- Conversion event tracking
- Site analytics
- Remarketing
You can implement these tags based on rules that you determine. For example, you can set it to only load conversion scripts on checkout or confirmation pages.
Google Tag Manager can be used to implement a bulk delay on the load time of all tags on your website by up to 6 seconds after the initial page load (see instructions), or you can delay each tag individually if you want to give your tags different load times.
Sometimes, there are workarounds to get the functionality you need on your website without having to load a third-party script. Always search Google for the script you’re loading to see if there’s a speed-friendly way around it.
Advanced Tip: You can also defer all scripts instead of using async.
3. Use selective loading on mobile vs. desktop
Since mobile websites are usually slower than desktop websites to begin with, it’s a good idea to load certain scripts only on the desktop version of your website. Google also ranks you based on the mobile version of your site.
As a rule of thumb, use the lowest amount of scripts or fancy effects as possible on your website, whether it’s the mobile or the desktop version.
4. Optimize and compress your images
The images on your website can play a huge part in your website’s performance, especially as more and more are added over time. By implementing a few image optimization steps, you’ll be able to set your website up for long-term success.:
Be sure to compress all images using your image compression platform of choice (we like Image Compressor for PNG and JPGs). Smaller image sizes are excellent for website performance because they load quicker than larger images. Just be mindful of image quality — you don’t want to reduce size so much that your images appear grainy.
Additionally, you can also convert your images to WebP — which is a smaller, and more compact image file format that lets you serve high-quality images. Webflow even allows you to convert any existing images in Webflow directly to WebP via their WebP conversion tool.
5. Lazy load images
Lazy loading is the process of loading images onto your website when a viewer scrolls to them instead of right away. Like the hack I discussed earlier with script delays, this allows your website to load up faster without impacting the user interface or experience.
One of the benefits of lazy loading is that it allows you to optimize your images for retina displays, making for larger images without impacting website speed.
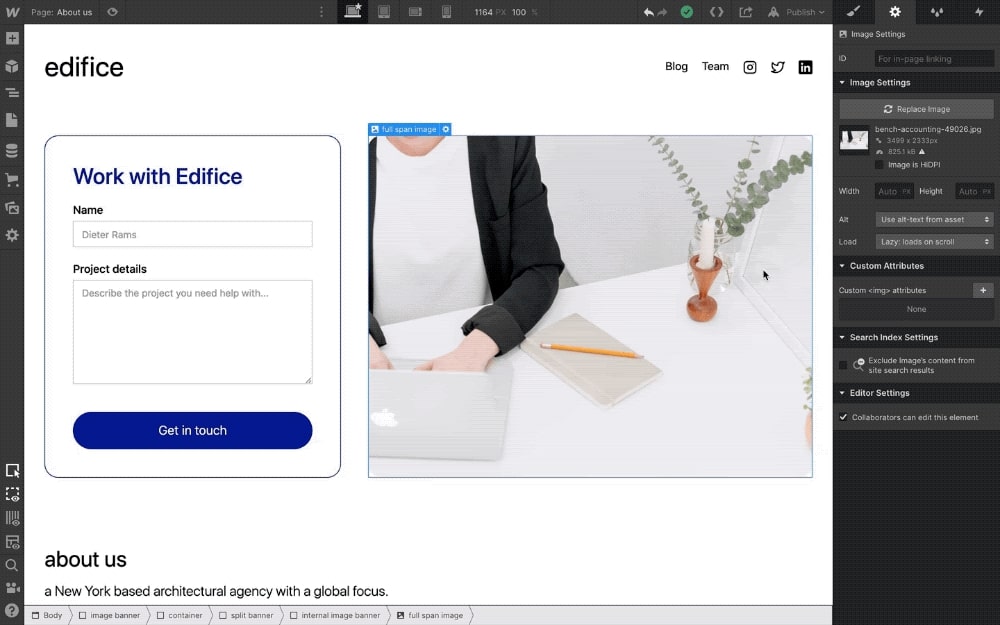
As of August 2020, Webflow has made all new images set to lazy load by default. You can check if your images are lazy loading by clicking on the image, going to the Element Settings panel on the right, and making sure the "Load" is set to "Lazy."

6. Use SVGs
Whenever possible, use SVG images instead of JPGs or PNGs. SVGs are generally much smaller file sizes and have the highest quality possible. Don’t forget to:
- Optimize your SVGs by making them all the same size (for example, 72x72). This reduces the number of combo classes needed to resize them, reducing lines of code in your Cascading Style Sheets (CSS).
- Run all SVG images through an SVG compressor, like this one.
Advanced bonus tip: If you have many SVG images on the hero header of your site, they will usually load right away because the viewer needs to see them (instead of being lazy loaded).
The workaround is to:
- Add an embed code where you want the image to be placed.
- Add the SVG code into the embed.
- If it’s an icon, set the color in the SVG code using currentColor. Create a color swatch for your icons and select that color. Now, anytime you want to change ALL the icon colors on your entire site, just change the color of the swatch.
7. Reduce or remove your fonts
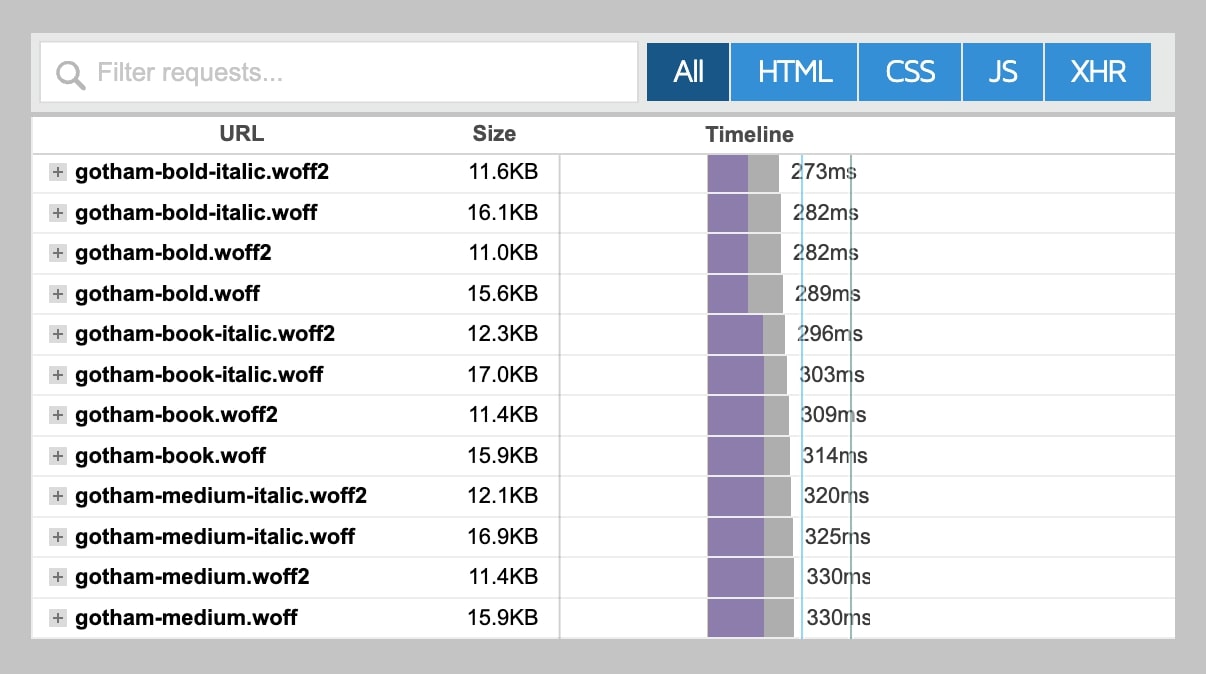
Avoid loading many different fonts on each page. Each font and weight is another server request, inevitably slowing everything else down. Here’s an example of a site with many fonts and even duplicate fonts with 12 requests to the server:

If page speed is your ultimate goal, remove all fonts and only use “system-UI” as your font. This doesn’t load any font at all, it simply loads the default font for the device viewing your site. For example, Segoe UI for Windows, Roboto for Android Phones, San Francisco or Blink for Macs, and Helvetica Neue as a default fallback font.
Doing this is simple: Login to your Designer in Webflow, click the “Navigator" icon on the left, select "Body" on top, on the top right of the Body Styles, select a class and choose Body (All Pages). Then change the Font on the right (under Typography) to system-ui.
This is a major time saver. For example, if you’re using a Google Font, changing to a system-UI font will save you a handful of requests to Google’s servers.
Because a system-UI font makes font loading and rendering unnecessary, it also ensures that text loads instantly onto your pages, saving you crucial seconds of time. This helps to maximize the FID and CLS scores for your website’s Core Vitals Report.
8. Avoid preloads
Preloading is a behind-the-scenes directive to your browser, telling it to load another page before the user clicks on it. For example, if 90% of your visitors go to your Pricing page from your homepage, you can preload it so it loads instantly.
This impacts website speed since it has to load 2 pages: the page you’re on, and the next page. If you’re currently using preloading, you may want to consider turning it off for maximum performance.
Note: preloading is disabled for all links by default in Webflow.
Test, test, test
When supercharging your Webflow site performance, the most important thing to do is test your website’s performance before and after making any changes. If you suspect something will help your website load faster, add it and test it. If you suspect something is making your website slower, remove it and re-test it.
To get started on testing your page speed, check out the following tools:
Testing is the only foolproof way to ensure the changes you’re making are having a positive effect on your website. It allows you to catch potential issues early on and nip them in the bud, in addition to implementing beneficial changes that bolster your performance.


