


Learn how to customize Webflow form notification emails per form.
Webflow moved form notification settings in October 2025 (from Site Settings directly into each Form Block's Settings panel in Designer). If you're following an older tutorial and can't find the settings, that's why.
The change is worth understanding because it unlocks something previously impossible: each form on your site can now have completely independent notification settings.
Your contact form can send to sales@yourcompany.com, your support form can route to support@yourcompany.com, and your newsletter signup notifies nobody; all configured separately, without Zapier or workarounds.
In this guide, we explore where notification settings live in the current interface, every customization field and its limitations, the variable syntax that works and the one limitation that frustrates everyone, and the troubleshooting steps for when notifications don't arrive.
What do you need before customizing Webflow form notifications?
Three things determine what notification features you can access: your Site plan (controls who you can notify), your Workspace plan (controls sender branding), and whether your forms have unique names.
Missing any of these doesn't break the setup. It determines which options are available to you before you start.
Site plan requirement (controls who you can notify)
The free Starter Site plan limits notifications to 5 recipients, and all 5 must be Workspace members. Any paid Site plan, Basic ($14/mo), CMS ($23/mo), Business ($39/mo), or Enterprise, removes this restriction.
You can add unlimited recipients and notify any email address, regardless of Workspace membership.
Workspace plan requirement (controls sender branding)
On Starter, Core, and Freelancer Workspaces, notifications are sent from no-reply-forms@webflow.com with "Webflow Forms" as the sender name. This cannot be customized.
On Growth Workspaces and above, notifications are sent from no-reply@webforms.io with no Webflow branding. The Sender name field in the notification panel lets you set a custom display name on any plan, but your Workspace tier controls the underlying sending address.
Published forms with unique names
Published forms with unique names are essential for managing notifications across sites with multiple forms. By default, every new form in Webflow is named "Email Form".
If you have three contact forms across different pages and all three are named "Email Form", your notification settings still work, but managing them becomes confusing when you're trying to identify which form's settings you're editing.
Name your forms descriptively, for instance, "Homepage Hero Contact", "Footer Newsletter Signup", "Pricing Page Demo Request". These names appear in notification subject lines when you use the {{formName}} variable, making received emails immediately identifiable.
Email address access and permissions
Email address access and permissions matter when configuring recipients. If you're setting up notifications for a client and they want submissions sent to team@clientcompany.com, verify you have permission to add that address.
Some corporate email systems block automated messages from unknown senders, which means your perfectly configured notification might deliver successfully on Webflow's end but be filtered by the recipient's spam filter before anyone sees it.
Test notifications with actual recipients after initial setup to confirm delivery.
5 steps to customize Webflow form notification emails
Customizing notifications means selecting your Form Block, opening the Email Notifications panel, and configuring five fields: recipients, sender name, reply-to address, subject line, and email body.
Each form on your site is configured independently. The whole process takes about 10 minutes once you know where to find the settings.
1. Select your Form Block and access notification settings
Open your Webflow project in Designer and navigate to the page containing the form you want to customize. Your form might be on the main page canvas, inside a section, or nested within other elements.
The fastest way to find it: open the Navigator panel (left sidebar or keyboard shortcut Z), then expand the page structure until you see the Form element. Form elements display with a distinctive icon and the form name you assigned during creation.
Click directly on the Form element to select it. Make sure you're selecting the Form Block wrapper, not individual input fields inside the form. The Selection indicator at the top of the canvas should show "Form" or your custom form name.
If it shows "Input" or "Text Field", you've selected a child element rather than the parent Form Block. Click the form's outer wrapper again.
With the Form Block selected, look at the Settings panel on the right side of the Designer interface. Scroll down past the form name and success/error message settings until you reach the "Send to" section. This section controls where form submissions go when visitors submit the form.
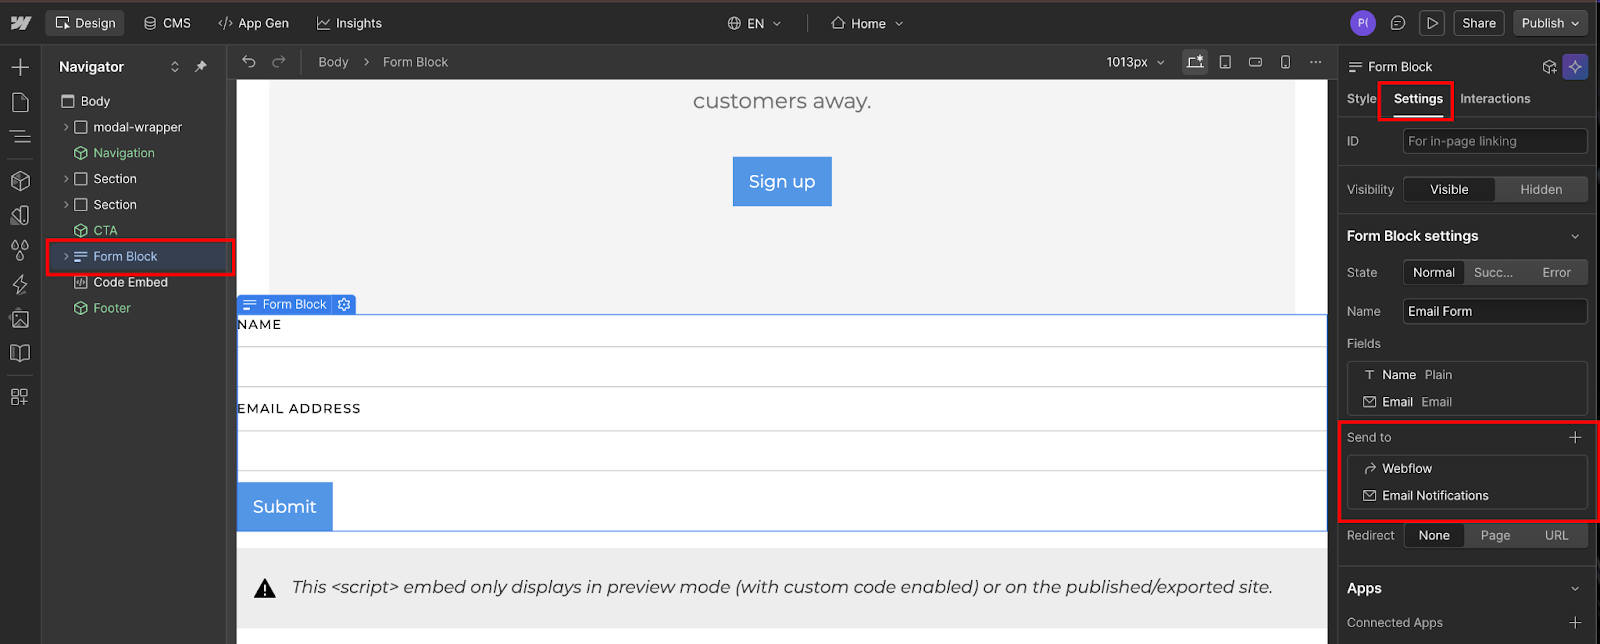
The "Send to" section shows active destinations for this form's submissions.
By default, new forms include two destinations:
- Webflow: Which stores submissions in Site Settings → Forms)
- Email Notifications: Which triggers notification emails
If you don't see "Email Notifications" in the list, click the "+" add icon next to "Send to" and select "Email Notifications" from the dropdown menu.
Click on "Email Notifications" in the Send to list. This expands the notification configuration panel to show all available customization fields.
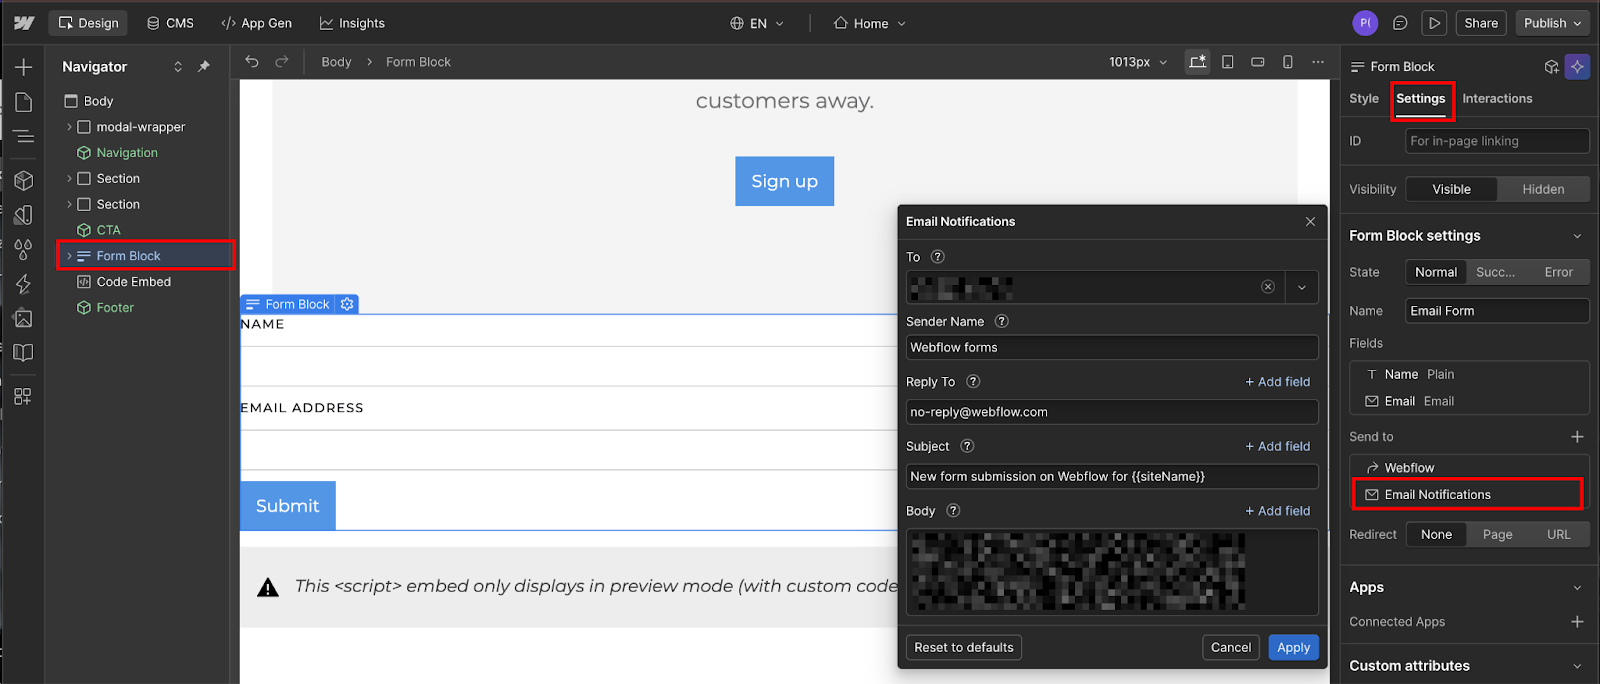
If you've never customized this form's notifications before, the panel displays default values based on your account settings.
2. Configure recipient email addresses and workspace members
The notification configuration panel opens with the "To" field at the top. This field controls who receives email notifications when someone submits this specific form. The field accepts both direct email addresses and Workspace member selections, depending on your site plan.
On paid site plans (Core, Growth, Business, Enterprise), click inside the "To" field and start typing an email address. Webflow displays a dropdown showing matching Workspace members if any exist, but you can also enter any email address directly.
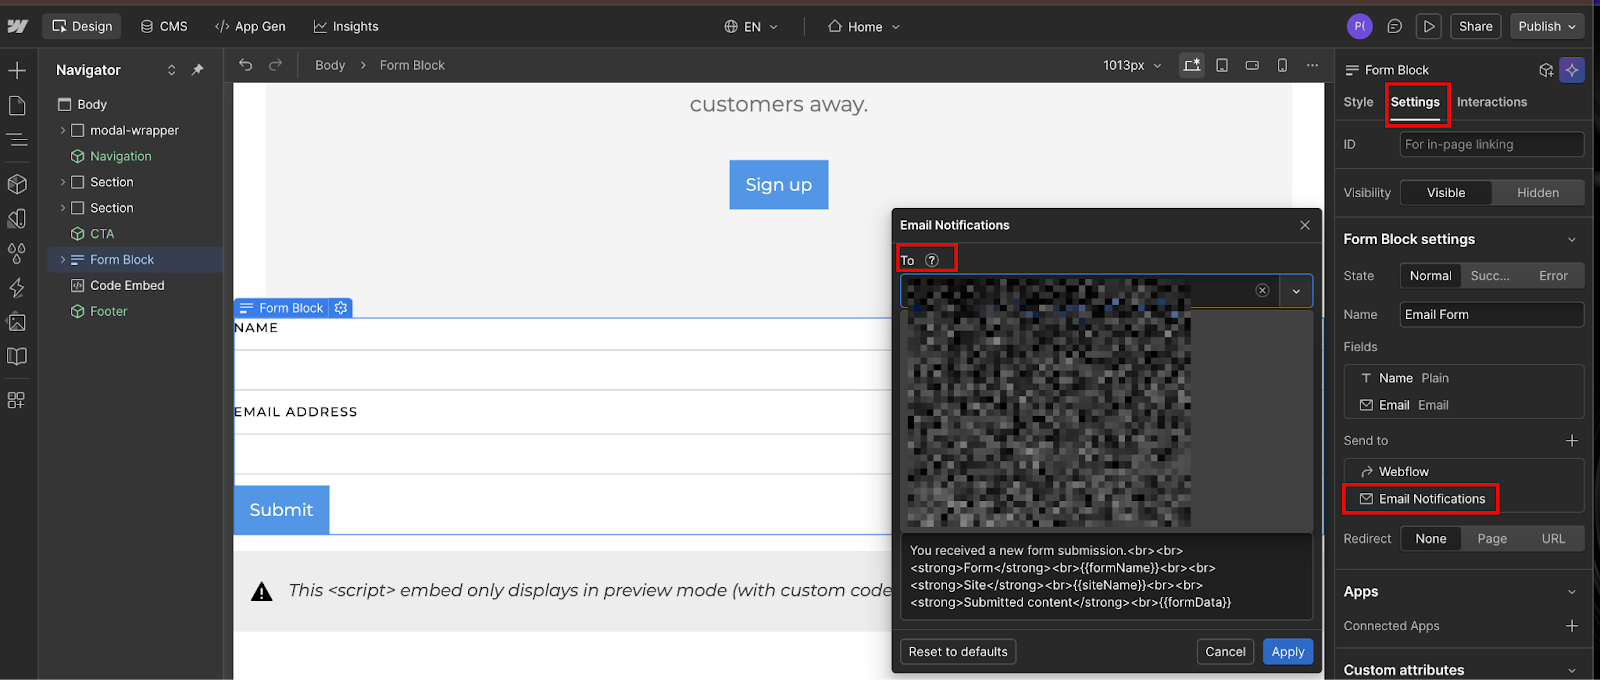
Type the complete email address, then press Return or Enter on your keyboard to add it to the recipient list. The address appears as a tag inside the "To" field.
To add multiple recipients, press Return after entering each address.
Common configurations include:
- Multiple team members, e.g., sales@company.com, admin@company.com, manager@company.com
- Departmental aliases that forward to multiple people internally, e.g., team@company.com, which your email system can route to multiple recipients
Webflow doesn't limit the number of recipients on paid plans. You can add 10, 20, or 50 email addresses if needed, though from my experience, most sites use between 1 and 5 recipients per form.
On the free Starter site plan, the "To" field behaves differently. Click the dropdown icon and select from Workspace members only, as you cannot type arbitrary email addresses. The dropdown shows all members with access to your Workspace. Select up to five members.
If you need to send notifications to someone outside your Workspace on a Starter plan, you must either add them as a Workspace member (which may require upgrading your Workspace plan depending on member limits) or upgrade to a paid site plan to unlock direct email address entry.
If you want to turn off email notifications entirely for this form while keeping submissions stored in Webflow, delete all email addresses from the "To" field. Leave it empty. Webflow continues to capture form submissions and store them in Site Settings → Forms, but won't send notification emails.
This is useful for low-priority forms like newsletter signups, where you review submissions in batches rather than responding to each one individually.
3. Set sender name and reply-to address
Below the "To" field, you'll see the "Sender name" field. This controls what recipients see as the sender name in their email inbox before they open the notification. The default value is typically "Webflow Forms" on free Workspace plans or your site name on paid plans, but you can customize this to anything you want.
Enter a sender name that provides immediate context about where the form submission came from.
The "Reply to" field appears below the sender name and controls where replies go when recipients hit "Reply" in their email client. This is one of the most powerful customization options because it enables direct communication with form submitters without manually copying email addresses.
Click inside the "Reply to" field.
You have two options:
- Enter a static email address
- Use a dynamic form field variable
For static addresses, type the email where you want replies to go (contact@yourcompany.com, sales@yourcompany.com). This works when your team needs all replies centralized in one inbox, regardless of who submitted the form.
Using dynamic variables in the Reply-to field
For dynamic reply-to addresses that change based on who submitted the form, use the form field variable syntax. If your form has an email input field named "Email" (check the field's name attribute in the input field settings), type exactly this in the Reply to field: {{Email}}
When someone submits the form and enters their email as john@example.com, the notification email's reply-to address automatically becomes john@example.com. Your team receives the notification and clicks "Reply", their email client pre-fills the "To" field with john@example.com, and they're immediately in conversation with the lead without extra steps.
Important limitation: the Reply to field accepts only ASCII characters (the standard English alphabet, numbers, and basic punctuation). If your form collects international characters in name or email fields, the variable might not work correctly.
In practice, email addresses are ASCII-only by standard, so {{Email}} variables work reliably even when names contain special characters because email addresses themselves don't include them.
4. Customize the subject line with available variables
The "Subject" field controls what appears in the subject line of notification emails. This is where form notifications often fail to deliver value. Default subject lines are identical across all forms, leading to email threading issues and making it impossible to prioritize submissions without opening each one.
Click inside the "Subject" field and enter custom text that identifies this specific form and provides context about the submission.
Effective subject lines follow patterns like:
- "New contact inquiry from {{siteName}}",
- "Support request submitted via {{formName}}"
- "Partnership form completed on {{siteName}}"
You can use two system variables in the subject line:
- {{siteName}}: Displays your site's name as configured in Site Settings → General
- {{formName}}: Displays the form's name as configured in the Form Block's name field at the top of the Settings panel
Here's the critical limitation that confuses everyone: you CANNOT use individual form field variables in the subject line. Syntax like "New inquiry from {{Name}}" or "Contact request from {{Email}}" will not work.
The subject field limitation means all submissions from the same form produce identical subject lines. If your contact form's subject line is "New Contact Inquiry from Acme Company" and 10 people submit the form, all 10 notification emails will have that exact subject line.


Using subject line workarounds and when to use third-party tools
Workarounds exist but require custom code. Advanced users inject JavaScript into the form that dynamically modifies the form's data-name attribute (which {{formName}} reads from) to include a timestamp or unique identifier.
This creates unique subject lines by making each form submission appear to be a different form name. However, this approach is beyond pure Webflow configuration and isn't officially supported so I won't detail it in this guide focused on native Webflow features.
The practical approach: make subject lines as descriptive as possible, using {{siteName}} and {{formName}}, then rely on your team to check notifications promptly rather than letting them pile up into long email threads.
If subject line differentiation is critical to your workflow (for example, a high-volume support operation), consider third-party form tools like Formspree or JotForm that offer more flexible notification customization, or use Zapier to route submissions to your email system with custom subject line formatting.
5. Format the email body with HTML and form field variables
The "Body" field controls the content of the notification email that recipients see when they open the message. This is where you have the most flexibility for customization. Unlike the subject line, the body supports both individual form-field variables and HTML formatting for structured, readable notifications.
Click inside the "Body" field.
By default, the body uses a prebuilt template that includes labels for the form name, site name, and submitted content, with {{formData}} to handle field values. You can replace the whole thing or build on it.
When someone submits a form with Name, Email, Phone, and Message fields, {{formData}} outputs something like:
Name: John Smith
Email: john@example.com
Phone: 555-0123
Message: I'm interested in learning more about your services.
This default output works functionally but lacks visual formatting and doesn't let you control field ordering or add context around the data. To customize beyond {{formData}}, delete the default variable and build your own email body using a combination of static text, HTML formatting, and individual form field variables.
Individual form field variables follow the pattern {{FieldName}}, where FieldName matches the exact name attribute of your form input. To find a field's name attribute: select the input field in Designer, open the Settings panel, and look for the "Name" field.
Individual form field variables (e.g., {{Name}} or {{Email}}) are not supported in the body field. The variables that reliably work are the system variables:
- {{formData}}
- {{siteName}}
- {{formName}}
- {{formDashboardUrl}}
If you need field-level control over notification content, for example, displaying only certain fields or reordering them, route submissions through Zapier or Make, where you have full access to individual field values.
Testing and email client compatibility
Test your email body formatting by submitting the form with realistic test data and checking how the notification appears in your email client.
Some HTML renders differently across email clients (Gmail handles HTML differently than Outlook, Apple Mail has its own rendering engine). If formatting breaks in certain clients, simplify your HTML until it displays consistently across all clients.
The "Reset to defaults" button appears in the bottom-left corner of the Email Notifications panel. Click this to restore all fields (To, Sender name, Reply to, Subject, Body) to their default values. This is useful when you've experimented with customizations and want to start fresh, or when you're troubleshooting delivery issues and want to eliminate custom configuration as a potential cause.
After configuring all fields, simply close the notification settings panel. Webflow saves changes automatically. Then publish your site (click "Publish" in the top-right of Designer) to make notification settings live.
Notification configuration is stored with the form element, so the changes apply immediately when the site publishes. Don't forget this step. Changes made in Designer don't affect your live site until you publish.
What prevents Webflow forms notification emails from delivering?
Most delivery failures have one of four causes: an empty To field, spam filtering by the recipient's email system, a Starter plan sending to non-Workspace recipients, or a custom form action bypassing Webflow's processing entirely.
Here's how to identify which one you're dealing with.
An empty "To" field
An empty "To" field prevents all notifications and is the most common failure point. If you open notification settings and see the "To" field completely blank, no notifications will be sent even though form submissions are still captured and stored in Webflow.
This happens when someone accidentally deletes all recipient addresses while editing settings, or when migrating forms between Workspaces, where old recipient email addresses are no longer valid in the new Workspace context.
Check the "To" field first when notifications suddenly stop. If it's empty, add recipients back and republish your site.
Spam filter blocking
Spam filter blocking occurs when recipient email systems flag Webflow's notification emails as spam based on the sending domain. For Webflow's sending domains, Webflow may use one of three sending addresses.
The two most common are no-reply-forms@webflow.com (Starter/Core/Freelancer Workspaces) and no-reply@webforms.io (Growth Workspaces and above). Whitelist all three in your email system's safe sender list; Webflow's troubleshooting docs list the full set.
Notifications are delivered successfully from Webflow's perspective (no bounce), but the recipient's email server files them directly into spam folders, where no one sees them.
To diagnose spam filtering, check the recipient's spam or junk folder for emails from Webflow's sending domains. If you find notifications there, you'll need to whitelist Webflow's sending addresses in your email system's spam filter settings.
The exact steps vary by email provider. Gmail uses "Filters and Blocked Addresses" settings, Microsoft 365 uses "Safe Senders" lists, and custom corporate email systems require IT administrator access to modify spam filter rules.
One specific trigger worth knowing: Webflow's own documentation flags role-based recipient addresses (admin@, info@, support@) as more likely to be filtered. If your recipient is support@yourcompany.com and notifications aren't arriving, try routing to a name-based address (jane@yourcompany.com) and testing again.
Workspace plan restrictions
Workspace plan restrictions block notifications on free Starter site plans when recipients aren't Workspace members. This is a hard restriction. On Starter site plans, the 'To' field won't accept external email addresses. The UI returns an error if you try. Only Workspace members can be added as recipients.
The notification system silently skips non-Workspace recipients without error messages. If you're on a Starter site plan and notifications aren't arriving at client email addresses, check whether those addresses are added as Workspace members.
If not, either add them as members (which may require an upgrade to a Workspace plan) or upgrade to a paid site plan (Core or above) to remove the restriction.
Exported sites
Exported sites don't support notifications because Webflow only processes form submissions for sites hosted on Webflow's servers. If you exported your site for external hosting on your own server or another platform, forms won't connect to Webflow's submission processing system.
You'll need to implement a third-party form handler (Formspree, Basin, Netlify Forms) or rebuild form processing with custom backend code on your hosting platform.
Custom form action URL is set
If you've added a custom action URL to your form (pointing to an external endpoint), Webflow no longer processes submissions at all, which means no notifications, no storage in Site Settings → Forms, and no spam filtering. The custom action bypasses Webflow's entire form handler.
Check your form's Settings panel. If there's a URL in the "Action" field, that's the cause. Remove it if you want Webflow to resume processing, or keep it and implement notifications in your external endpoint instead.
You cannot use a custom action alongside Email Notifications. It's one or the other.
Notification limits on high-traffic forms
Notification limits on high-traffic forms can cause delivery delays or failures when forms receive hundreds or thousands of submissions in short periods. Webflow's notification system includes rate limiting to prevent abuse, though exact limits aren't publicly documented.
If your form receives legitimate high-volume traffic (thousands of submissions per hour during a product launch), some notifications may be queued or dropped. Consider implementing webhook integration to external systems that can handle high-volume notification processing more reliably than email.
When native notifications aren't enough
Webflow's built-in notification system covers most use cases — routing submissions to the right inbox, customizing content, and keeping it all inside Designer.
But two things it can't do natively:
- Send confirmation emails to form submitters
- Build conditional routing logic (e.g., "if the inquiry type is Support, notify support@; if it's Sales, notify sales@")
For those workflows, connect your form to Zapier or Make to get full control over notification logic without code.
Frequently asked questions
Can I send a confirmation email to the person who submitted the form?
No, not natively through the notification system. Form notifications are designed for internal team alerts, not outbound communication to submitters. To send a confirmation email to the submitter, you need either Webflow Logic (which has a Send Email action you can trigger on form submission) or a third-party integration, such as Zapier or Make, connected to an email service.
Someone unsubscribed from form notifications. How do I re-add them?
Every Webflow notification email includes an unsubscribe link. If a recipient clicks it, even accidentally, or forwards the email, they're removed from future notifications without any warning to you. To re-add them, go to the form's Email Notifications panel in Designer, re-enter their email address in the To field, and republish your site.
How do I send form notifications to different email addresses for different forms?
Configure each form's notification settings independently. Select the first form, open Email Notifications in the Settings panel, and add recipients specific to that form. Then select your second form and repeat the process with different recipients.
Why do my form notifications suddenly show "Webflow Forms" as the sender name when I've set a custom name?
The Sender name field lets you customize the display name, but if your Workspace is on the Starter, Core, or Freelancer tier, the underlying sending address remains no-reply-forms@webflow.com, and some email clients display the raw sending domain alongside or instead of your custom display name. Upgrading to a Growth Workspace changes the sending address to no-reply@webforms.io and removes Webflow branding from the sender display.


