

Visual Sitemap
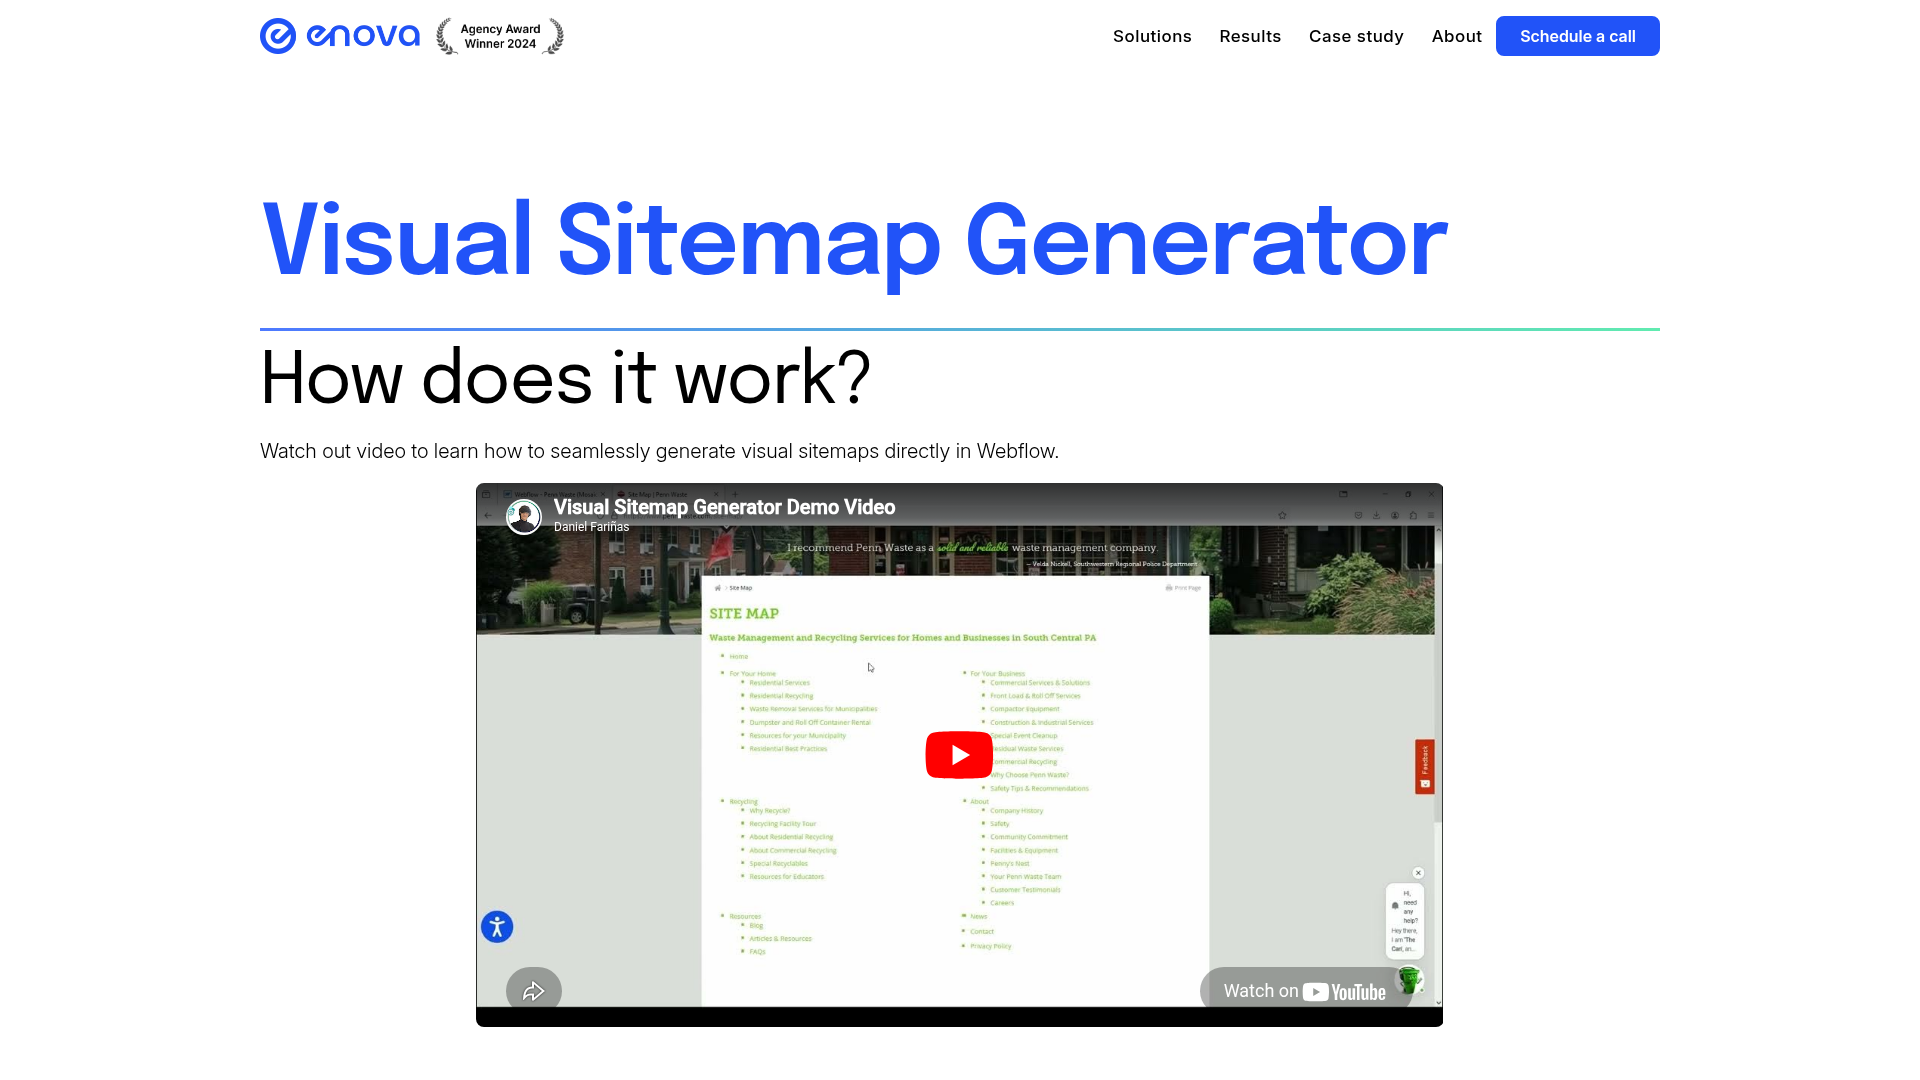
Add Visual Sitemap to Webflow to generate styled HTML sitemap pages directly on your canvas — no code required.

Most Webflow sites have an XML sitemap at /sitemap.xml that search engines read but visitors never see. If you're building a large content site, managing a complex client project, or migrating to Webflow from another platform, an HTML sitemap gives visitors and crawlers a single page listing every URL: organized, clickable, and styled to match your design system. Visual Sitemap automates that conversion. It reads your existing XML file and generates HTML link elements directly on your canvas, where you style and arrange them like any other Webflow element.
What is Visual Sitemap? Visual Sitemap is a Webflow Designer Extension by Enova that generates HTML sitemap elements from an uploaded XML sitemap file. It places structured link elements inside a container you select, creates CSS classes automatically, and lets you style the output using Webflow's native design tools.
How to integrate Visual Sitemap with Webflow
Visual Sitemap connects to Webflow through a single method: a native Designer Extension installed from the Webflow Apps Marketplace, with no embed codes, external scripts, or third-party automation connections required.
For teams that need programmatic sitemap generation, automated updates on page changes, or CMS-driven sitemap pages, the API section below covers how to build those workflows using the Webflow Data API independently of Visual Sitemap.
Install the Visual Sitemap app
Install Visual Sitemap from the Webflow Apps Marketplace. Once authorized for your workspace, the extension appears inside Webflow for any project in that workspace. No custom code in head or body tags is required.
The app requires access to site data and the Designer workflow, as shown in the permissions panel on the marketplace listing.
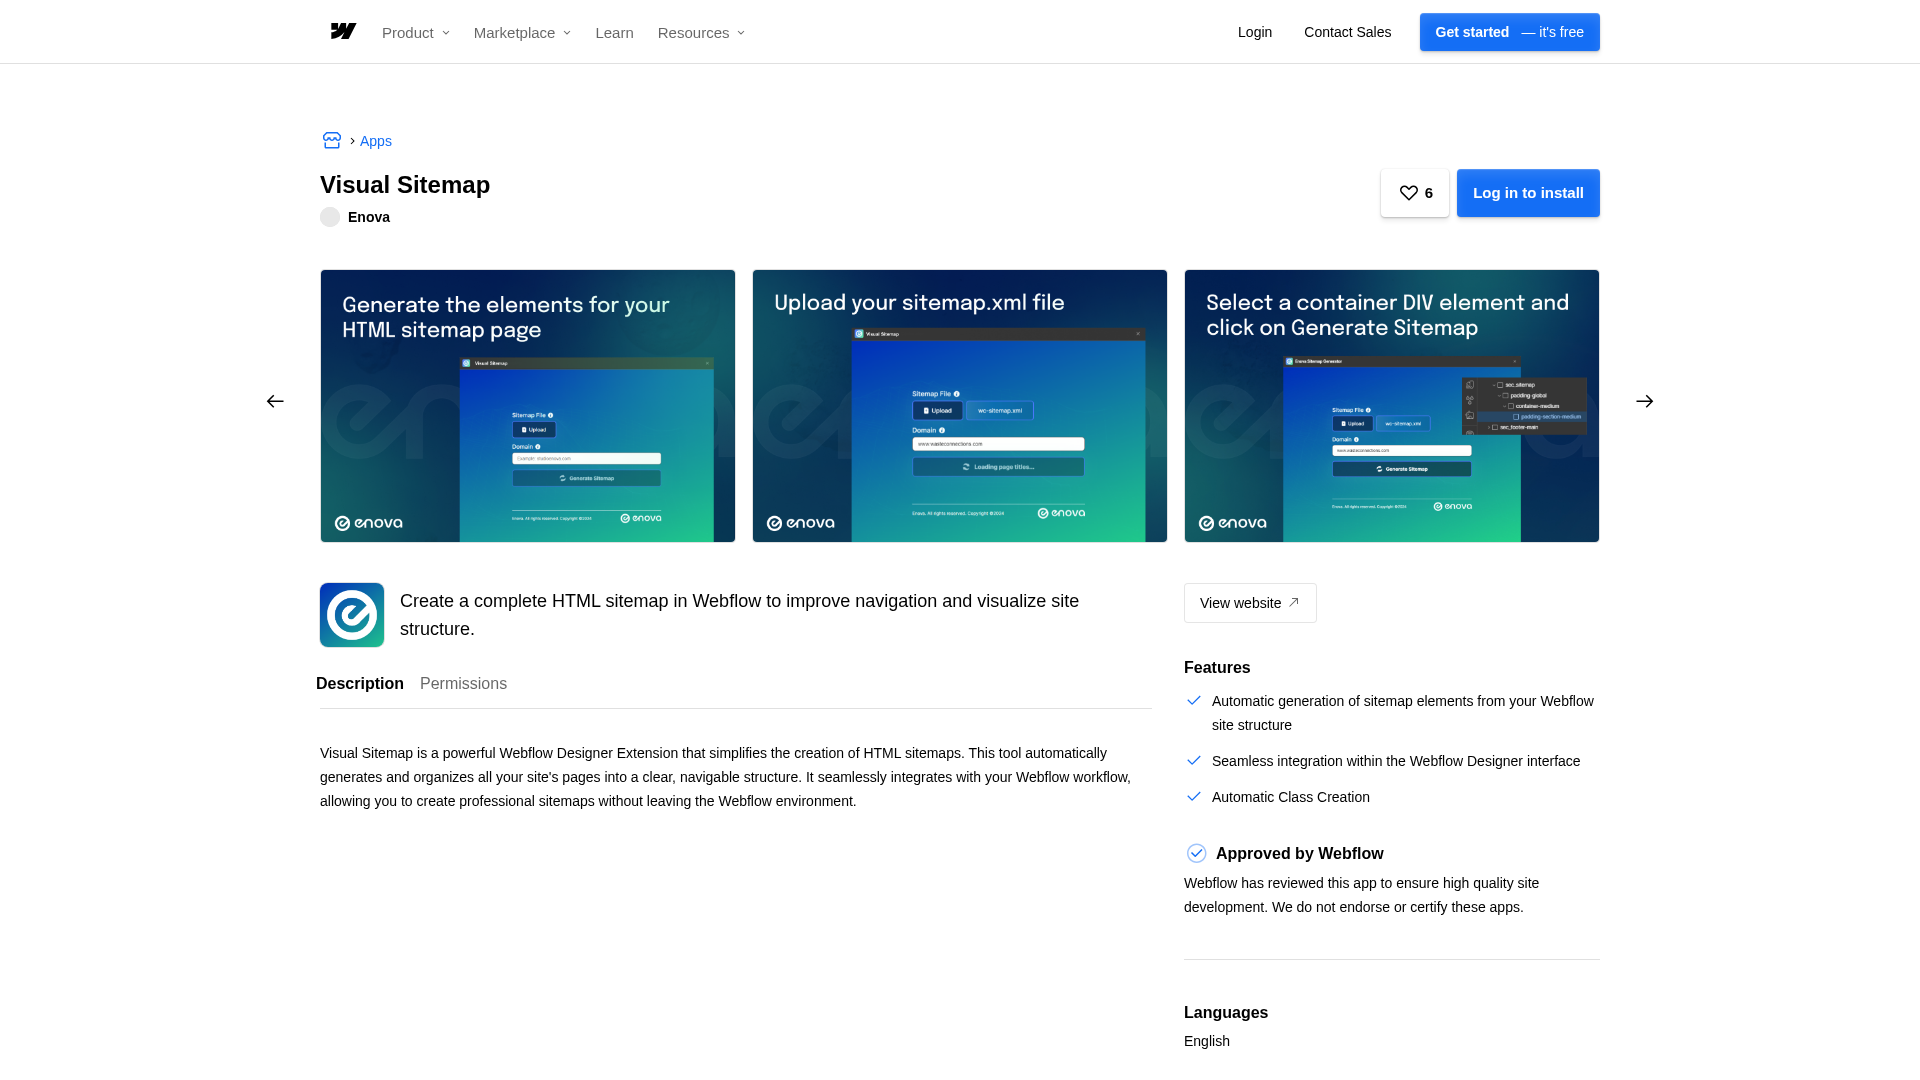
Generate HTML sitemap elements
With the extension installed, the workflow follows four steps:
- Create a dedicated page in your Webflow project where the sitemap will live (commonly
/sitemap). - Upload your
sitemap.xmlfile — Webflow generates one automatically atyourdomain.com/sitemap.xmleach time you publish on a paid site plan. - Select a container DIV element on the page where the sitemap links should appear.
- Click Generate Sitemap. The extension populates the container with organized link elements matching your site structure.
The generated elements behave like native Webflow elements: they appear in the Navigator, carry CSS classes automatically created by the extension, and respond to Webflow's standard styling tools. Adjust typography, spacing, color, and layout using those classes directly.
Visual Sitemap requires a pre-existing XML sitemap file. It reads your structure rather than crawling the site. If you toggle off "Sitemap Indexing" in a page's SEO settings before generating your XML, that page will be excluded from both the sitemap and search engine indexing. Pages that appear in the XML will appear in the HTML output, so review your XML source before generating. The extension renders only on your published site, not in Webflow preview.
Build with the Webflow API
Visual Sitemap has no public API, webhooks, or external endpoints. Teams building programmatic sitemap generation, automated updates on page changes, or CMS-driven sitemap pages construct those workflows using Webflow's own API and webhook system, independently of Visual Sitemap. This approach requires developer resources.
The Webflow Data API provides the following endpoints for sitemap workflows:
GET /v2/sites/:site_id/pages: Retrieve your full site page list, including slugs and parent relationships, to build a programmatic sitemap source.GET /v2/collections/:collection_id/items: Fetch CMS collection items to include dynamic content pages in a custom sitemap build.POST /v2/sites/:site_id/webhooks: Register webhooks forpage_created,page_deleted,collection_item_created, andcollection_item_changedevents to trigger sitemap rebuilds when content changes.POST /v2/sites/:site_id/publish: Publish site updates programmatically after updating sitemap content.
These endpoints give you full programmatic control over what appears in a sitemap and when it updates. Two common patterns follow.
To trigger sitemap rebuilds automatically: set up webhooks to listen for page_created, page_deleted, or collection_item_changed events. When your endpoint receives a payload, fetch the updated page list via GET /v2/sites/:site_id/pages and CMS data via the collections endpoint, regenerate your HTML sitemap content, and push it to a Webflow CMS collection item. This gives you automatic sitemap updates without manual regeneration after every publish.
To build a CMS-powered sitemap page: create a CMS collection that stores sitemap entries — page name, URL, and category. Populate it programmatically via the CMS API from your page structure. Bind a Collection List to this collection on a dedicated sitemap page. This gives you full control over which pages appear, how they're grouped, and their display order, beyond what Visual Sitemap's XML import approach supports.
Both patterns require a server-side environment. You cannot make authenticated Webflow API calls directly from browser JavaScript without exposing credentials. Serverless functions (AWS Lambda, Vercel, or Cloudflare Workers) are the standard setup for this kind of middleware.
What you can build with Visual Sitemap Webflow integration
Integrating Visual Sitemap with Webflow lets you turn an XML sitemap into a styled, visitor-facing HTML page. The API path extends this to dynamic, automatically maintained sitemap pages for sites where content changes frequently.
- SEO-focused HTML sitemap page: Build a dedicated
/sitemappage listing every URL in a clean, hierarchical layout, styled to match your site, giving both search engines and visitors a single crawlable reference point alongside your XML sitemap. - Client documentation page: Generate a styled site overview from the XML sitemap of a completed Webflow project, useful for client handoffs or as an internal reference for teams managing ongoing updates.
- Multi-section navigation hub: Create a categorized directory page for large sites (such as a university, municipal, or multi-brand site) where visitors need a single organized page to locate any section quickly.
- Post-migration audit page: Generate an HTML sitemap from the XML of a newly migrated Webflow site to verify page coverage and catch missing or orphaned URLs before launch.
Frequently asked questions
Install it from the Webflow Apps Marketplace listing. Once installed, the extension is authorized for your entire workspace and appears inside Webflow for any project in that workspace. No custom code or site settings changes are required.
Yes. Visual Sitemap imports an existing XML sitemap to generate HTML elements — it does not crawl your site independently. Webflow automatically generates a
sitemap.xmlfile each time you publish a site on a paid plan, accessible atyourdomain.com/sitemap.xml. You then upload that file to Visual Sitemap to generate the HTML elements. See Webflow's sitemap guide for details on auto-generation and how to exclude specific pages.Not through Visual Sitemap itself. It runs manually inside Webflow and has no API or webhook access. Automated sitemap updates require a custom solution built on Webflow's native tools: use the Webflow webhooks API to listen for
page_createdorcollection_item_createdevents, fetch the updated page list from the Pages API, then regenerate your sitemap content and push it to a CMS collection. That workflow runs independently of Visual Sitemap rather than integrating with it.The generated link elements appear inside the container DIV you select before generating, and they show up in your Navigator panel like any other Webflow element. The extension creates CSS classes automatically, which you can modify from the Styles panel using standard Webflow class-based design tools. The elements are only visible on your published site and do not render in Webflow preview mode.
Description
Connect Visual Sitemap with Webflow to convert your XML sitemap file into native HTML elements inside your project. Install the Designer Extension from the Webflow Apps Marketplace, select a container, and style the output with Webflow's standard design tools.
This integration page is provided for informational and convenience purposes only.

Webflow Templates from ThemeForest
Connect ThemeForest with Webflow to access third-party templates or manually recreate designs in Webflow Designer.
Webflow Templates from Creative Market
Purchase Webflow templates from Creative Market, then, redeem them on Webflow to edit and publish.

StickPNG
Connect StickPNG with Webflow to access 56,000+ transparent PNGs directly in your Designer Assets panel.

Responsive Webflow CMS Templates
Explore HTML5 responsive templates powered by the Webflow CMS for your business, portfolio, or blog.
Responsive Ecommerce Website Templates
Get responsive ecommerce templates and customize them visually. Launch with Webflow Hosting.
Premium Webflow Templates
Buy premium HTML5 responsive website templates, then customize them in Webflow without code.
Free Website Templates
Get the best free HTML5 responsive website templates, then customize them in Webflow without code.
Related integrations
Get started for free
Try Webflow for as long as you like with our free Starter plan. Purchase a paid Site plan to publish, host, and unlock additional features.
