


Connect Unsplash's image library to Webflow e-commerce sites using serverless proxies to keep API credentials secure while displaying dynamic product imagery.
Connecting Unsplash's image library to Webflow e-commerce sites requires a server-side proxy to securely store API credentials while displaying dynamic images. This guide covers authentication patterns, data flow, and implementation approaches for production deployments.
Purpose and scope
This integration lets e-commerce sites source product imagery from Unsplash's library while maintaining proper attribution and API compliance.
At a high level, this integration supports:
- Searching Unsplash's photo library with filters for orientation, color, and content type
- Displaying images dynamically on product pages and category listings
- Updating Webflow CMS items with external image URLs via API
- Meeting Unsplash's attribution and hotlinking requirements
The integration requires a serverless proxy layer because Webflow's custom code runs client-side, and API credentials must never be exposed in browser-accessible code, per the official Unsplash API guidelines.
Integration architecture overview
The recommended architecture uses a serverless function (like Cloudflare Workers) as a secure intermediary between your Webflow site and the Unsplash API. This keeps API credentials on the server side and prevents client-side exposure.
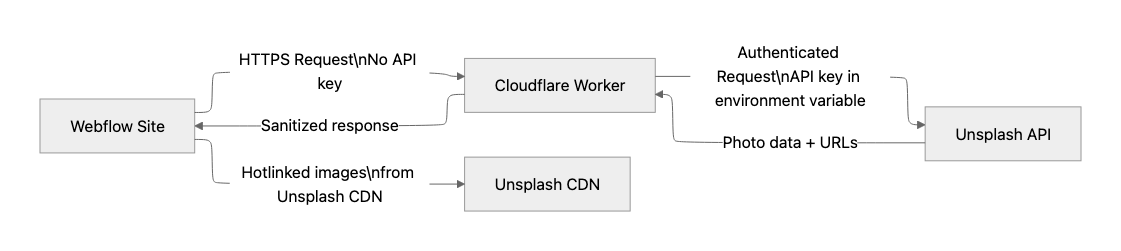
This pattern keeps API credentials on the server while allowing your Webflow custom code to request image data. The Webflow site then hotlinks directly to Unsplash CDN URLs for image delivery.
Data flow between systems
Understanding how data transforms between Unsplash and Webflow helps you design your CMS schema correctly.
Unsplash photo object structure:
{
  "id": "photo-abc123",
  "alt_description": "laptop on wooden desk",
  "urls": {
    "raw": "https://images.unsplash.com/photo-abc123",
    "regular": "https://images.unsplash.com/photo-abc123?w=1080",
    "small": "https://images.unsplash.com/photo-abc123?w=400",
    "thumb": "https://images.unsplash.com/photo-abc123?w=200"
  },
  "user": {
    "name": "Jane Photographer",
    "username": "janephoto",
    "links": {
      "html": "https://unsplash.com/@janephoto"
    }
  },
  "links": {
    "download_location": "https://api.unsplash.com/photos/abc123/download"
  }
}
Webflow CMS item payload:
{
  "fieldData": {
    "product-image": "https://images.unsplash.com/photo-abc123?w=1080",
    "image-attribution": "Photo by <a href=\"https://unsplash.com/@janephoto?utm_source=your_app&utm_medium=referral\">Jane Photographer</a> on <a href=\"https://unsplash.com/?utm_source=your_app&utm_medium=referral\">Unsplash</a>",
    "photographer-url": "https://unsplash.com/@janephoto?utm_source=your_app&utm_medium=referral"
  }
}
Your CMS collection should include text or link fields for attribution data and image URLs.
For external images from Unsplash, store image URLs in text fields rather than image fields, since Webflow image fields are designed for uploaded assets. You can use the CMS API or CSV import to populate these text fields with external image URLs.
If using CSV import, ensure URLs end with valid file extensions (.jpg, .png, .gif, .svg, .webp, .avif). See Webflow's CMS field documentation for detailed field type specifications.
Step 1: Set up your Unsplash developer account
You need an Unsplash developer account and a registered application to obtain API credentials.
At a high level, you'll:
- Create an account at https://unsplash.com/oauth/applications
- Register a new application with your Application Name, Description, Website URL, and Redirect URI
- Obtain your Access Key (Client ID, used for public authentication) and Secret Key (for OAuth token exchanges, kept confidential)
New applications start in demo mode with a 50 requests/hour limit.
Apply for production mode to access 5,000 requests/hour after implementing proper photographer attribution and using hotlinked image URLs.
Step 2: Deploy a serverless proxy function
The proxy function serves as a secure intermediary that authenticates with the Unsplash API using server-side credentials while returning sanitized image data to your Webflow site.
The proxy handles three core responsibilities:
- Request validation: Accepts parameters from your Webflow site (like search queries and pagination) while filtering any potentially malicious input
- Authenticated forwarding: Adds the Authorization: Client-ID header using credentials stored in environment variables before forwarding requests to Unsplash
- Response sanitization: Returns only the necessary image data (URLs, attribution information, alt text) with appropriate CORS headers for your Webflow domain
A minimal proxy implementation validates incoming parameters, constructs an authenticated request to Unsplash's search endpoint, and returns the response with CORS headers restricting access to your specific Webflow domain.
You can store your Access Key using Wrangler secrets rather than hardcoding it. For complete implementation patterns and deployment instructions, see the Cloudflare Workers documentation.
Step 3: Integrate with Webflow
Webflow provides three official methods for displaying external images, each suited to different use cases.
Method 1: Client-side rendering with custom code
To display dynamic images, add JavaScript to your page's custom code section that calls your secure proxy to render images.
The client-side code should:
- Fetch data from your proxy endpoint (never directly from Unsplash)
- Parse the response and extract image URLs, alt descriptions, and attribution data
- Create image elements with proper src, alt, and loading="lazy" attributes
- Append images to a designated container element in your Webflow layout
This approach keeps all API authentication on the server side while enabling real-time image updates driven by user interactions or URL parameters.
Custom code requires a paid site plan. For implementation details and code placement options, see Webflow's custom code documentation and site plans documentation.
Method 2: CMS population via API
For product catalogs, you can update CMS items with external image URLs using the Webflow CMS API v2. The v2 API supports bulk updates of up to 100 items per request, allowing you to populate product images from external sources like Unsplash while maintaining proper hotlinked URLs.
Method 3: CSV import
For initial data population, Webflow's CSV import supports importing external image URLs directly into image fields. However, imported URLs do not automatically generate responsive variants, which is critical for product images requiring cross-device performance optimization.
Step 4: Configure API authentication and rate limits
Both APIs require specific header configurations and have documented rate limits you must respect. Configure authentication and understand rate limits before building your integration.
Unsplash API authentication
All Unsplash API requests require an Authorization header.
For public authentication using your Access Key, use:
Authorization: Client-ID YOUR_ACCESS_KEYFor OAuth 2.0 user-specific actions, use:
Authorization: Bearer ACCESS_TOKENThe Unsplash API documentation covers the complete authentication flow, including OAuth 2.0 for user-specific actions.
Primary endpoints for e-commerce
Search photos returns filtered results matching your product categories:
GET https://api.unsplash.com/search/photos
  ?query=laptop
  &orientation=landscape
  &color=white
  &per_page=30

Authorization: Client-ID YOUR_ACCESS_KEY
Accept-Version: v1
Note: The per_page parameter has a maximum value of 30. For more results, use pagination with the page parameter (default: 1).
The orientation parameter (landscape, portrait, squarish) helps maintain consistent layouts. The color filter supports brand palette consistency.
Random photos provide dynamic imagery for hero sections through the random endpoint, which accepts optional parameters including:
- query to narrow selection (e.g., "minimal", "luxury")
- orientation to specify landscape, portrait
- squarish, count to retrieve up to 30 images (default: 1)
- content_filter for brand-safe imagery selection
GET https://api.unsplash.com/photos/random
  ?query=minimal
  &count=5
Note: When count>1, this endpoint returns an array of photo objects. When count=1 or unspecified, it returns a single photo object instead. The maximum count value is 30.
Also, download tracking must be triggered whenever an image is downloaded or displayed:
GET https://api.unsplash.com/photos/:id/download(where :id is replaced with the unique photo identifier)
This endpoint is mandatory for API compliance.
Webflow CMS API Authentication
According to the Webflow Authentication Documentation, all Webflow CMS API operations require Bearer token authentication:
Authorization: Bearer YOUR_TOKENToken Types:
- Site tokens: Obtained from Site Settings > Apps & Integrations > API Access (recommended for single-site implementations)
- OAuth tokens: For applications requiring multi-site access (requires full OAuth authorization flow)
Rate limit handling
The API returns rate limit headers (X-Ratelimit-Limit, X-Ratelimit-Remaining, X-Ratelimit-Reset) for monitoring. Implement exponential backoff when you receive HTTP 429 responses.
Step 5: Implement attribution requirements
Unsplash API usage requires visible attribution linking to both the photographer and Unsplash. The required attribution format must include both the photographer and Unsplash in the following HTML structure:
Photo by <a href="https://unsplash.com/@photographer?utm_source=your_app_name&utm_medium=referral">Photographer Name</a> on <a href="https://unsplash.com/?utm_source=your_app_name&utm_medium=referral">Unsplash</a>
Key requirements:
- Credit both the photographer AND Unsplash platform
- Include UTM parameters with your application name
- Direct links to the photographer's profile and Unsplash homepage
Store attribution data in dedicated CMS text fields and render them alongside images using custom code embeds with HTML and dynamic field binding.
Step 6: Verify integration success
Confirm your integration works correctly by validating each component against expected behaviors.
Proxy verification
Your serverless function should return successful responses when queried directly.
Key indicators of correct proxy behavior include:
- HTTP 200 status codes with proper CORS headers, allowing your Webflow domain
- Response payloads containing Unsplash photo objects with urls, user, id, and alt_description fields
- Rate limit headers (X-Ratelimit-Limit, X-Ratelimit-Remaining) present in responses
For debugging serverless functions, see the Cloudflare Workers debugging documentation.
Webflow integration verification
On your published Webflow site, verify the integration maintains proper security and functionality:
- Requests route through your proxy (not directly to Unsplash), visible in browser DevTools Network tab
- Images load from images.unsplash.com (confirming hotlinking compliance)
- Attribution links include UTM parameters with your application name
For troubleshooting client-side code issues, see Webflow's custom code documentation.
API compliance verification
Review your implementation against the Unsplash API Guidelines checklist:
- Attribution is visible for all displayed images
- Images hotlinked from Unsplash CDN
- Download endpoint triggered for download actions
Troubleshoot common issues
Several technical constraints affect Webflow integrations with external image APIs. Plan for these constraints when building your integration.
CORS errors: Webflow cannot modify server headers for CDN-served assets. When encountering CORS errors with canvas element image processing, implement a reverse proxy or serverless function that adds appropriate CORS headers. See the Mozilla CORS documentation for header specifications.
External image limitations: When using external URLs in Webflow CMS image fields, responsive image variants are not automatically generated, CDN caching and optimization features are bypassed, and URLs must end with valid file extensions (.jpg, .png, .gif, .svg, .webp, .avif). For responsive delivery, use Unsplash's URL-based resizing parameters and serve appropriate sizes via srcset attributes in custom code.
Rate limit exceeded: Unsplash's demo mode limit of 50 requests per hour is insufficient for production sites. Apply for production access (5,000 requests per hour) before launch. Implement server-side caching to reduce API calls for frequently-requested queries.
Advanced considerations
Production deployments at scale require additional infrastructure patterns, automation workflows, and multi-locale support strategies.
Scaling for high-traffic sites
For sites exceeding 5,000 image requests/hour:
- Implement response caching at the proxy layer using Cloudflare Workers Cache API
- Pre-populate CMS items with image URLs during off-peak hours using the Webflow CMS API v2 bulk operations
- Request higher Unsplash rate limits with documented traffic projections
Batch workflows with automation platforms
Make.com's Unsplash integration provides 17 actions and 12 search modules for image sourcing workflows. However, Make.com offers no Webflow triggers, meaning Webflow events cannot initiate these workflows directly.
This integration is suitable for batch operations triggered by external events or scheduled tasks, such as importing curated product images into Webflow's CMS via the API.
Multi-locale implementations
The Webflow CMS API v2 supports a cmsLocaleId parameter for multi-language sites. You can maintain locale-specific attribution text while using hotlinked image URLs across locales. See the Webflow CMS API localization documentation for parameter details.
Additional resources


