The simplest features can sometimes make the biggest difference.
Adding a basic form to your website enables communication to flow both ways between you and your customers. Forms let you gather customer information and allow customers to interact with your business in more direct ways.
Google Forms is a simple tool with powerful features and many use cases for all sorts of websites. By embedding Google Forms into your webpages, you can make your site more useful.
The benefits of embedding forms in your website
Forms have many useful functions. Embedding a form into the pages of your website looks more professional than giving an outside link, and it keeps visitors on your website instead of sending them elsewhere.
Lead generation
Embed a form into your website to capture leads. Visitors can sign up for newsletters or promotional downloads. They can also get access to content upgrades like webinars, ebooks, and white papers. With a lead-generating form, visitors give you their contact information, giving you the opportunity to turn a website visit into a sales conversion later on.
Contact forms
You can add a contact form to your website, giving visitors a way to provide you with feedback or ask a question about your business. Adding a contact form means visitors stay on your site instead of moving to a second platform to email you, reducing bounce rates.
Registration forms
You can use a form to register visitors for website accounts or give them access to events. If you’re holding an online or in-person event, users can register to attend. If you’re offering a limited-availability product, users can register for pre-sale.
Surveys
Embed a survey into your site to gather customer feedback. Custom logic lets you refine the information you’re gathering from each user, so they are given different questions based on previous responses. This way, you can use surveys to understand your customers’ needs and preferences better.
Make a quiz!
Quizzes are fun and interactive. You can add one to your site simply to delight visitors, or you can add a quiz that helps users find the perfect product type for their needs. A form might help someone select the perfect fit for a pair of jeans or the right type of mattress for their sleeping style.


Build websites that get results.
Build visually, publish instantly, and scale safely and quickly — without writing a line of code. All with Webflow's website experience platform.
Why use Google Forms
Google Forms has some distinct advantages over other form types. Some website-building platforms have their own built-in form-building capabilities — you can learn more about Webflow’s in this video. However, unlike built-in forms, a Google Form can be created without an attached website and then shared elsewhere on the web, allowing you to collect information from multiple sources. You can then use Google’s tools to analyze or compile all the responses.
Google Forms is free to use (though you can get a paid Google Workspaces plan if you need more storage space). The forms are easy to create and extremely customizable, both in format and field options. You can add custom logic so that users are presented with different fields based on their previous responses. This allows you to get more nuanced or complex information.
A Google Form is also automatically responsive, even when embedded. That means your visitors can use it on any device, including smartphones, and the form will still be functional and retain the same design aesthetic. Google also has high standards for user security, so its forms are secure, private, and encrypted.
How to add a Google Form to your website
Here’s how to build out your form in Google Forms, design its appearance, and then embed it into your site wherever it’s needed. Since Google Forms is a separate system from your site builder, any changes you make will automatically apply to your embedded form, and the responses you receive will all get funneled back into Google Forms’ Responses tab.
Build your form fields
Open up Google Forms and create a new form. You can start from scratch or use a template. At the top, you have an area to add a title for your form and any additional information the user needs.
Follow best practices for designing web forms, including giving users very clear information about what the form is for and what you’ll be doing with their personal information.
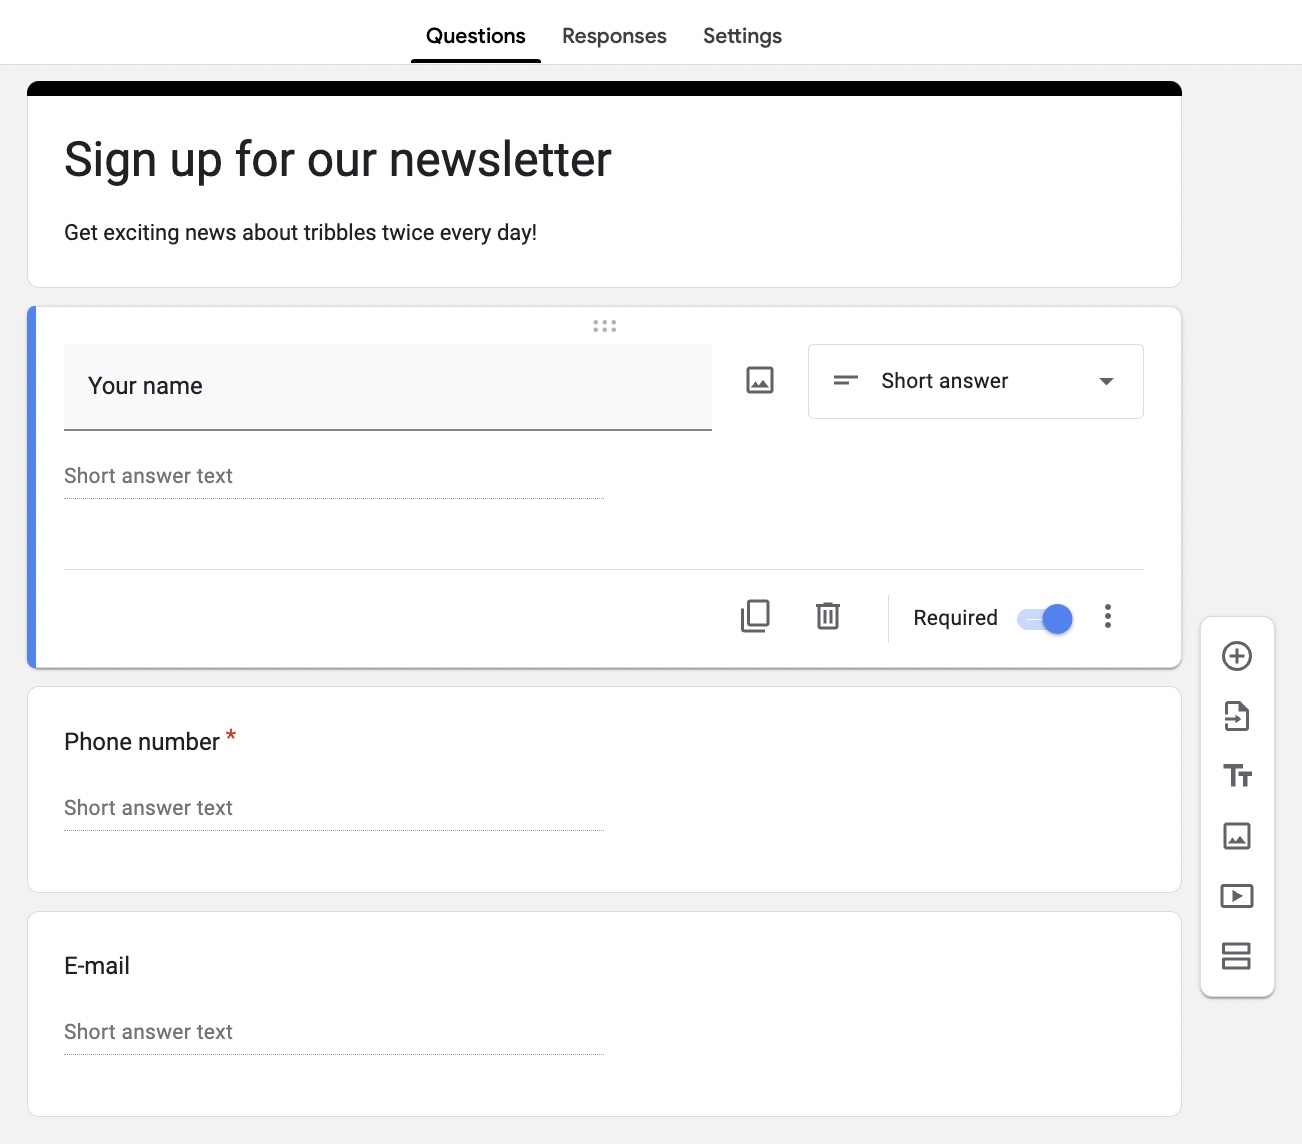
You can then add fields to your form. It will automatically choose a format based on your title, but you can change this to suit your needs. Field options are:
- Short answer
- Paragraph
- Multiple choice
- Checkboxes
- Dropdown
- File upload
- Linear scale
- Multiple choice grid
- Checkbox grid
- Date
- Time
A newsletter sign-up might only need a single short-answer field, while a customer survey will require many fields of different types. You can also adjust your settings to make some fields mandatory or optional and add links or images.
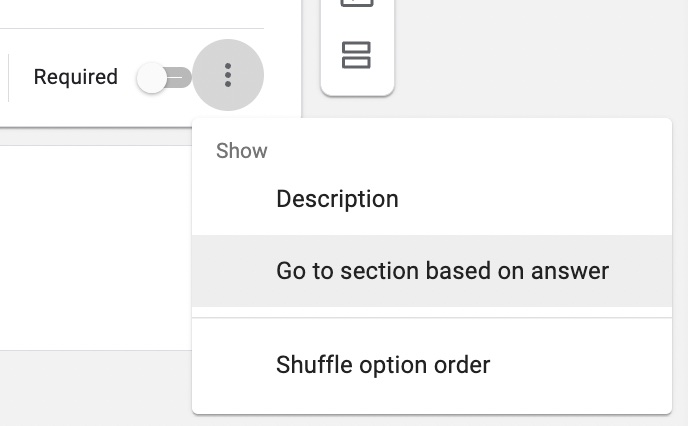
The three dots in the lower right-hand corner allow you to add logic by going to different fields or options depending on the user’s response.
Design your form’s appearance

The paint palette icon located in the upper right allows you to customize the appearance of your form. You can choose colors, fonts, and images. While these options are fairly basic, you can still make your form match the design of your webpage as closely as possible.
Get your embed code
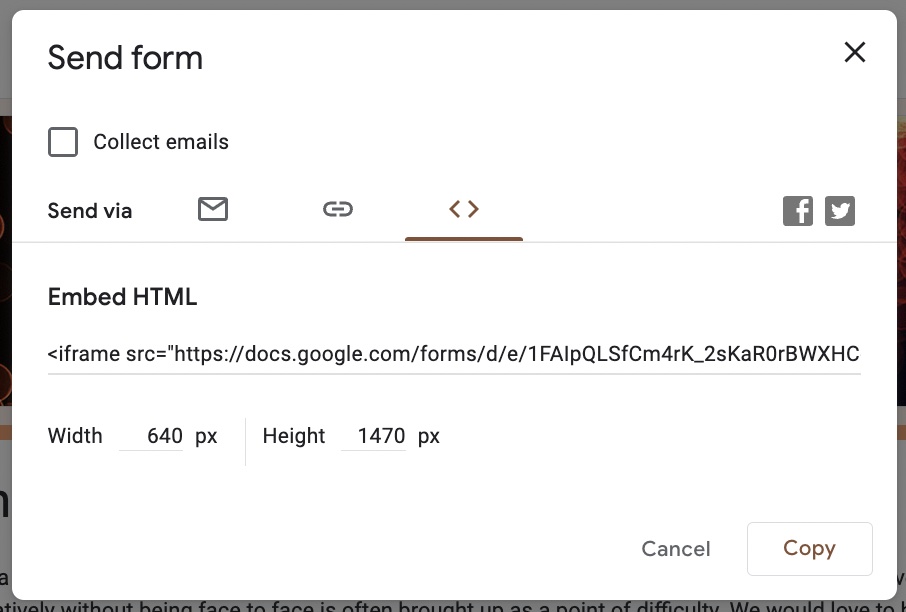
Once your form is complete and published, you want to get your embed code. First, click “Send” in the top right corner of Google Forms. The third option listed under “Send via” has the two chevrons that indicate “Embed.” Click these.
This will give you access to the embed HTML code for your form. Choose the size you want for your embedded form and hit “Copy.”
Embed your form in your website
Embedding your form into your website is simple on most website platforms, but each tool has a slightly different method for doing so.
In Webflow
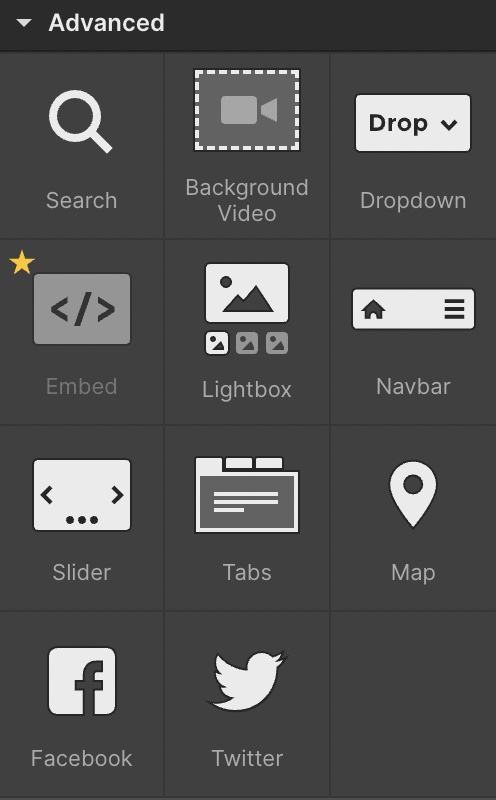
In Webflow, the Embed option is at the bottom of the Elements tab under “components.” You will need a paid Webflow account or active site plan in order to use advanced functions like embedding HTML.
Add a div block to your design, click “Embed,” and drag it into your div block. This will trigger a pop-up where you can paste your Google Form embed code. Save, close the window, and hit publish to see your form.
In other website builders
Depending on the website builder you’re working with, the embed option might be built into the platform or require a third party plugin.
This option is usually found under an “embed” menu. Once you locate the embed menu in your website builder, you can paste the embed code from Google forms into the field that appears on your page. From there, you can preview what it will look like and then publish the page to make the form functional.
Make your website more effective with Google Forms data
Once your form is embedded and your site is live, responses will begin coming in from visitors, which you can view in your original Google Form under the Responses tab. Forms will give you automatic summaries with charts for certain types of questions. You can also set it up to download data into Google Sheets or whatever analytics or record-keeping tools you choose.
The responses to your forms can give you valuable connections to your customers, allowing you to understand their needs better and get the information you need to improve your user experience.
Forms are an incredibly easy way to make your site more professional, more functional, and more useful.


