


Learn how to link Webflow forms to HubSpot using the native app.
Webflow and HubSpot connect natively through the HubSpot app — no Zapier middleware, manual CSV exports, or hand-coded form submissions. The integration supports three distinct connection methods, depending on your HubSpot plan and the level of design control you need over the form itself.
This guide covers the form mapping approach: keeping your existing Webflow forms exactly as styled while routing submissions directly into HubSpot's CRM. Form submissions post to Webflow first, then automatically sync to HubSpot.
Here's what we'll cover: the prerequisites you need before starting, the exact process to map Webflow forms to HubSpot, how to troubleshoot when field mappings break or submissions disappear, and the specific scenarios where you'd choose form mapping over embedding HubSpot forms directly.
3 integration methods to link Webflow forms to HubSpot with the native app
The HubSpot native app offers three ways to connect forms depending on your HubSpot plan and design requirements. Form mapping is the fastest and works on any plan. Developer embed gives the most styling control but requires Professional or Enterprise.
Choose based on how often your marketing team needs to edit form fields, and whether you have text-only inputs or complex field types:
On privacy compliance: HubSpot's tracking code sets first-party cookies to identify returning visitors and track behavior across sessions. For sites serving EU users or operating under GDPR/CCPA, your consent management platform (CookieHub, OneTrust, etc.) won't automatically detect HubSpot's tracking.
You'll need to either integrate it with HubSpot's cookie banner API or use HubSpot's native consent banner with your Webflow domain added to HubSpot's consent settings.
Form submissions without tracking consent still reach HubSpot, but they won't associate with visitor session data or page view history. If your contact's timeline shows zero page views despite multiple form submissions, it typically means visitors declined cookie consent or blocked third-party scripts via browser extensions.
What do you need to link Webflow forms to HubSpot using the native app?
Four things need to be in place before you start: active accounts on both platforms with the right permission levels, a published Webflow form with at least one test submission, a matching HubSpot form, and custom code access on your Webflow plan.
Missing any of these causes silent failures — the app installs fine, but form data doesn't flow.
Webflow requirements
Webflow requirements begin with a published site that includes at least one form. The form must have a unique name; duplicate form names cause mapping failures because Webflow's API fetches forms based on most recent submissions, and identical names create ambiguous references.
I've debugged this exact issue on six different client sites where marketing teams duplicated footer newsletter forms across pages without changing the form name attribute.
Each form field needs an HTML Label element, not just a placeholder or visual label. This is where 90% of initial setup problems occur. Webflow displays a "Field Settings" panel where you enter the field's name attribute, but the integration specifically requires separate Label elements with matching text.
The Label element lives in Webflow's Add Panel under the Forms section. You drag it into your form, position it near the corresponding input, then ensure the Label's text field exactly matches the input field's name attribute.
If you're starting from scratch, Webflow's default Form Block already includes correctly structured Label elements. This only becomes an issue if you've rebuilt form fields manually or stripped Labels out.
HubSpot requirements
HubSpot requirements include an active HubSpot account with access to the forms you want to connect. Free HubSpot accounts support basic form mapping and iframe embeds. Developer embed functionality, which provides the best styling control, requires HubSpot Marketing Professional ($890/month) or Enterprise ($3,600/month) plans.
Create a matching form in HubSpot before mapping Webflow fields. The HubSpot form doesn't need to be published anywhere, but it must exist in your forms library with the exact field names you intend to map.
Domain verification
Domain verification becomes relevant when you want HubSpot's tracking code to capture page view data.
Navigate to HubSpot Settings → Tracking & Analytics → Tracking Code, then add your Webflow domain to the "Additional Site Domains" list. Sites created in HubSpot accounts after November 2022 must also be added to external domains in the consent management settings under Privacy & Consent.
Webflow plan restrictions
Custom code access is required to install the HubSpot tracking code on your Webflow site. This is available on paid Workspace plans (Core, Growth, Agency, or Freelancer) and on paid Site plans (CMS, Business, or Ecommerce).
Free Starter plans don't support custom code injection, which prevents the HubSpot tracking code from loading even if the app installs successfully.
5 steps to link Webflow forms to HubSpot using the native app
The full connection involves installing the app, authenticating both accounts, mapping form fields through Webflow's Site Settings, enabling HubSpot's non-HubSpot form collection, and verifying data reaches HubSpot's contact database.
Each step must be completed in sequence.
Step #1: Install the HubSpot app in your Webflow workspace
Open your Webflow project in the Designer, then click the Apps & Integrations icon (puzzle piece) in the left sidebar.
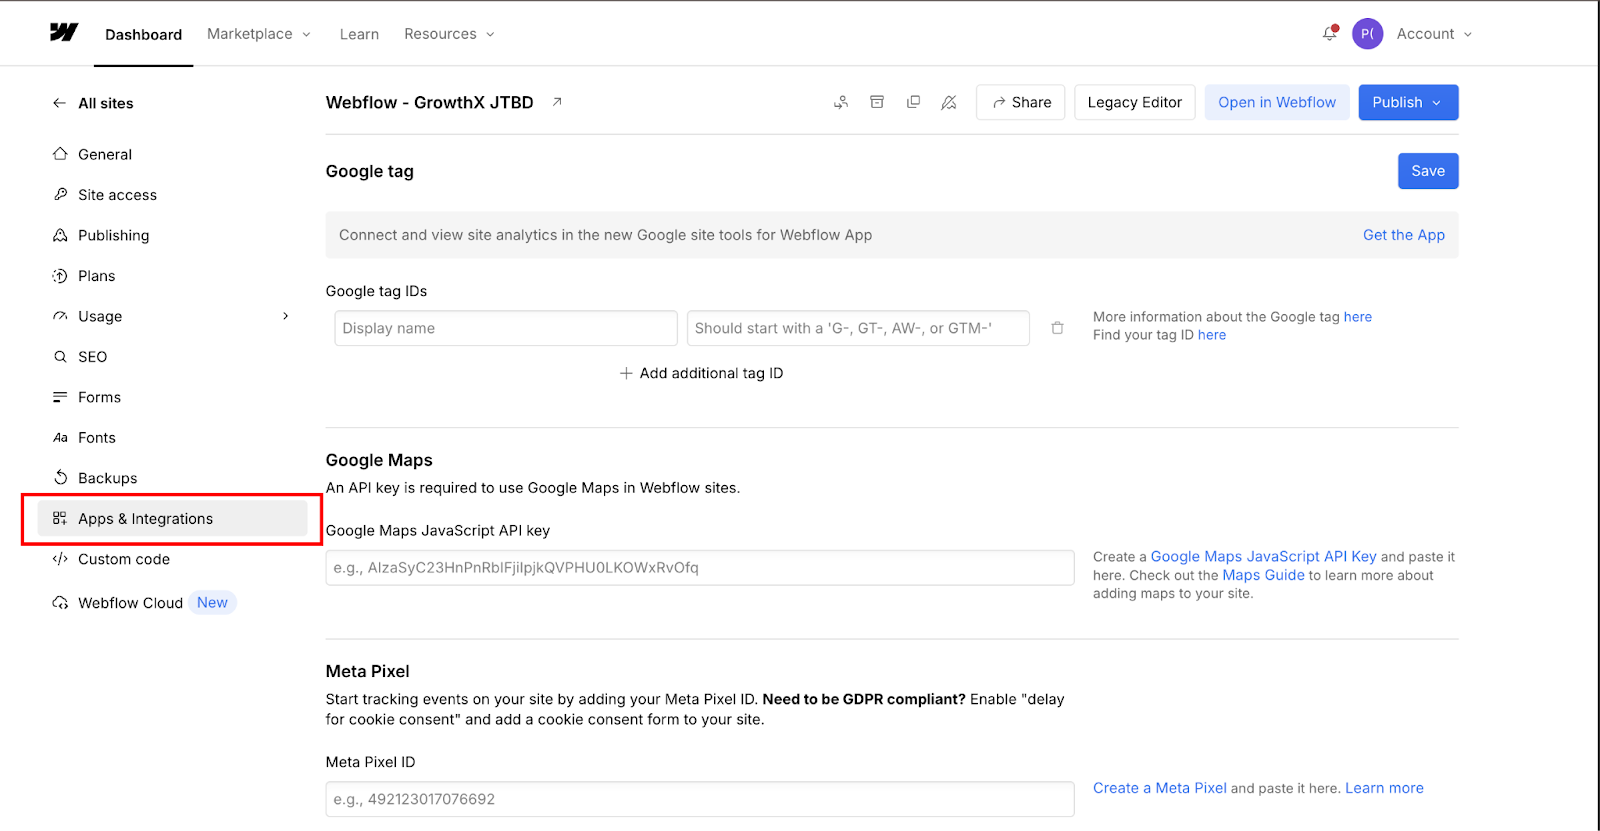
Scroll to Connected Apps and Click on “Find an App”. Search for "HubSpot" in the Apps panel search bar and select the official HubSpot app.
Verify it shows "Approved by Webflow" and "Enhanced security" badges to confirm you're installing the certified integration rather than a third-party alternative.
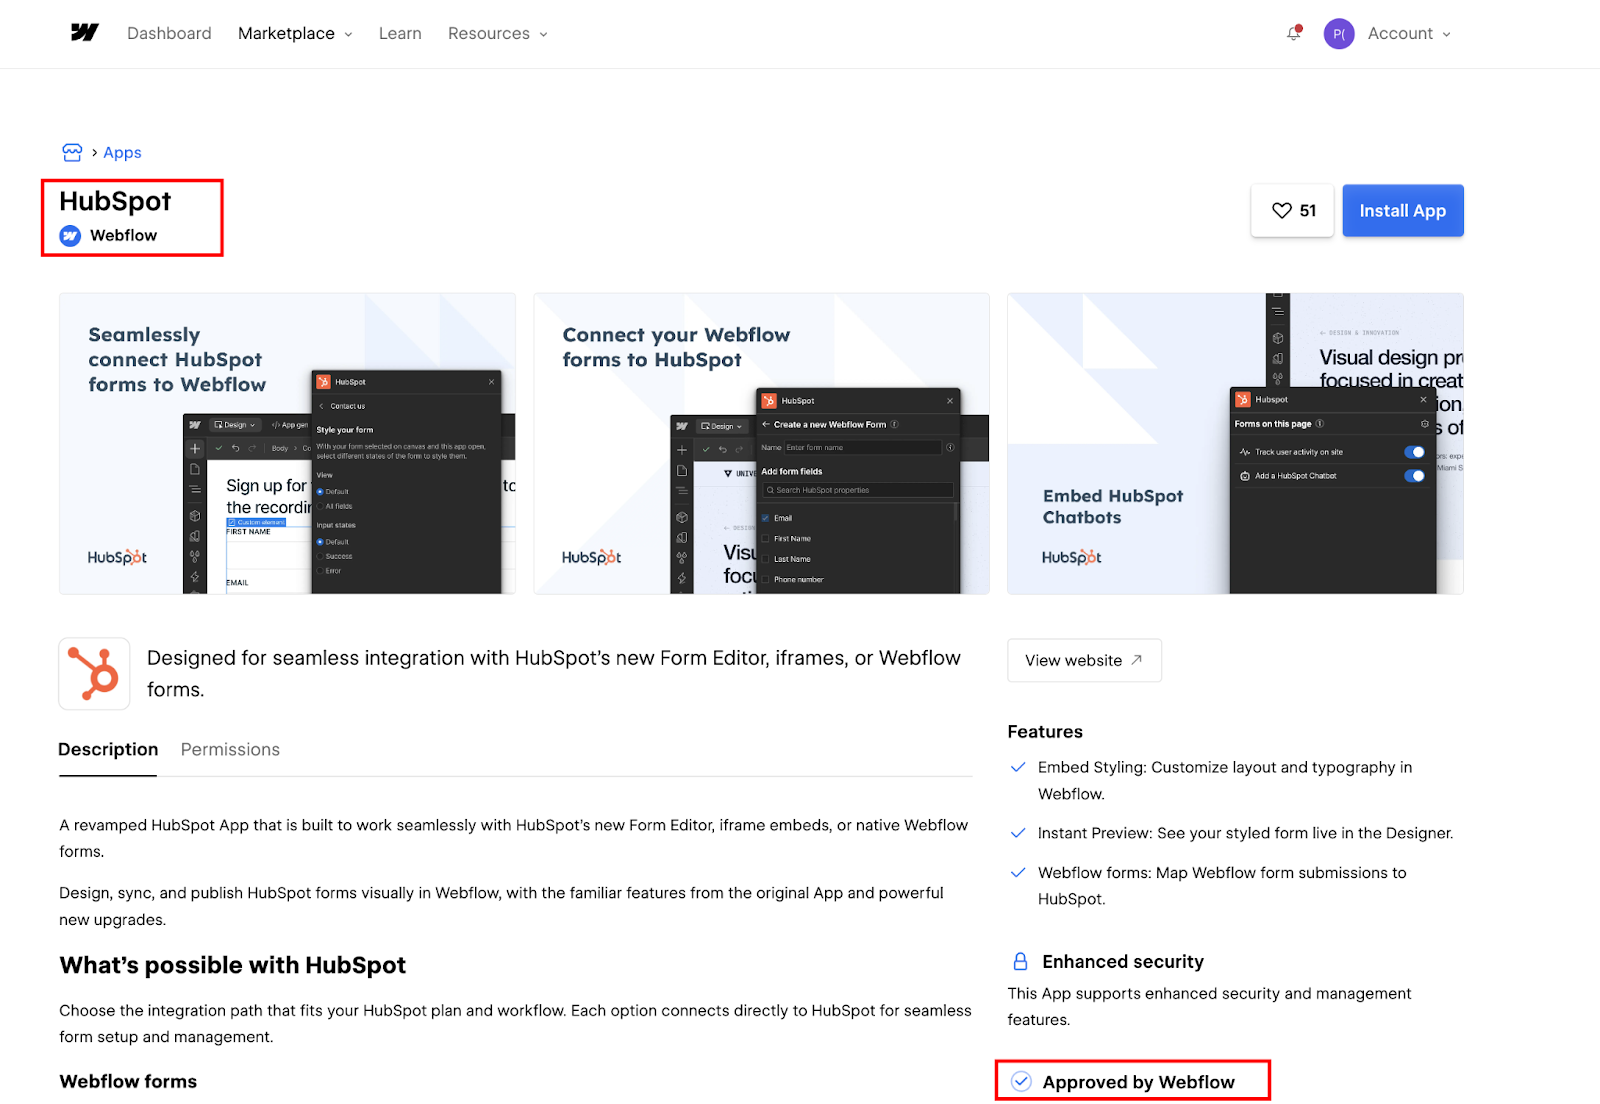
Click Install app, then select the specific Webflow site you want to connect. The app connects at the site level, not the Workspace level. You must select individual sites during installation. This site-level scoping means agency teams managing multiple client projects need to install and authorize separately for each site.
The installation process redirects you to HubSpot's authorization page, where you'll grant Webflow access to specific HubSpot resources. Review the permissions carefully: the app requests access to forms, contacts, tracking data, and file assets.
Click "Choose account" to select which HubSpot portal connects to this Webflow site, then click "Connect app" to complete OAuth authentication.
One important note for agency teams: if you ever need to disconnect and reconnect the HubSpot app (account transfer, portal switch, reinstall), you'll also need to delete and re-add the form integration on any previously connected sites. Reconnecting the app alone won't restore existing form mappings.
After authorization completes, you'll return to Webflow's Designer with the HubSpot app installed. The app appears in your Apps panel with a green "Installed" indicator. Don't try mapping forms immediately. The app needs at least one form submission on your published site before field detection works correctly.


Step #2: Publish your Webflow site and create a test form submission
Navigate to the Webflow page containing the form you want to connect, then click Publish in the top-right corner. Select your publishing target (staging domain or custom domain), wait for the publish process to complete, then open your live site in a new browser tab.
Locate the form on your published page and fill out every field completely. Partial submissions or empty fields can cause field mapping issues during step 4. Use realistic data that matches the expected format for each field type.
Submit the form and verify that the Webflow success message appears. Check Webflow's Site Settings → Forms tab to confirm the submission logged correctly in Webflow's form submission database.
This test submission serves two purposes: it allows Webflow's API to detect which forms exist on your site, and it populates the field list that the HubSpot app uses during mapping.
If you're setting up multiple forms, create test submissions for each one before proceeding to mapping. The app can only detect forms that have received at least one submission on the published site. Forms that exist in the Designer but haven't been submitted yet won't appear in the mapping interface.
Step #3: Enable non-HubSpot form collection in HubSpot
The HubSpot native app works by leveraging HubSpot's "non-HubSpot forms" feature, which automatically captures submissions from any HTML form on your site once the tracking code is installed. You need to enable this feature in HubSpot before form data will flow from Webflow.
Log in to your HubSpot account and click the Settings gear icon in the top-right corner. In the left sidebar navigation, expand the settings menu and navigate to Tools → Marketing → Forms. This opens HubSpot's forms management area.
At the top of the forms page, you'll see multiple tabs. Click the "Non-HubSpot Forms" tab. This section controls whether HubSpot automatically detects and captures submissions from external forms that aren't built in HubSpot's form builder.
Locate the toggle labeled "Collect data from website forms" and set it to ON.
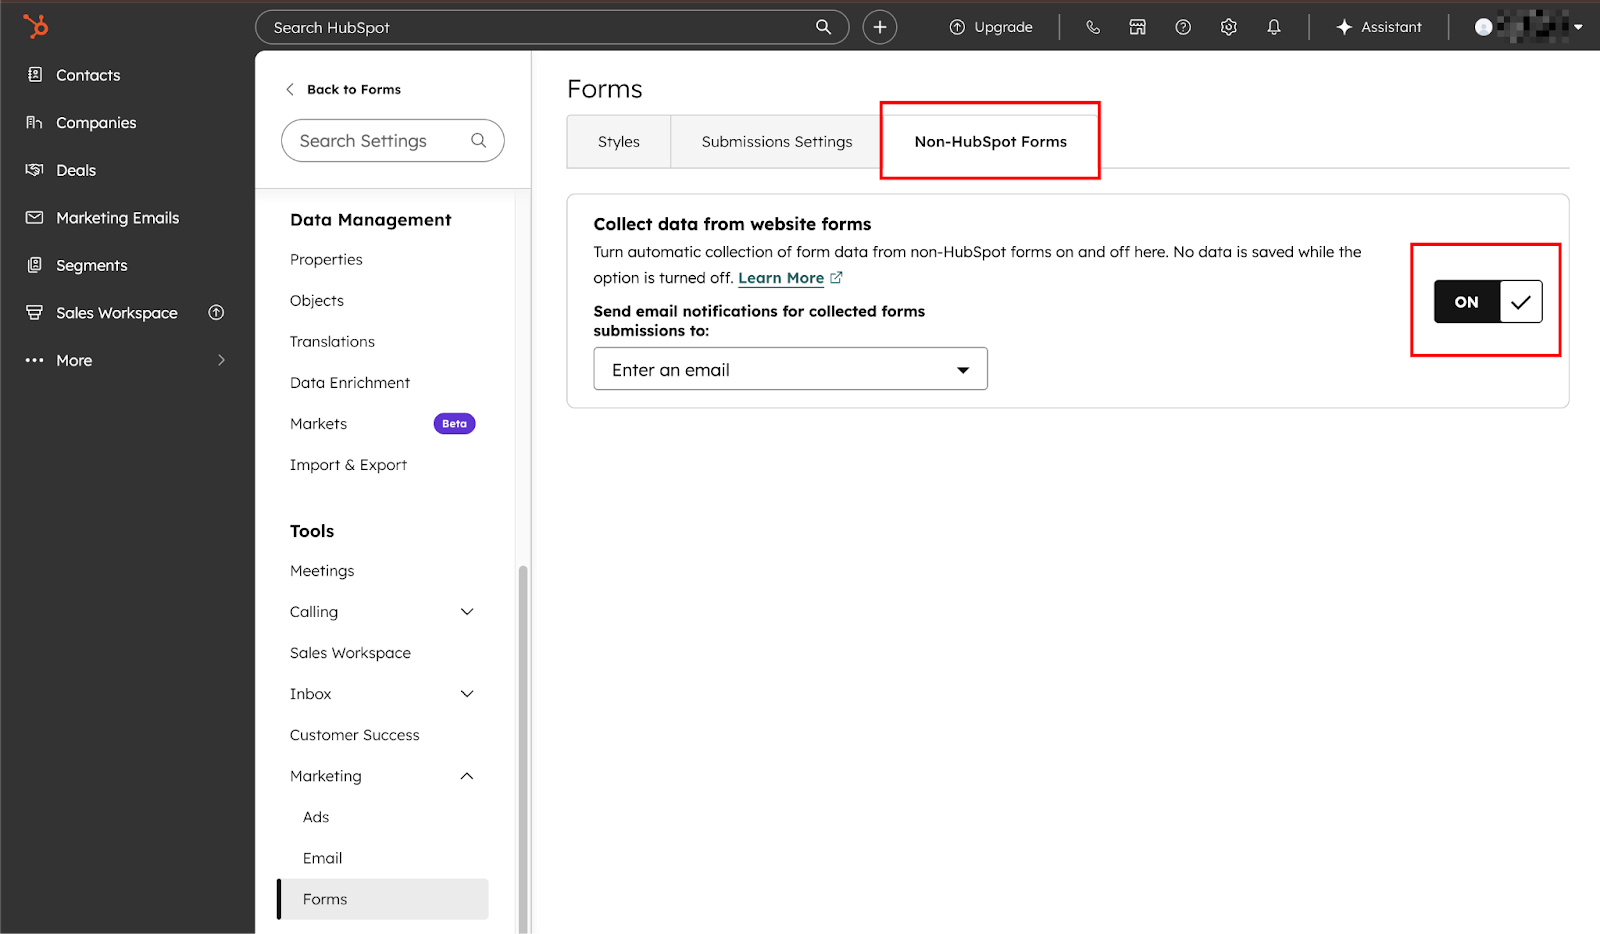
When enabled, this setting allows HubSpot's tracking script to monitor form submissions across your entire website and automatically create contact records from the submitted data.
A few important notes about this setting: HubSpot can track up to 10,000 non-HubSpot forms per account. Each form submission attempt is recorded, including incomplete submissions where users clicked submit but hadn't filled in the required fields.
This limit refers to unique form objects across all connected sites in your HubSpot account — not submission volume. Agencies managing multiple client sites within a single portal should note that each site's forms count against the shared limit.
The system creates a new "non-HubSpot form" entry in your forms dashboard the first time someone submits each unique form on your site.
Step #4: Install HubSpot tracking code in Webflow
The tracking code is what actually captures form submissions and sends them to HubSpot. Without this script on your Webflow site, the non-HubSpot forms feature won't work regardless of your settings.
Return to HubSpot Settings (gear icon) and navigate to Account Management → Tracking & Analytics → Tracking Code in the left sidebar. You'll see your unique tracking code displayed in a code block. This JavaScript snippet is specific to your HubSpot account and contains your portal ID.
Click the "Copy" button to copy the entire tracking code to your clipboard.
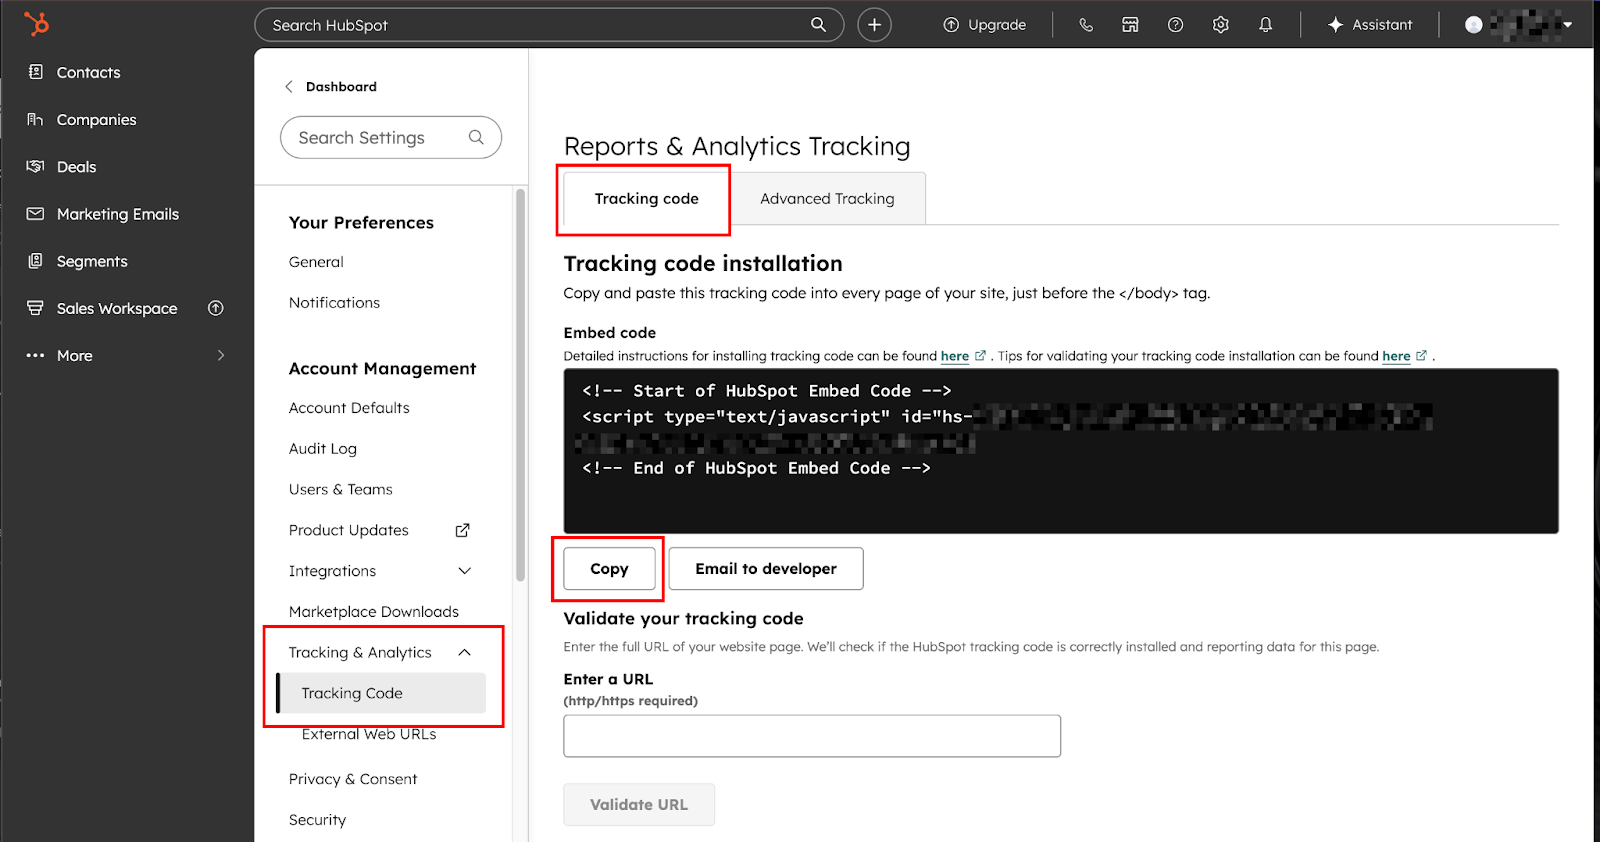
The code should start with <!-- Start of HubSpot Embed Code --> and include a script tag that loads HubSpot's JavaScript library.
Paste the code into Webflow Custom Code
Switch back to Webflow and open your project in the Designer. Navigate to Site Settings (found in the left sidebar or top-left project menu). Click the Custom Code tab to open panels for site-wide code injection.
Paste the HubSpot tracking code into the Head Code field. The Head Code section executes before your page renders, ensuring the tracking script loads early and can monitor all form submissions.
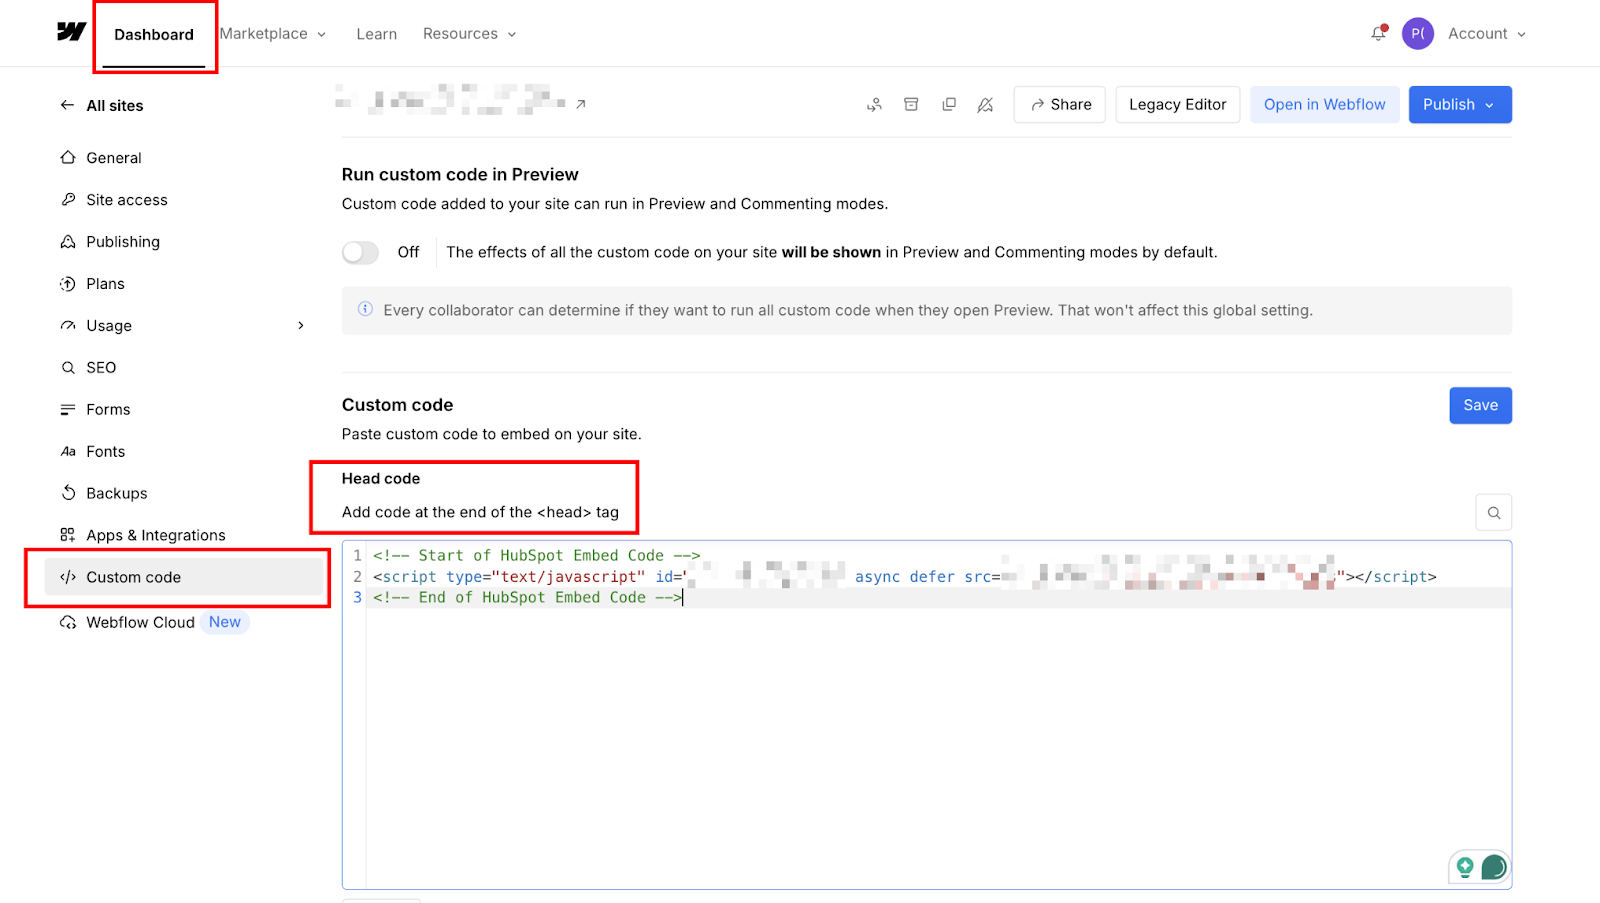
Click "Save Changes" in Webflow, then publish your site. The tracking code only becomes active on your published site, not in Webflow's preview or staging environments.
To verify the tracking code installed correctly, open your published Webflow site in a browser and view the page source (right-click → View Page Source). Search for "hs-script-loader" in the source code. If you find it, the tracking code is present and loading correctly.
Step #5: Ensure Webflow form field names match HubSpot properties
HubSpot's non-HubSpot forms feature relies on form field name attributes to map submitted data to the correct contact properties. If your Webflow field names don't match HubSpot's expected property names, the data either won't import or will create custom properties instead of populating standard fields.
In Webflow Designer, select your form, then click each input field individually. In the Settings panel on the right, look for the field labeled "Name". This is the HTML name attribute that HubSpot reads to determine where the data should go.
The most common field name mappings are:
- firstname (not "first_name" or "First Name"): HubSpot's First Name property
- lastname: Last Name property
- email: Email property (required; HubSpot won't create contacts without this)
- phone: Phone Number property
- Company: Company Name property
- message: Message property (often used for text areas)
One limitation to check before mapping fields: The form mapping method only supports plain text inputs. Dropdowns, radio buttons, checkboxes, and text areas won't map to HubSpot via this method. If your form includes these field types, you'll need the iframe embed or developer embed methods instead. Confirm your form only uses text inputs before proceeding.Field names are case-sensitive and must match exactly. I've debugged multiple integrations where the issue was simply "Email" instead of "email" or "first_name" with an underscore instead of "firstname" without one.
If you're unsure which property name to use, check HubSpot's contact properties list. Navigate to Settings → Data Management → Properties in HubSpot, then search for the property you want to populate. Click on the property and look for the "Internal name" field. That's the exact string your Webflow form field name needs to match.
After updating field names in Webflow, publish your site again. The tracking code reads these name attributes from the published HTML, so changes don't take effect until you republish.
What causes Webflow forms to stop syncing with HubSpot? / Troubleshooting form integration issues
Sync failures almost always trace to one of five causes: field name mismatches, tracking code in the wrong location, browser extensions blocking HubSpot's script, cookie consent preferences stopping session tracking, or reCAPTCHA interference.
The symptom is usually obvious (submissions appear in Webflow but not HubSpot), but identifying the specific cause requires checking each one in sequence.
Field name mismatches
Field name mismatches account for the majority of sync failures. HubSpot's non-HubSpot forms feature reads the HTML name attribute from each form field and attempts to match it to a HubSpot contact property.
If your Webflow field is named "first_name" but HubSpot's property is "firstname" (no underscore), the data won't map correctly.
To diagnose this, check your Webflow form field names in Designer (select each input and view the "Name" field in Settings), then compare them with HubSpot's property names. In HubSpot, go to Settings → Data Management → Properties, search for the property, and check the "Internal name" field. These must match exactly; case-sensitive, no extra characters.
The most reliable approach is to use HubSpot's standard property names in your Webflow fields. Common standard names include: firstname, lastname, email, phone, company, website, address, city, state, zip.
If you need custom properties, first find the exact internal name in HubSpot's property settings, then use it in your Webflow field name attribute.
Tracking code placement errors
Tracking code placement errors occur when the HubSpot script isn't loading correctly on your published Webflow site. The most common mistake: pasting the tracking code in the Footer Code instead of the Head Code. The script needs to load before forms initialize, which means it must be in the Head.
Test this by opening your published site, right-clicking anywhere on the page, selecting "View Page Source," then searching (Ctrl+F or Cmd+F) for "hs-script-loader". If you don't find this string, the tracking code isn't on the page.
Go back to Webflow → Site Settings → Custom Code and verify the HubSpot tracking code appears in the Head Code field (not Footer Code), then republish.
Browser extension conflicts
Browser extension conflicts happen when visitors use ad blockers, privacy extensions, or script blockers that prevent HubSpot's tracking code from executing. Common culprits include uBlock Origin, Privacy Badger, Ghostery, and Brave browser's built-in shields. These tools detect HubSpot's script as a tracking pixel and block it entirely.
You can't control visitor browser extensions, but you can verify that the integration works by testing in a clean incognito/private window with extensions disabled.
If submissions appear in HubSpot during incognito testing but fail in your regular browser, extension blocking is confirmed. This affects a percentage of real visitors, too.
Cookie consent barriers
Cookie consent barriers block session tracking when visitors decline cookie consent through your consent banner. HubSpot's tracking code sets first-party cookies to identify returning visitors and link page views to contact records.
If a visitor declines cookies, HubSpot can still capture the form submission (because that's a direct data submission, not a cookie-based one), but it won't link it to their browsing history.
This manifests as contacts in HubSpot showing form submissions but zero page views in their timeline. To verify: open a contact record, check the Activity timeline, and look for "Page view" events. If you only see "Form submission" events, cookie tracking is blocked or declined.
If you're using a consent management platform like CookieBot or OneTrust, ensure it's properly configured to work with HubSpot's tracking code. Some consent platforms block all scripts by default until consent is granted, which prevents the tracking code from loading even when visitors accept cookies.
reCAPTCHA conflicts
reCAPTCHA changes how submissions route when Webflow forms include reCAPTCHA and are mapped to HubSpot. When reCAPTCHA is active, the form no longer submits through Webflow's standard form handler so that the submission won't appear in Webflow's form submissions tab.
The data still reaches HubSpot, but your Webflow-side submission log goes dark, which can appear to be a sync failure when it isn't one.
The fix: either remove reCAPTCHA from forms you're syncing to HubSpot (and rely on HubSpot's built-in bot detection), or switch to HubSpot's iframe or developer embed methods, which support HubSpot's native reCAPTCHA fields.
Beyond basic form capture
Form mapping handles one-way data flow: Webflow submissions into HubSpot contacts. For teams that need more — triggering HubSpot workflows from Webflow page events, syncing HubSpot CRM data back into Webflow CMS, or building multi-step automations across both platforms, two paths are worth knowing.
Explore Zapier's Webflow integration to connect Webflow form submissions to HubSpot workflows, Slack notifications, Google Sheets, and 5,000+ other apps without custom code. It's the right tool when you need conditional logic between platforms that the native HubSpot app doesn't cover.
See Webflow's developer docs for API-level integration, custom field mapping, bi-directional sync, or CMS data flowing between HubSpot and Webflow.
Frequently asked questions
Why aren't submissions appearing in HubSpot?
Check four things: "Collect data from website forms" is toggled on, the tracking code is in your site's Head Code, field names match HubSpot's internal property names exactly, and your form includes an email field.
Do submissions count against both platforms' limits?
Yes. Each submission counts against your Webflow site plan's form quota and HubSpot's 10,000-form limit for non-HubSpot forms.


