


Learn how to send Webflow form submissions to HubSpot via Zapier.
Webflow and HubSpot don't share a direct two-way data connection out of the box, but Zapier closes that gap without custom code. Set up the trigger once, and every Webflow form submission creates or updates a contact in HubSpot within seconds.
This method keeps your existing Webflow forms exactly as designed while routing every submission directly to HubSpot's contact database. Webflow receives the submission first, so it counts against your site plan limits, then Zapier captures a copy and sends it to HubSpot immediately. No manual exports, CSV imports, or weekend data gaps.
In this article, here's what we'll cover: the prerequisites you need before starting, how to create the Zap connection in the correct sequence, the exact field-mapping approach that prevents data loss, and troubleshooting steps for when submissions don't appear in HubSpot or the integration randomly stops working after running successfully for weeks.
What do you need to connect Webflow forms to HubSpot via Zapier?
Before creating your Zap, you need three things confirmed: a published Webflow form with at least one test submission, active accounts on all three platforms with the right permission levels, and consistent field names between your Webflow form and HubSpot's contact properties.
Missing any of these causes the integration to fail during setup or break silently after it's live.
Webflow requirements
Webflow requirements start with a published form on your live site. The form must exist on the published domain (not just in Designer), and at least one person, even if it's just you doing a test submission, must have submitted the form successfully.
Zapier's "New Form Submission" trigger pulls from Webflow's form submission API, which only returns forms that have received submissions. If your form shows 0 submissions in Webflow Site Settings → Forms, Zapier won't detect it during setup.
Each form should have a unique name that clearly identifies its purpose and location. Duplicate form names across multiple pages create confusion in Zapier's form selection dropdown.
Instead of seeing "Contact Form" fifteen times, name your forms descriptively: "Homepage Hero Contact", "Pricing Page Demo Request", "Blog Subscribe Footer". This naming convention prevents you from accidentally mapping the wrong form later.
Build your Zap in this exact order: publish the form → submit a test → then create the Zap. If you create the Zap before completing both steps, the form won't appear in Zapier's form selection dropdown, and you'll need to start over.
Zapier requirements
Zapier requirements include a free or paid Zapier account with available task allocation. Every form submission that triggers your Zap consumes one task from your monthly limit. Free accounts get 100 tasks per month, which translates to 100 form submissions.
If your site generates more traffic, budget for a paid plan:
- Professional: $19.99/month (billed annually) or $29.99/month (billed monthly) for 750 tasks; multi-step Zaps, premium apps, and webhooks included
- Team: $69/month (billed annually) or $103.50/month (billed monthly) for 2,000 tasks; adds shared workspace, user roles, and SAML SSO
- Enterprise: Custom pricing; annual task limits (tasks don't expire monthly), dedicated account manager, advanced permissions
Monitor your task usage in Zapier's dashboard to avoid hitting limits mid-month and missing leads.
HubSpot requirements
HubSpot requirements include an active HubSpot account (free tier works) with permission to create and edit contacts. The integration uses HubSpot's "Create or Update Contact" action, which deduplicates contacts based on email address.
When a submission arrives with an email that already exists in your HubSpot database, the action updates that contact's properties rather than creating a duplicate record. This deduplication happens automatically. You don't need HubSpot Marketing Professional or paid plans to use it.
Verify that your HubSpot contact properties include all the fields you want to populate from Webflow submissions. Standard properties such as First Name, Last Name, Email, Phone Number, and Company are available by default.
Custom properties (industry, budget range, project timeline, referral source) need to be created in HubSpot Settings → Data Management → Properties before you can map Webflow fields to them. When creating custom properties, enable the "Use in forms and bots" setting, or Zapier won't show the property in its field mapping dropdown.
5 steps to send Webflow form submissions to HubSpot via Zapier
Building the Webflow-to-HubSpot connection in Zapier involves creating the Zap, configuring the Webflow trigger, setting up the HubSpot action, mapping fields, and testing end-to-end before going live.
The sequence matters. Skipping the trigger test before configuring actions can cause field-mapping errors that won't surface until real submissions fail to sync correctly.
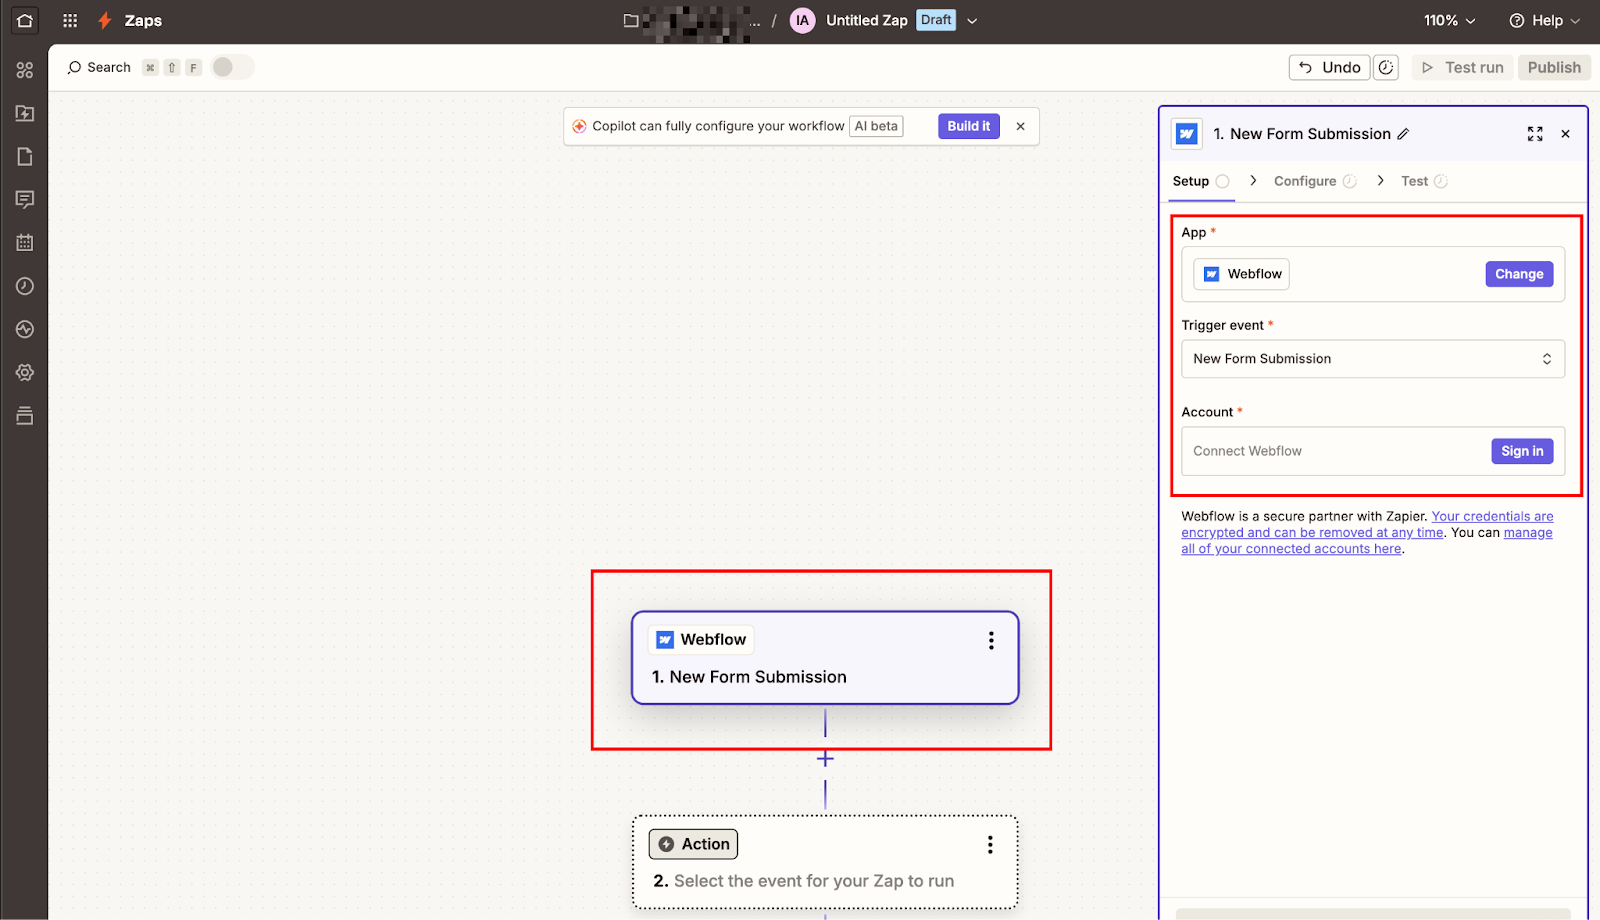
Step #1: Create a new Zap and configure the Webflow trigger
Log in to your Zapier account and click the "Create Zap" button in the top navigation or dashboard. Zapier opens the Zap editor interface, where you'll build your automation step by step.
In the trigger configuration panel, search for "Webflow" in the app selection dropdown and select it as your trigger app. Zapier displays a list of available Webflow-specific trigger events. Choose "New Form Submission" from the event dropdown.
This trigger fires instantly when someone submits a form on your published Webflow site, using Webflow's webhook system to notify Zapier in real-time rather than polling for new submissions on a schedule.
If the webhook delivery fails, Zapier falls back to polling. On paid plans, polling runs every 2 minutes. On the free plan, it runs every 15 minutes, which means a submission could take up to 15 minutes to appear in HubSpot if the initial webhook fails.
Click "Sign in to Webflow" to authenticate your Webflow account. Zapier redirects you to Webflow's OAuth authorization page, where you'll grant Zapier permission to access your sites and form data.
Select the Webflow workspace that contains the site with your form, then authorize the connection. Zapier returns you to the Zap editor with your Webflow account connected.
The "Account" dropdown now shows your connected Webflow account.
Configure the submission
In the next tab (Configure), you'll see two additional configuration fields: "Site" and "Form". Click the Site dropdown and select the specific Webflow site that hosts the form you want to monitor. Only sites within the authenticated workspace appear in this list. If you manage multiple client sites across different workspaces, you'll need to create separate Zaps for each workspace.
After selecting your site, the Form dropdown populates with forms that have received at least one submission. If your form doesn't appear in this list, it means either the form hasn't been published yet, no one has submitted it, or the form name is duplicated across multiple pages.
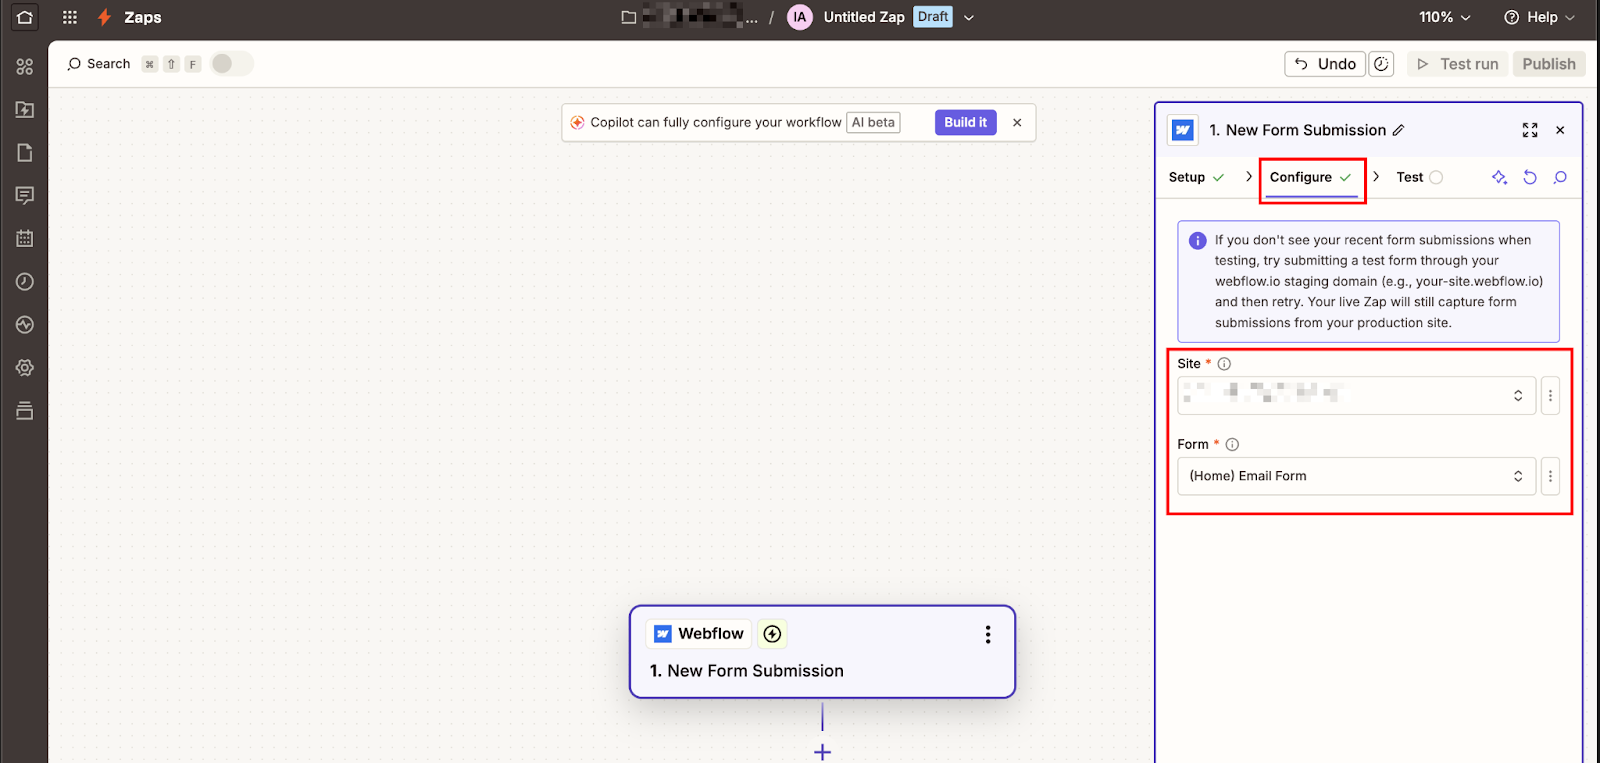
Select the form you want to connect from the dropdown. Zapier displays the form name you configured in Webflow's form settings. This is why unique, descriptive form names matter during setup.
Step #2: Test the trigger and verify that the field data appears correctly
Click the "Test trigger" button at the bottom of the trigger configuration panel. Zapier queries Webflow's API to fetch the most recent form submission for the selected form.
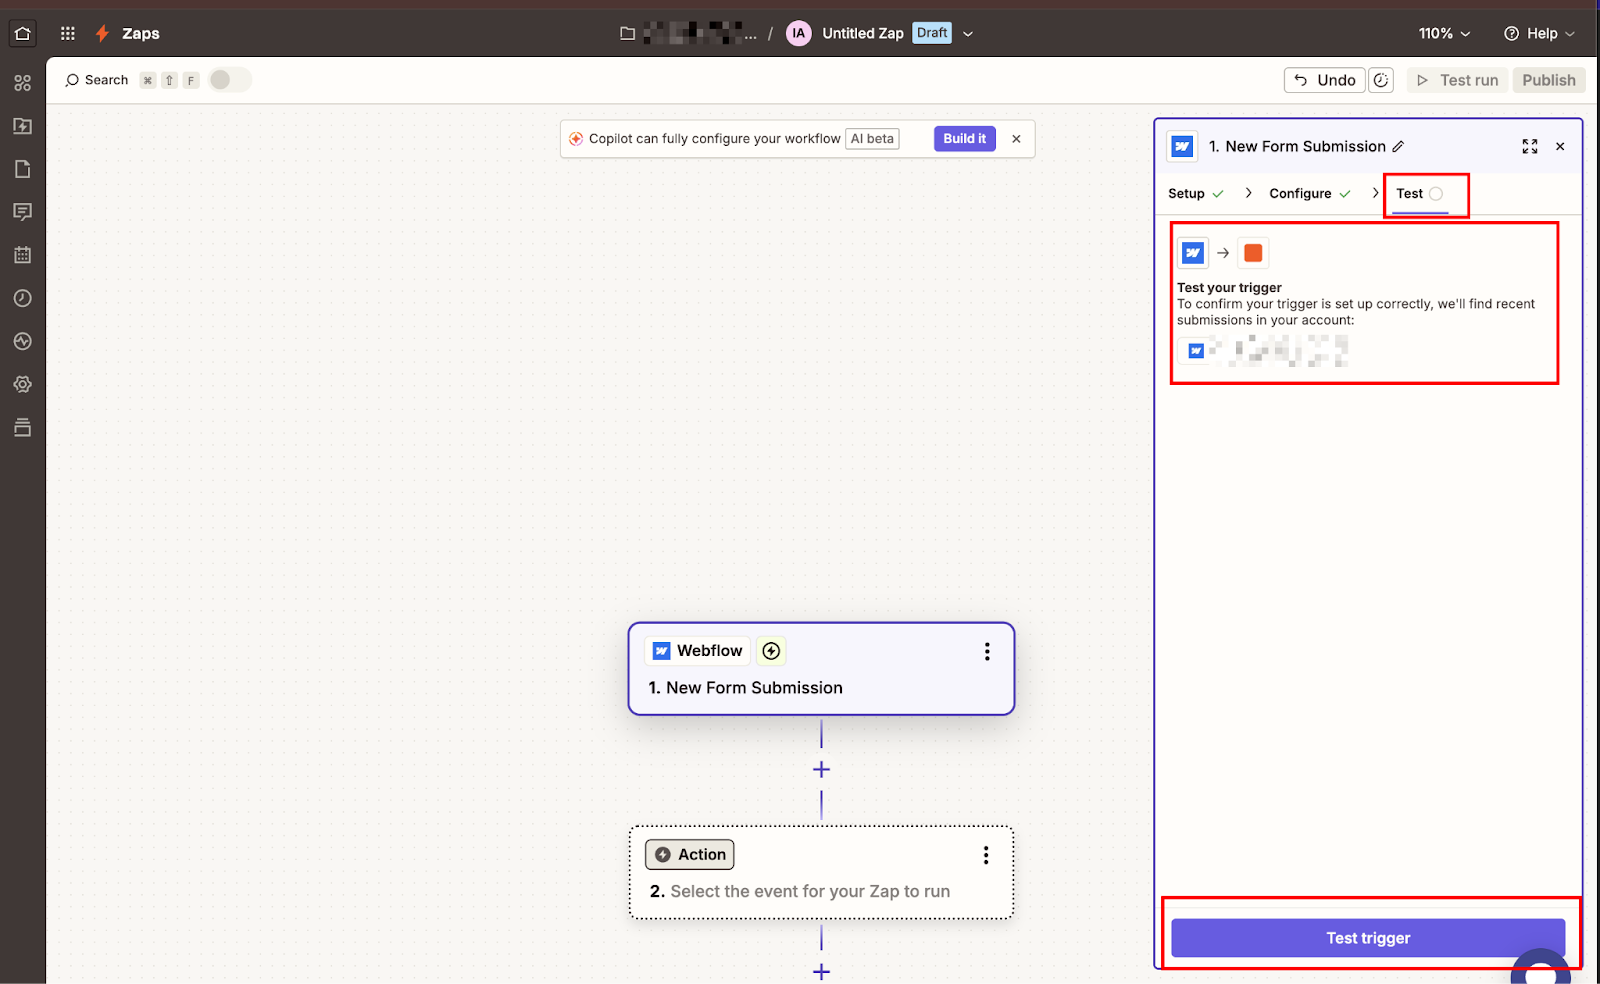
This test pull accomplishes two goals:
- It confirms Zapier can successfully communicate with Webflow's API
- It loads actual submission data that you'll use to map fields in the next step
Zapier displays the test data in an expandable accordion showing all form fields and their submitted values. Review this data carefully. Each field from your Webflow form appears with its corresponding value from the most recent submission.
Common fields include: Name (the form field's name attribute), Email, Phone, Message, and any custom fields you added to your form.
Verify that all expected fields appear in the test data. If a field is missing, it means either the field doesn't have a name attribute in Webflow, or it wasn't filled out during the most recent submission. Return to Webflow Designer, select each form input field, and check the "Name" field in the Settings panel.
Every input you want to sync to HubSpot must have a name attribute.
Once you're satisfied with the test data, click "Continue" to move to the action configuration step. Zapier saves this test data and makes it available in dropdown menus when you're mapping fields in subsequent steps.
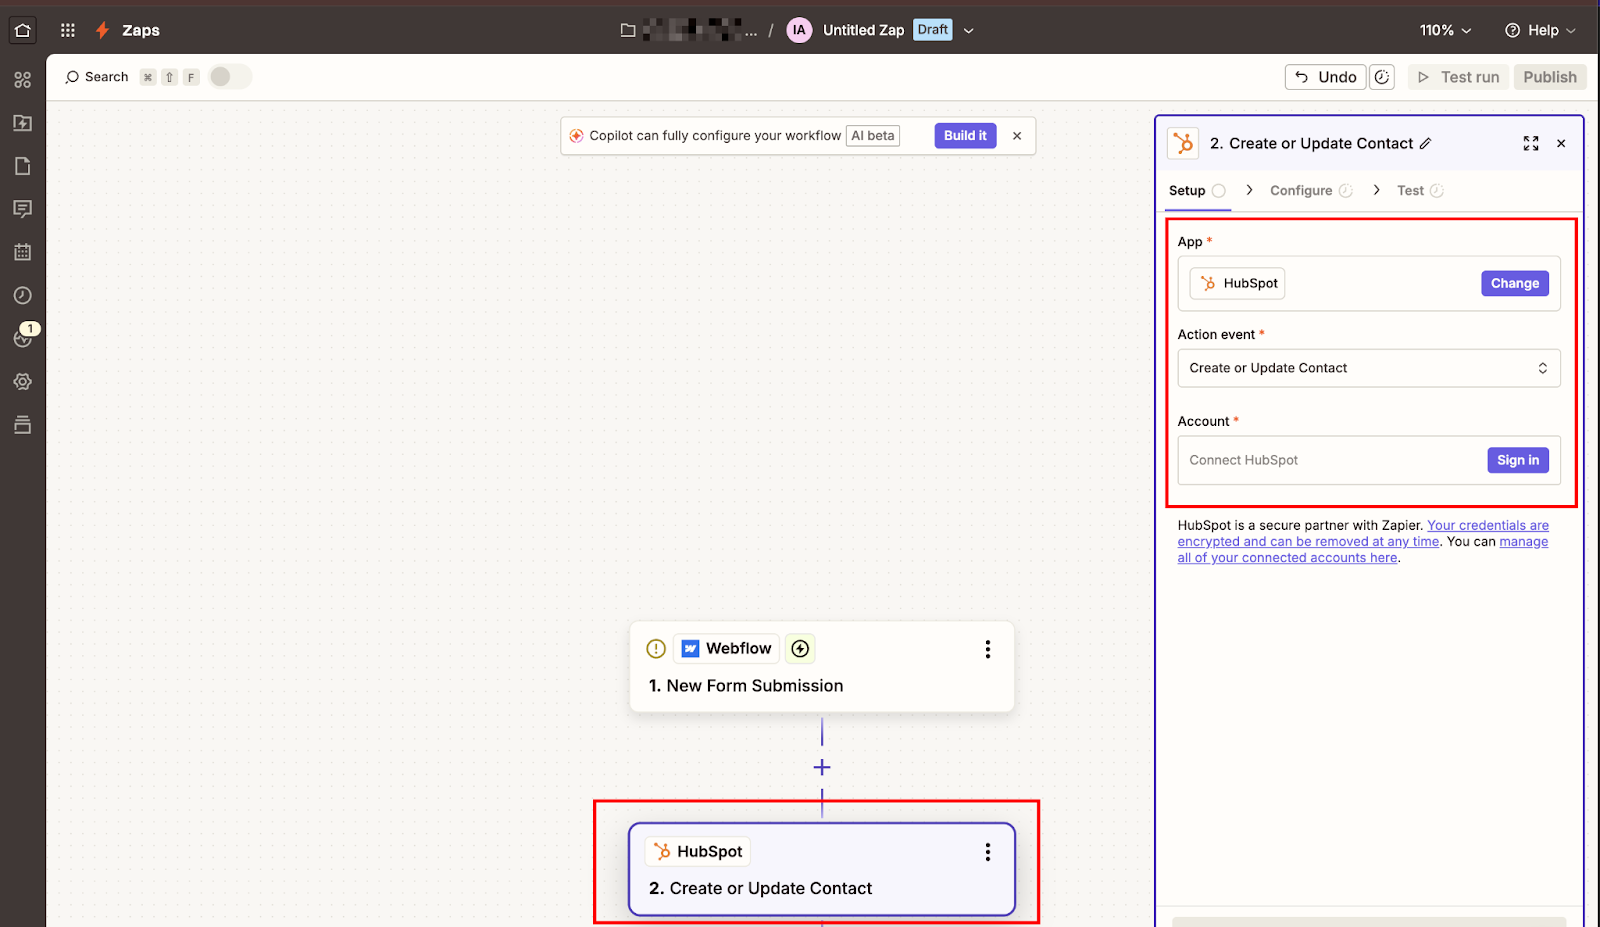
Step #3: Add HubSpot action and select create or update contact
In the action configuration panel, search for "HubSpot" in the app selection dropdown and select it. Zapier displays a list of available HubSpot actions. Scroll through the list and select "Create or Update Contact" from the action event dropdown.
This specific action is critical: it prevents duplicate contacts by checking whether a contact with the submitted email address already exists before deciding to create a new one or update an existing one.
The alternative "Create Contact" action only creates new contacts and fails when it encounters an email address that already exists in your HubSpot database.
Click "Sign in to HubSpot" to authenticate your HubSpot account. Zapier redirects you to HubSpot's OAuth authorization page, where you'll grant Zapier permission to create and modify contacts in your CRM.
Select the HubSpot portal you want to connect (if you manage multiple portals), then authorize the connection. Zapier returns you to the Zap editor with your HubSpot account connected.
The "Account" dropdown now shows your connected HubSpot account.
After that, in the Configure tab, Zapier displays the field mapping interface, where you'll specify which Webflow form data maps to which HubSpot contact properties. This mapping section contains dozens of available HubSpot fields organized into standard properties and custom properties.


Step #4: Map Webflow form fields to HubSpot contact properties
The field mapping interface shows HubSpot properties with empty input fields. Each input field includes a dropdown icon that reveals all available data from your Webflow trigger test. You'll use this dropdown to select which Webflow form field populates each HubSpot property.
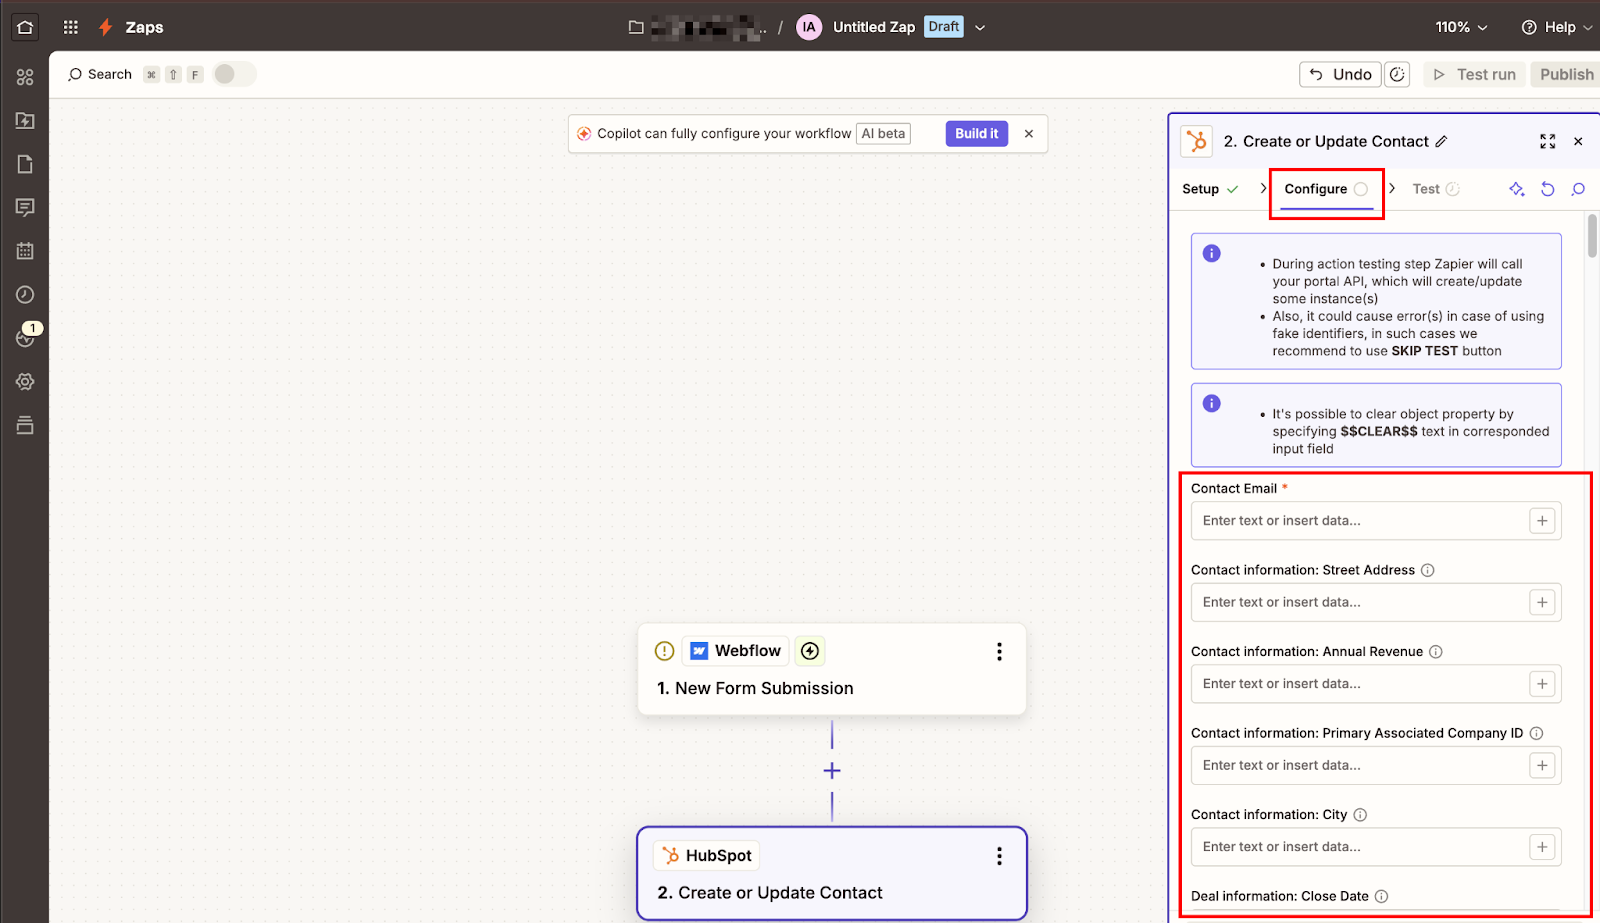
Start with the required fields. Email is mandatory. HubSpot won't create or update contacts without it. Click the Email input field, then click the dropdown icon to reveal available Webflow data.
Select the form field that contains the email address (typically labeled "Email" or "email" in the dropdown). Zapier inserts a reference, such as "1. Email," into the input field, indicating it will use the Email value from step 1 (your Webflow trigger) whenever the Zap runs.
Map additional standard fields based on what your form collects.
Common mappings include:
- First Name: Select Webflow's "First Name" or "firstname" field
- Last Name: Select Webflow's "Last Name" or "lastname" field
- Phone Number: Select Webflow's "Phone" or "phone" field
- Company Name: Select Webflow's "Company" or "company" field
- Website: Select Webflow's "Website" or "URL" field
HubSpot's field list is long. Over 100 properties, depending on your portal configuration. Scroll through the standard properties section first, mapping everything your form collects.
Then scroll to the Custom Properties section if you've created custom fields in HubSpot that correspond to unique form fields like "Project Budget", "Timeline", "Referral Source", or industry-specific qualifiers.
If your Webflow form collects data that doesn't have a direct HubSpot property match, you have two options:
- Create a new custom property in HubSpot (Settings → Data Management → Properties → Create Property)
- Use one of HubSpot's flexible text fields, like "Message" or "Description," as a catch-all for miscellaneous information
Leave unmapped fields blank. You don't need to map every HubSpot property. Only the ones your form actually collects. Empty fields in the mapping interface won't cause errors; Zapier simply won't update those properties when the Zap runs.
Step #5: Test the complete Zap and verify that data appears in HubSpot
Click the "Test action" button at the bottom of the field mapping interface. Zapier executes the HubSpot action using the test data from your Webflow trigger, actually creating or updating a contact in your live HubSpot portal with the test submission data.
Zapier displays the test results showing exactly what happened in HubSpot. Look for a success message indicating the contact was created or updated. The results panel includes the contact's Record ID (HubSpot's internal identifier), the email address used for deduplication, and all properties that were set during the test.
Switch to your HubSpot portal in a new browser tab.
Navigate to Contacts → Contacts, then search for the email address from your test submission. The contact should appear in your database.
Click into the contact record and review all mapped fields, and verify that:
- First name and last name appear correctly (not swapped or truncated)
- Phone number formatting matches your expectations
- The company name didn't end up in the wrong field
- Custom properties populated with the correct values
- Message or text area content preserves line breaks if needed
Check the contact's Activity timeline by scrolling down in the contact record. You won't see a "Form submission" event here. That only appears when you use HubSpot's "Create Form Submission" action instead of "Create or Update Contact". The "Create or Update Contact" action modifies contact properties directly without creating a timeline event.
If you need form submissions to appear in the timeline for sales team visibility, you'll need to add a second action step using "Create Form Submission" with a placeholder HubSpot form.
Once the test succeeds, return to Zapier and click "Publish" in the top-right corner of the Zap editor. Zapier activates your Zap and begins monitoring your Webflow form for new submissions.
From this point forward, every form submission on your published Webflow site will trigger the Zap, creating or updating a contact in HubSpot within 5-10 seconds.
What causes Webflow-Zapier-HubSpot integrations to fail or stop working?
Most failures are configuration issues, not platform bugs. The integration worked at setup, but broke when something changed in Webflow, HubSpot, or Zapier without corresponding updates in the other systems.
Five specific causes account for almost all failures, and each one has a clear diagnostic path.
Form field changes in Webflow
Form field changes in Webflow cause the most frequent failures. Someone on your team edits a Webflow form (adds a new field, renames an existing field, changes a field's name attribute) without realizing that Zapier references those exact field names in its mapping.
When the Zap runs after the field change, it can't find the renamed field in the submission data, so that data never reaches HubSpot. The Zap appears to succeed (green checkmark in task history) because Zapier successfully created or updated a contact, but the contact record in HubSpot is missing the data from the changed field.
To diagnose this, compare your current Webflow form structure against the field mappings in your Zap. Open Webflow Designer, select each form field, and note the exact value in the "Name" field.
Then open your Zap, click Edit, and review the field mappings in the HubSpot action. Every mapped field should still exist in Webflow with the same name attribute. If you find mismatches, update the mappings to reference the current field names, test the action, then republish the Zap.
HubSpot property changes
HubSpot property changes break field mappings when someone modifies custom properties without updating the integration.
Here are some common scenarios:
- A custom property gets deleted because it seems unused
- A property gets renamed for clarity
- A property's field type changes from single-line text to a dropdown with predefined values
When Zapier tries to write data to a deleted property, the action fails with an error like "Property 'project_budget' does not exist". When it attempts to write free-form text to a dropdown property that accepts only specific values, HubSpot rejects the submission.
Check HubSpot Settings → Data Management → Properties to verify all custom properties referenced in your Zap still exist and accept the data type your form submits.
If a property was deleted, either recreate it with the same internal name or update your Zap mapping to use a different HubSpot property. If a property's field type changes, adjust your Webflow form to submit values that match the new constraints (e.g., dropdown options, number ranges, date formats).
Zapier task limits
Zapier task limits cause silent failures when your account runs out of available tasks mid-month. The Zap stops processing new form submissions but doesn't send failure notifications unless you've configured alert settings.
Check Zapier → Usage to see your current task consumption and monthly limit. On the free plan, Zaps stop once you reach 100 tasks per month. On paid plans, Zapier defaults to pay-per-task billing — Zaps keep running past your limit, and you're charged at 1.25x your plan's per-task rate.
Zaps only stop if you've disabled pay-per-task or hit the 3x cap. Check Zapier → Billing and usage to see current consumption and whether pay-per-task is enabled.
API authentication expiration
API authentication expiration happens when you change your Webflow or HubSpot account password, enable two-factor authentication, or when OAuth tokens expire after extended periods of inactivity.
Zapier stores access tokens that allow it to interact with your accounts without prompting for login credentials each time. When those tokens expire or become invalid, the Zap fails with authentication errors like "Could not authenticate with Webflow" or "Invalid access token for HubSpot".
Fix this by reconnecting your accounts. Navigate to Zapier → My Apps, find the problematic app (Webflow or HubSpot), click the three-dot menu, and select "Reconnect". Zapier prompts you to log in and re-authorize access.
After reconnecting, test your Zap to verify it can access your data again, then republish.
Duplicate submissions from Zapier bugs
Duplicate submissions from Zapier bugs occasionally occur when Zapier's webhook system processes the same form submission multiple times, creating duplicate contacts in HubSpot even though "Create or Update Contact" should prevent duplicates.
This happens rarely (less than 1% of submissions in my client implementations), but when it does, it's frustrating. The root cause is typically webhook retry logic. Webflow sends the submission notification to Zapier, Zapier processes it successfully, but the response acknowledgment times out before Webflow receives it.
Webflow interprets the timeout as a failure and retries the webhook, causing Zapier to process the submission again.
You can't prevent this entirely (it's a webhook timing issue outside your control), but you can reduce its impact by adding a "Find Contact" step before your "Create or Update Contact" action.
The Find step searches HubSpot for a contact with the submitted email address. If found, the Zap updates that contact. If not found, the Zap creates a new contact. This explicit find-then-update workflow prevents duplicates more reliably than the automatic deduplication in "Create or Update Contact".
The trade-off: your Zap uses two Zapier tasks per submission instead of one (one for Find and one for Create/Update).
Need the connection without Zapier in the middle?
Zapier handles Webflow-to-HubSpot form submissions reliably once configured. For teams that want the connection without a third-party dependency, or whose forms use dropdowns, checkboxes, or text areas that Zapier handles but the native HubSpot app doesn't, there are two paths worth knowing.
Explore the HubSpot native app to connect Webflow forms directly to HubSpot, bypassing Zapier. It's faster to set up and has no per-submission cost. The trade-off: it only supports plain text inputs and doesn't support multi-step logic or conditional routing.
See Webflow's developer docs for API-level control, bi-directional sync, CMS data flowing between platforms, or custom field mapping beyond what either method supports.
Frequently asked questions
When should I use Zapier instead of the native HubSpot app?
Use Zapier when you need logic that the native app doesn't support: conditional routing (send demo requests to one HubSpot owner and newsletter signups to another), multi-step workflows (Webflow → HubSpot + Slack notification), or connections to tools beyond HubSpot. The native HubSpot app is faster to set up and has no per-submission cost. It's the right default if your only need is routing Webflow submissions into HubSpot contacts.
The Zap shows as successful, but I don't see the contact in HubSpot; what's wrong?
Check two things first: the email field and the HubSpot portal. If no email value was mapped or the submitted email field was empty, HubSpot's Create or Update Contact action will succeed (Zapier's side ran without errors) but will not create a contact, as an email is required. Second, confirm you're looking in the same HubSpot portal that's connected to the Zap. If you manage multiple portals, it's easy to search in the wrong one.
Do Webflow form submissions count against both Webflow and Zapier limits when using this integration?
Yes. Each form submission counts as one submission toward your Webflow site plan's form limits and one task toward your Zapier monthly task limit. A site generating 500 submissions per month consumes 500 Webflow form submissions and 500 Zapier tasks. Monitor usage dashboards for both platforms to avoid hitting limits mid-month.
Can you update existing HubSpot contacts when someone submits a Webflow form more than once?
Yes. Use HubSpot's "Create or Update Contact" action instead of "Create Contact" in your Zap. This action checks whether a contact with the submitted email address already exists in HubSpot before deciding whether to create a new one or update an existing one. When an existing contact submits a form with updated information (a new phone number or a different company), the action updates their contact record with the new values rather than creating a duplicate.


