


Build a centralized marketing automation hub connecting Webflow forms and CMS data to email platforms, CRMs, and analytics tools using Zapier.
Webflow's native form handling and CMS provide a solid foundation for capturing leads and managing content. Zapier extends this foundation through five official triggers and three primary CMS actions:
- New Form Submission
- New Order
- Updated Order
- New Comment
- New Resolved Comment Thread
- Create Item
- Update Item
- Find Item
These triggers that form the Zapier Webflow integration let you connect Webflow to email marketing platforms, CRMs, analytics tools, and beyond. This guide covers the architecture, implementation patterns, and technical considerations for building production-ready marketing automation workflows.
What you'll build
A centralized marketing automation hub connects Webflow forms and CMS data to downstream marketing tools through Zapier's event-driven workflow engine. The architecture supports real-time lead routing, automated email list management, CRM synchronization, and cross-platform data consistency.
At a high level, you'll:
- Configure OAuth 2.0 authentication between Webflow and Zapier with granular site-level access control
- Set up form submission triggers with exact form name matching (case-sensitive)
- Implement conditional routing using Zapier paths (maximum 10 branches per path group, maximum 3 nesting levels)
- Connect email marketing, CRM, and analytics endpoints
- Handle rate limits (Webflow: 60-120 req/min plan-dependent; Zapier: 20,000 webhook requests/5 min) and error scenarios
Architecture overview
The system follows an event-driven pattern where Webflow events trigger Zapier workflows that route data to multiple destinations.
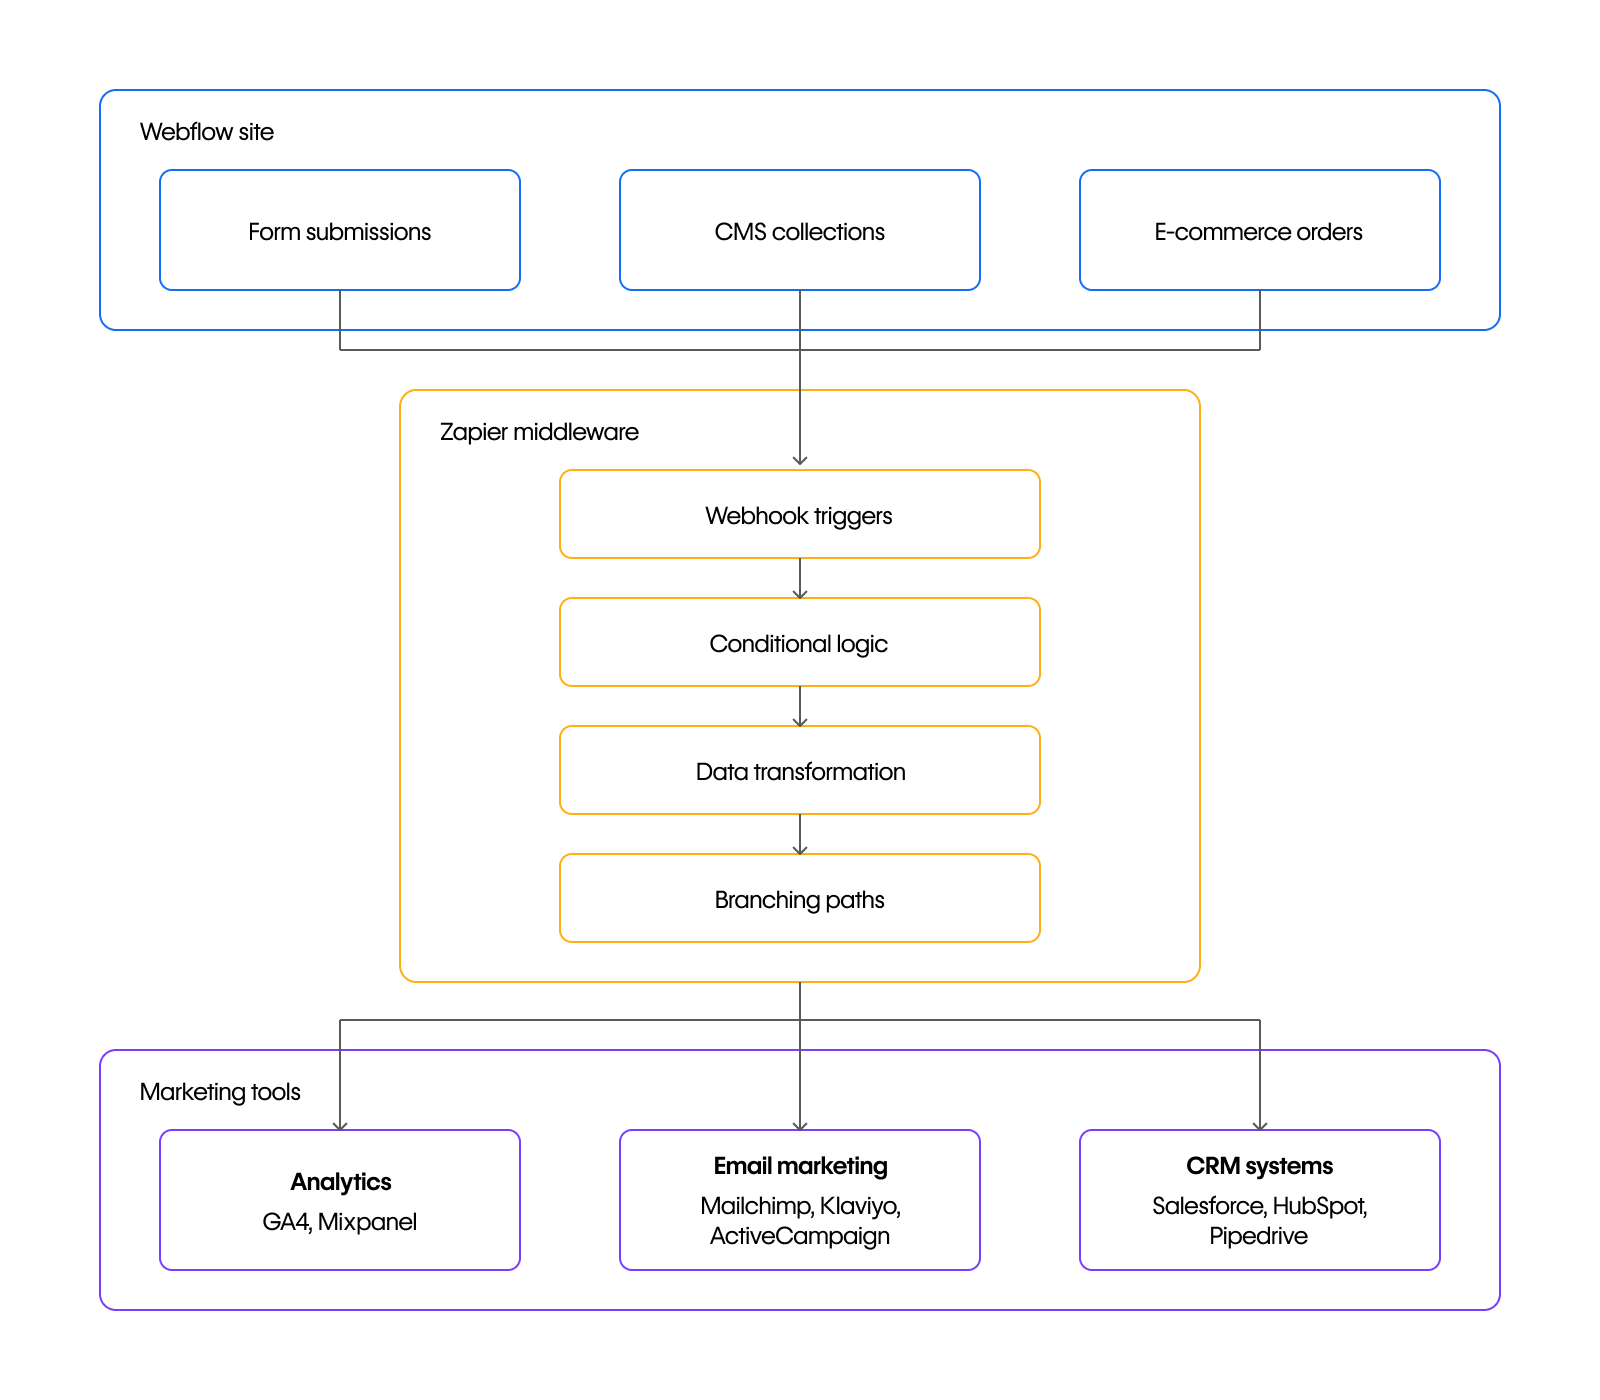
Data flow sequence:
- User submits form on Webflow site
- Webflow triggers instant webhook to Zapier
- Zapier filters data based on custom rules or simple conditions
- Formatter transforms field names and converts data types
- Paths route data to appropriate destinations (up to 10 path branches with up to 3 levels of nesting)
- Each destination receives mapped fields via its API
Using Zapier as an integration layer enables routing Webflow form submissions and eCommerce triggers to multiple marketing destinations without modifying Webflow itself. However, the integration cannot map CMS reference fields, and component-embedded forms are not detected by Zapier.
Prerequisites and account setup
Before building workflows, you need properly configured accounts with appropriate access levels.
Webflow requirements:
- Published site with at least one form containing a test submission
- Account with API access capabilities
- Unique form names (unnamed forms default to "Email Form")
- Forms placed outside of components (Zapier cannot detect component-embedded forms)
Zapier requirements:
- Zapier account with multi-step Zap capabilities (up to 100 steps per Zap)
- Access to Webhooks by Zapier for advanced webhook scenarios
- Formatter and Paths access for conditional workflows
Marketing tool accounts:
- Email platform (Mailchimp, ActiveCampaign, or Klaviyo) with API credentials
- CRM (Salesforce, HubSpot, or Pipedrive) with OAuth 2.0 authentication
- Analytics platform (GA4 or Mixpanel; note that Segment lacks direct Zapier integration)
For detailed account setup, see the Zapier Webflow setup guide.
Step 1: Connect Webflow to Zapier via OAuth
Webflow uses the OAuth 2.0 Authorization Code Grant flow for Zapier connections.
At a high level, you'll:
- Initiate connection from Zapier's app selection interface
- Authenticate via OAuth through Webflow's authorization screen
- Select specific sites and workspaces for scoped access grants
- Verify connection status in Zapier's connections dashboard
During authentication, Zapier redirects to Webflow's authorization screen where you select specific sites for scoped access grants. OAuth tokens are issued automatically without manual API key entry. Tokens can be revoked through Webflow account settings or Zapier's connections page.
Token security: Store OAuth access tokens in environment variables for any custom integrations. Never expose tokens in source code or client-side storage.
See Webflow OAuth documentation for implementation details.
Step 2: Configure form submission triggers
Form submission triggers activate when users submit Webflow forms. Configuration requires matching the exact form name (case-sensitive) and having at least one test submission available.
At a high level, you'll:
- Select "New Form Submission" as trigger event and authenticate via OAuth
- Choose your connected Webflow account and select the site
- Select the form by name (case-sensitive matching)
- Test the trigger to pull recent submission data
Form submission payload structure:
{
  "triggerType": "form_submission",
  "payload": {
    "name": "Contact Form",
    "siteId": "580e63e98c9a982ac9b08...",
    "data": {
      "name": "John Doe",
      "email": "john@example.com",
      "company": "Acme Corp"
    },
    "submittedAt": "2024-01-15T10:30:00.000Z",
    "id": "submission-id",
    "formId": "form-id"
  }
}
After modifying forms, republish the site for changes to propagate to Zapier. See Webflow Forms documentation for form configuration details.
Step 3: Map fields
Each platform expects specific field names and data formats. This section covers the required and optional field mappings for email marketing platforms and CRMs, along with platform-specific configuration details.
Map fields to email marketing platforms
Email platforms require the email address as a required field, with optional mapping of additional subscriber properties.
"Add/Update Subscriber" action creates new contacts or updates existing subscriber records based on email address match.
- ActiveCampaign: Supports email (required), contact name, and phone number with "Create or Update Contact" and "Add to Automations" actions.
- Klaviyo: Supports bidirectional triggers—new Klaviyo events can trigger updates to Webflow CMS items.
For platform-specific field requirements, see:
Map fields to CRM platforms
CRM integrations create leads or contacts from form submissions. Use email address as the unique key identifier for deduplication across all connected systems.
- Salesforce: Requires OAuth 2.0 authentication. Supports form submissions, new orders, and updated orders triggers. Standard fields include FirstName, LastName, Email, Company, and Phone.
- HubSpot: Supports form submission triggers only. Order-based workflows require alternative approaches such as Salesforce or custom webhooks.
- Pipedrive: Actions include "Create Item," "Update Item," and "Find Item" for CMS automation, plus eCommerce workflow actions.
See Salesforce + Webflow and HubSpot + Webflow for configuration guidance.
Step 4: Implement conditional routing with Paths
Paths enable branching logic that routes submissions to different destinations based on field values. Use this pattern for lead scoring, geographic routing, or product-specific workflows.
Path configuration limits:
- Maximum 10 path branches per path group
- Maximum 3 levels of nesting
- All paths within a group can execute simultaneously if conditions match
Filter syntax by data type:
Paths execute top-to-bottom. Configure the fallback path last to catch submissions that don't match specific criteria.
For conditional logic patterns, see Filter and Path rules documentation.
Step 5: Transform data with Formatter
Formatter modifies field values between trigger and action steps. Supported transformations include date/time formatting, number formatting, text transformations (case conversions, splitting, regex extraction), and lookup tables for key-value mapping.
Common transformation patterns:
Multiple Formatter steps can be chained together within a Zap workflow. See Get Started with Formatter for available functions.
Step 6: Handle CMS updates bidirectionally
Webflow CMS actions enable programmatic content management through Create Item, Update Item, and Find Item operations.
CMS item payload structure:
{
  "fieldData": {
    "field-slug": "field-value",
    "name": "Item Name",
    "slug": "item-slug"
  },
  "isDraft": false,
  "isArchived": false
}
The integration cannot map CMS reference and multi-reference fields. Workflows involving collection relationships require direct API calls.
See Webflow CMS API Reference for complete endpoint documentation.
Step 7: Verify integration success
Testing confirms data flows correctly before enabling production workflows.
At a high level, you'll:
- Test triggers to verify Zapier receives webhook payloads with correct JSON structure
- Test filter conditions using Zapier's supported filter syntax with sample data
- Verify Formatter transformations produce expected output values
- Check destination platforms for created/updated records with correct field mapping
Monitor ongoing workflows: Review Zap history for failed runs, check Zapier Task Usage for execution counts, monitor rate limit headers, and set up error notifications via Zapier's built-in alerts.
For systematic debugging, see Zapier troubleshooting guide.
Step 8: Troubleshoot common issues (optional)
Forms not appearing in Zapier dropdown:
Authorization button greyed out: Known issue with Webflow v2 app in Zapier causing HTTP 410 errors. Consider using older v1.11.1 integration as workaround.
HTTP error codes reference:
For connection issues, use Zapier's connections page to test, reconnect, or remove problematic connections.
Other important integration notes
Beyond the core workflow steps, production deployments require attention to rate limits, webhook security, and multi-platform scaling. This section covers the technical constraints and optimization strategies that affect high-volume implementations.
Rate limits and performance constraints
Both platforms impose distinct request limits that affect high-volume workflows.
Webflow API rate limits:
Source: Webflow Rate Limits Documentation
The site publish endpoint has a hard limit of 1 successful publish per minute per site for non-Enterprise accounts.
Source: Zapier Webhooks Rate Limits and Zapier Zap Limits
Flood protection: Zapier automatically triggers flood protection when workflows receive 100+ simultaneous events, throttling to 1 event per second.
Optimization strategies:
- Use instant webhook-based triggers instead of polling
- Implement delay steps to distribute API calls over time
- Split complex workflows across multiple Zaps
- Monitor X-RateLimit-Remaining header to track available requests
See Webflow rate limits and Zapier Zap limits for complete documentation.
Advanced webhook implementation
For security-critical workflows, implement native Webflow webhooks with HMAC SHA-256 signature verification instead of Zapier triggers. Dashboard-created webhooks lack signature validation headers.
API-created webhook configuration:
POST /webhooks
{
  "siteId": "site-id",
  "triggerType": "form_submission",
  "url": "https://your-endpoint.com/webhook",
  "apiVersion": "v2"
}
Signature verification (Node.js):
// Signature verification for API-created webhooks only
const isValidRequest = await webflowClient.webhooks.verifySignature({
  headers: req.headers,
  body: JSON.stringify(req.body),
  secret: process.env.WEBFLOW_CLIENT_SECRET
});

if (!isValidRequest) {
  return res.status(401).send('Invalid signature');
}
Use native webhooks for: Security-critical data, custom business logic, high-volume event handling, direct database integration.
Use Zapier for: Rapid prototyping, connecting to 5,000+ marketing tools, non-technical team workflow management.
See Working with Webhooks for complete implementation details.
Scale across multiple marketing tools
Webflow trigger compatibility:
Segment lacks direct Zapier integration. Implement via custom webhooks or API integrations outside of Zapier.
Data consistency strategy:
- Use email address as unique identifier across all systems
- Implement conditional logic before create/update actions to prevent duplicates
- Log transactions to Google Sheets for audit trail
- Set up error notifications for failed API calls
For platform-specific integration guides, see Google Analytics 4 + Webflow and Mixpanel + Webflow.
Security and compliance considerations
Zapier maintains SOC 2 Type II, SOC 3, GDPR, CCPA, and EU-US Data Privacy Framework compliance.
Security best practices:
- Enable two-factor authentication on all accounts
- Store OAuth tokens in environment variables, never in source code
- Implement state parameter in OAuth flows for CSRF protection
- Verify webhook signatures using HMAC SHA-256 for API-created webhooks
- Rotate tokens regularly and revoke unused connections
See Zapier Security and Compliance and Webflow Marketplace Guidelines for complete security documentation.
Next steps
Immediate optimizations:
- Incorporate delay steps between API-intensive actions to stay within rate limits
- Set up error notification Zaps that alert on workflow failures
- Create a monitoring dashboard in Google Sheets that logs all workflow executions
Advanced implementations:
- Build lead scoring logic using Formatter number transformations and filter conditions
- Implement lead routing using Path branching logic
- Create multi-step Zaps that syndicate CMS items to email marketing platforms
Documentation resources:
- Webflow Developer Portal for API reference
- Zapier Platform Documentation for custom integration development
- Multi-step Zaps guide for workflow optimization patterns


