


Learn how to connect Webflow forms to Mailchimp using direct POST or Zapier.
There are two common ways to connect Webflow forms to Mailchimp — and both have a failure mode most tutorials skip.
The first: you build the form in Webflow's Designer for perfect visual consistency, configure the Mailchimp action URL, publish the site, and discover that your carefully designed success state never appears. Webflow's form states don't trigger when POSTing to external endpoints. The form submits silently. No confirmation. Just a blank screen and confused subscribers wondering if it worked.
The second: you embed Mailchimp's form directly, solve the submission problem, and create a new one: fonts, spacing, and a submit button that's clearly not yours. Visitors notice. Conversions drop.
The fix isn't adding more integrations. It's choosing the right connection method for your constraints.
If you need Webflow's native styling and don't require tags, use the direct form action method. If you're routing subscribers to different audiences based on form location or need conditional tagging, use Zapier.
In this guide, we explore these two implementation paths, including the exact field mappings, API endpoints, and configuration settings for syncing data between platforms. No generic "connect your tools" advice; just the specific setup steps, common failure points, and troubleshooting fixes that work in production.
How do you connect a Webflow form to Mailchimp?
You can connect Webflow forms to Mailchimp using Webflow's native form action (the fastest setup with full styling control) or Zapier automation (which enables tagging and conditional logic). The native method takes 5 minutes but doesn't support tags.
Zapier takes 15 minutes to configure, costs a minimum of $19.99/month (Professional plan, billed annually), and adds 30-second to 3-minute submission latency.
Both methods create the same result: form submissions from your Webflow site automatically add subscribers to your Mailchimp audience. The difference lies in which features you have access to and how much control you have over styling, validation, and workflow automation.
Which Mailchimp connection method is right for your Webflow site?
Both methods work with Mailchimp's free plan (up to 500 contacts and 1,000 sends/month). Tags and Interest Groups are available on the free tier. Advanced segmentation, A/B testing, and removing Mailchimp branding require a paid Mailchimp plan. Check Mailchimp's current pricing before assuming features are available.
Here’s how to choose:
Choose method 1 if you need zero ongoing cost, design consistency is your priority, and you don't need tags or audience routing.
Otherwise, choose method 2 if you need subscriber tagging, want to route to multiple audiences, or have high-stakes forms where Firefox compatibility matters.
Method #1: How to set up a native Webflow form with Mailchimp action URL (direct POST)
Setup time: 5 minutes
Cost: $0
Best for: Fast implementation with complete design control, no external dependencies
The native method uses Webflow's built-in form functionality to POST data directly to Mailchimp's subscribe endpoint. No middleware, no monthly cost, full styling control — but Webflow's success and error states won't trigger, and you can't add tags programmatically.
This is the method I use for 70% of client implementations. A fashion e-commerce site collecting 800 newsletter signups monthly uses this approach because its brand guidelines require pixel-perfect form styling. A consulting firm's contact form feeds 200 leads per month into Mailchimp nurture sequences using the same direct POST pattern.
The trade-off: Webflow's success and error states don't trigger when POSTing to external URLs. You won't see Webflow's green checkmark or red error message. Mailchimp handles the response, typically redirecting to its hosted confirmation page or displaying its default message.
For many use cases, this doesn't matter. You're capturing emails, not building complex user experiences.
Step #1: Create your Mailchimp audience and generate the action URL
Log in to your Mailchimp dashboard and click the Audience tab. If you don't have an audience yet, create one by clicking "Create Audience" and following the prompts.
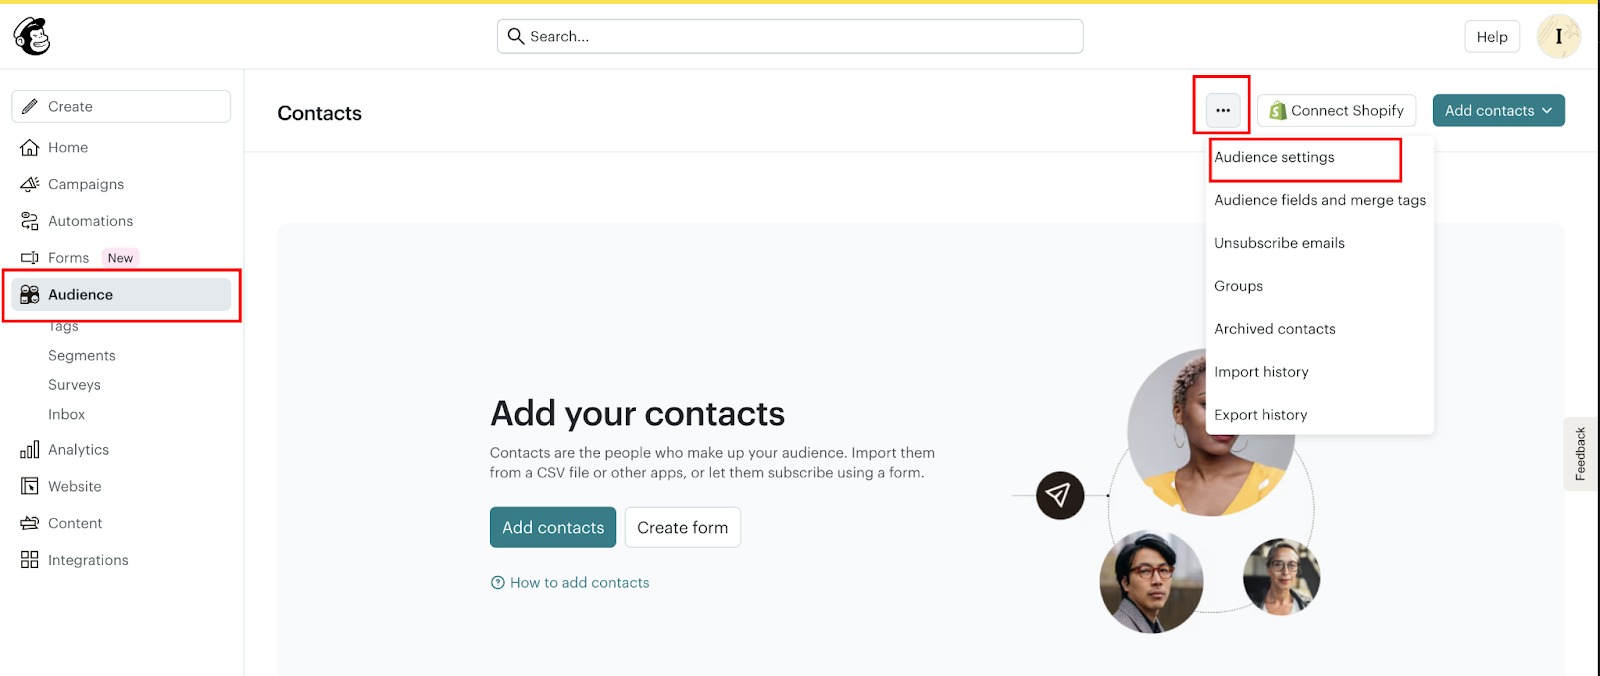
Each audience in Mailchimp represents a distinct email list. You might have separate audiences for customers, prospects, or different product lines.
Once your audience exists, go to Forms → Other forms. Mailchimp will generate a form builder interface.
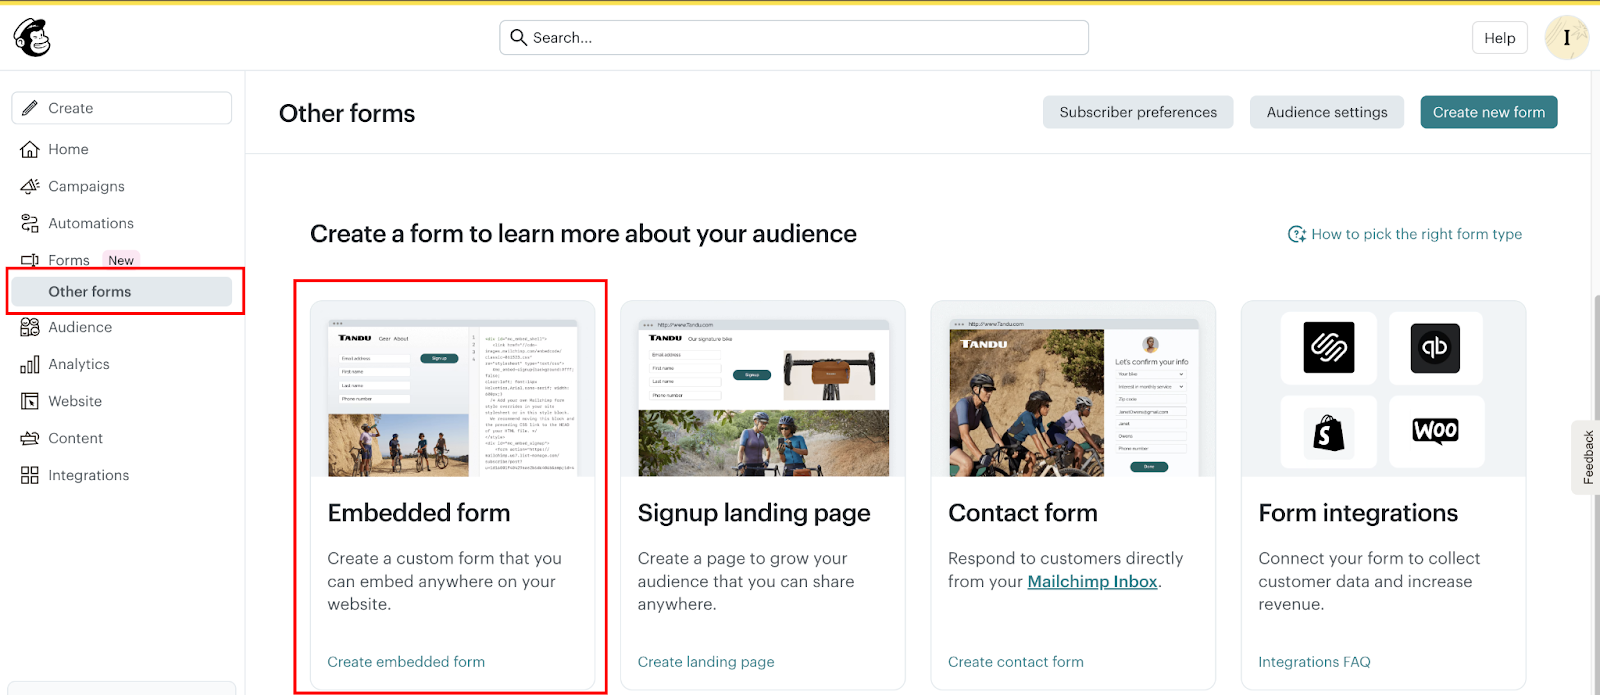
You don't need to customize the form design here, as you're only extracting the action URL.
Click "Embedded form." Mailchimp will prompt you to name the form before proceeding. Enter any name and click "Continue to Builder."
On the next screen, click "Continue" again to reach the final embedded form HTML.
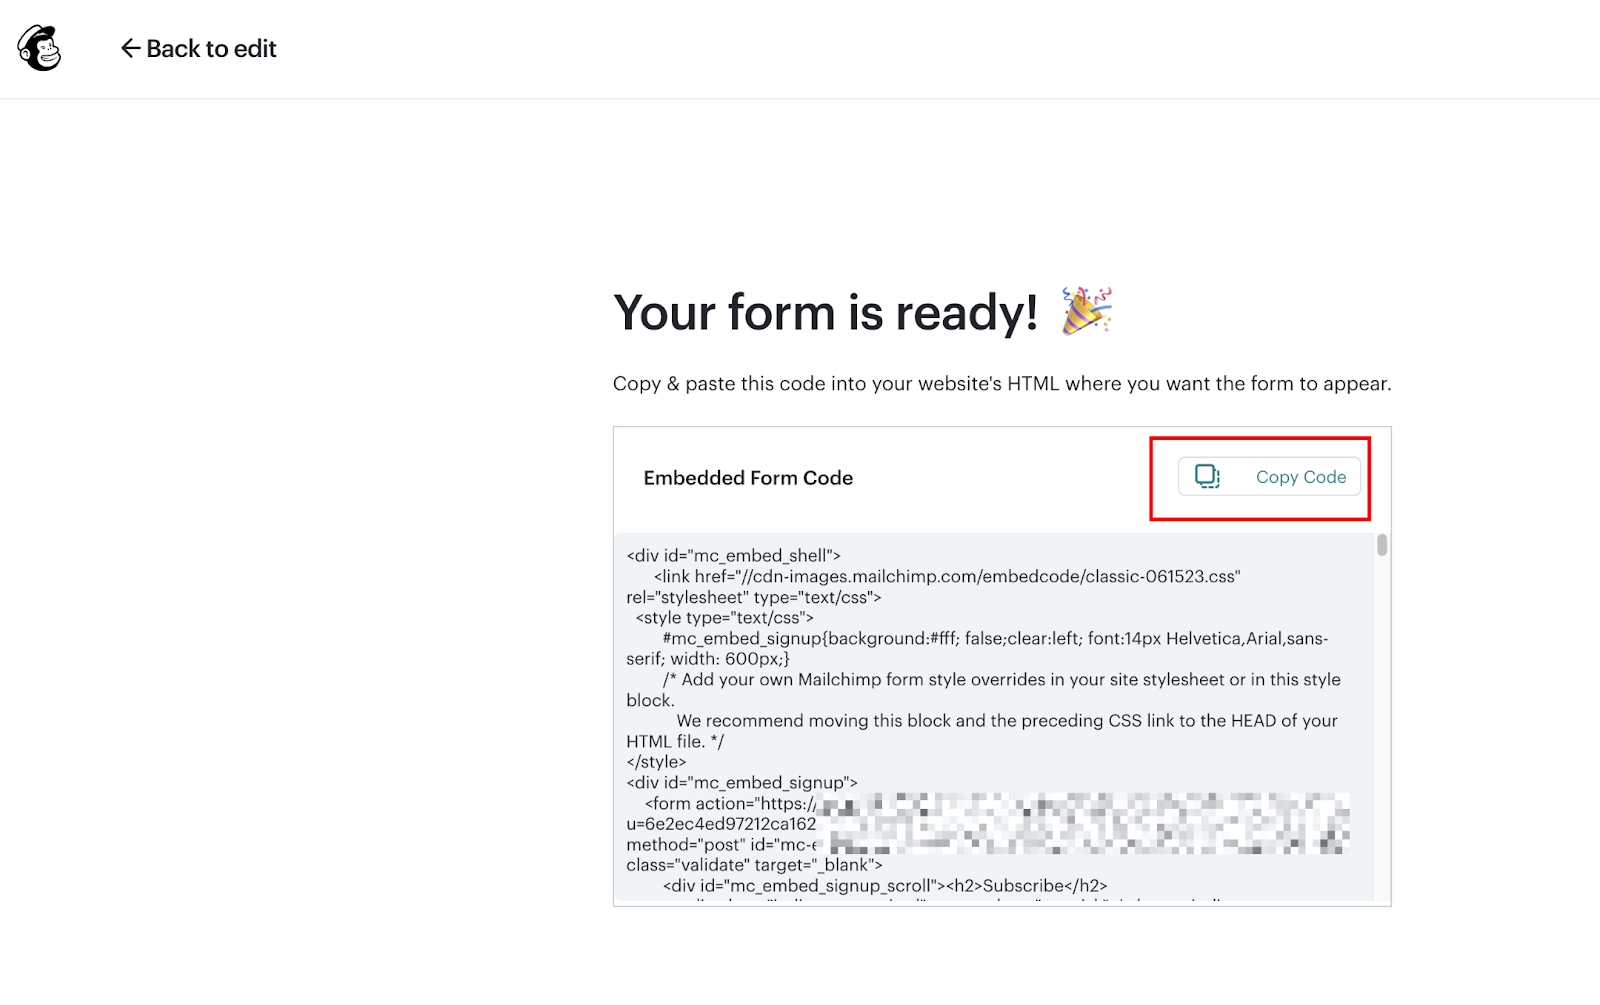
Copy everything between the quotation marks after action=. For example:
<form action="https://webflow.us5.list-manage.com/subscribe/post?u=c4efffc6b2128bfd18f898b49&id=f941b60121&f_id=908640edf0" method="post">
This is your Mailchimp subscribe endpoint. It should start with https:// and include parameters such as u= (your user ID) and id= (your audience ID). Save this URL. You'll paste it into Webflow in the next step.
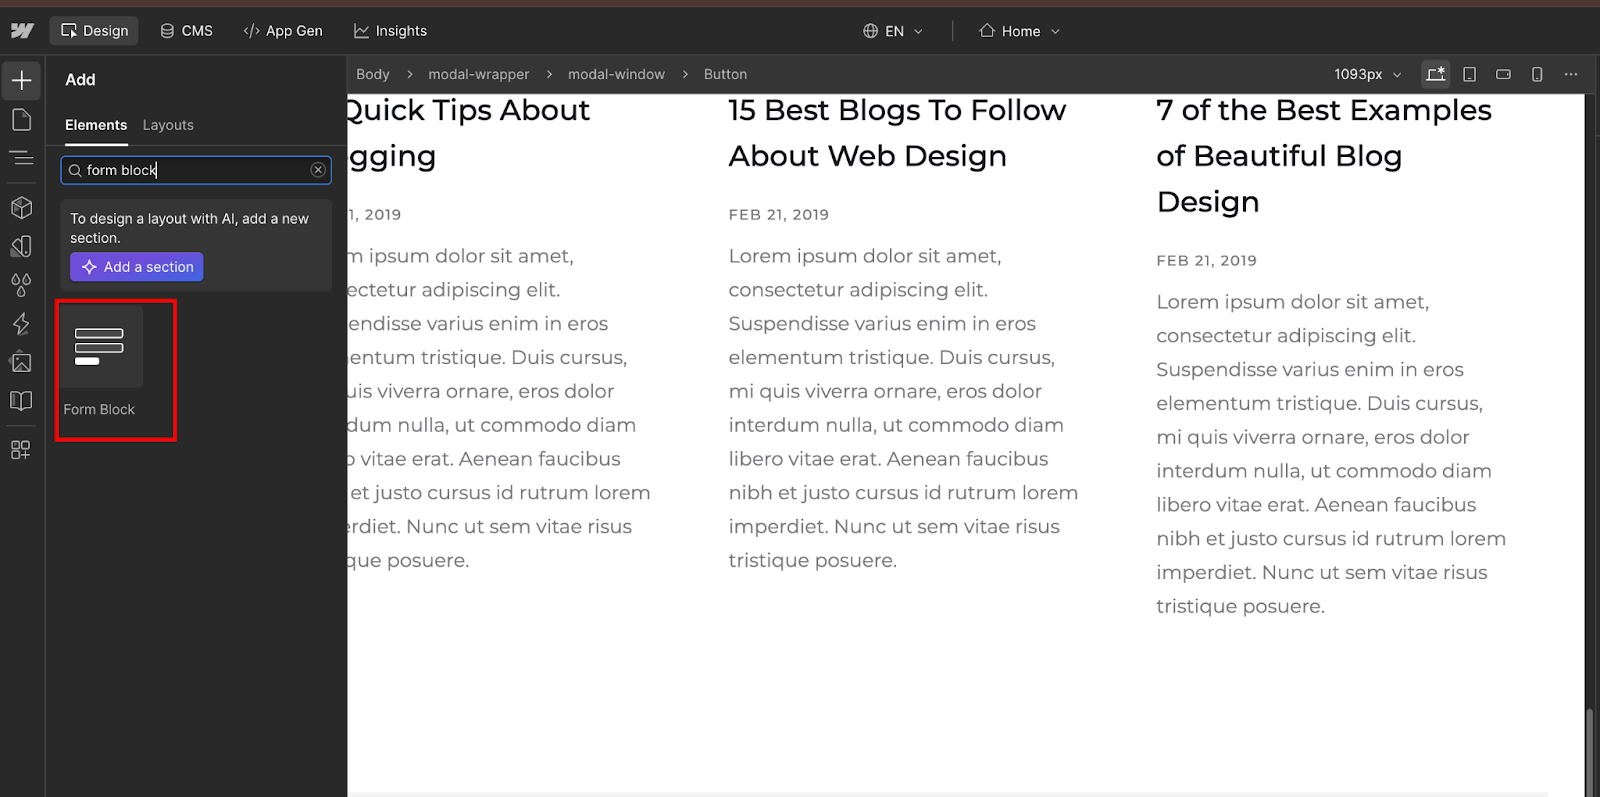
Step #2: Build your form in Webflow Designer
Open Webflow Designer and navigate to the page where you want the signup form. Drag a Form Block onto your canvas. The default form includes Name and Email fields. You can keep these or customize based on what data you want to collect.
Click the form container to select it, then open the Settings panel (gear icon). Under Form Settings, change "Send to" from "Webflow" to "Custom action." A new field labeled "Action" will appear. Paste the Mailchimp subscribe URL you copied earlier. Make sure it includes https://. Omitting the protocol will break the integration.
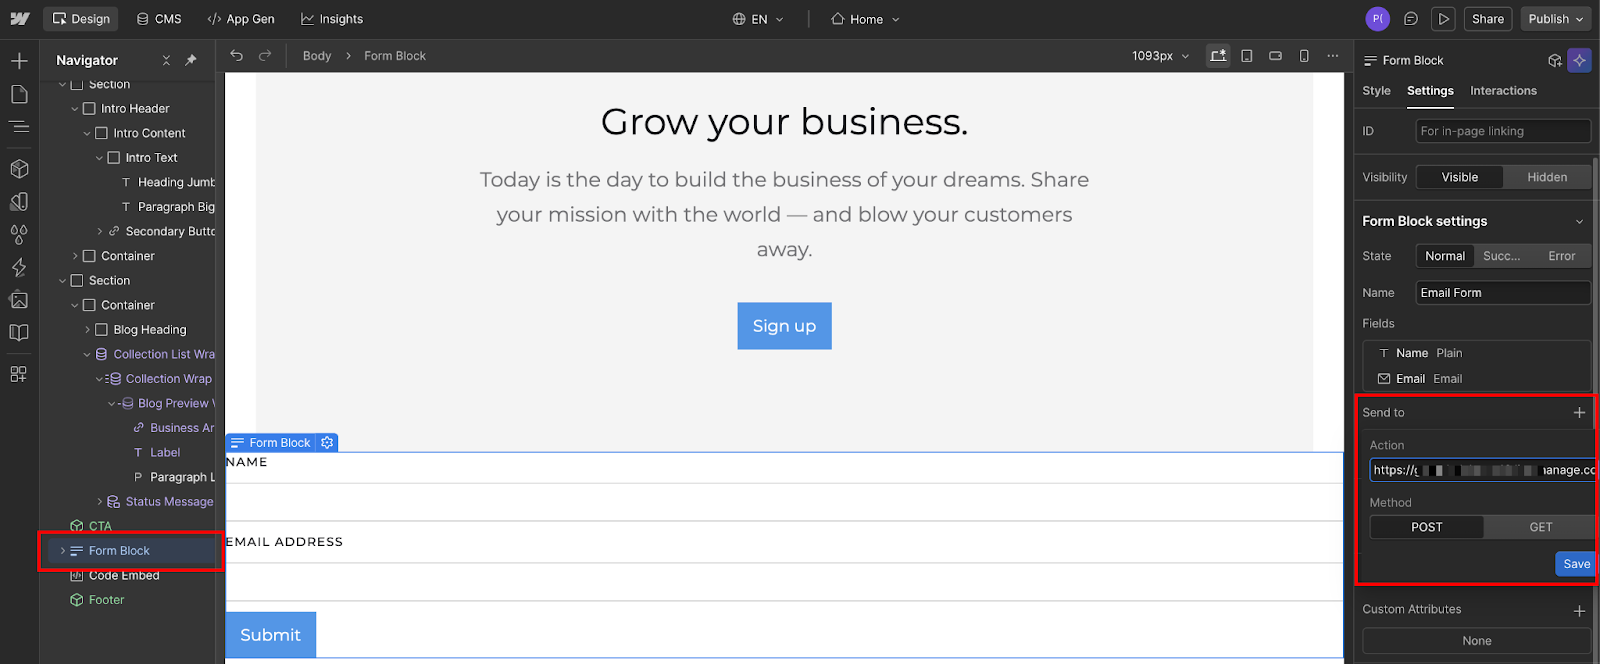
Now comes the critical part: field name mapping. Mailchimp expects specific field names (called merge tags) that match your audience's subscriber fields. Click each input element in your form and check its "Name" attribute in the Settings panel.
Required field mappings:
- Email field: Must be named
EMAIL(uppercase) - Name field: If you're using Webflow's default single Name field, you have two options: rename it
FNAMEto map to Mailchimp's first name merge tag (subscribers will be added with first name only), or split it into two separate inputs namedFNAMEandLNAMEif you want full name capture
These field names are case-sensitive and must be uppercase. Mailchimp won't recognize lowercase variants like "email" or "Email".
If your Mailchimp audience has custom fields (like Company or Phone), you can add corresponding inputs to your Webflow form, but you'll need to check Mailchimp's merge tag names in Audience → Settings → Audience fields and merge tags.
Step #3: Configure opt-in settings and test the integration
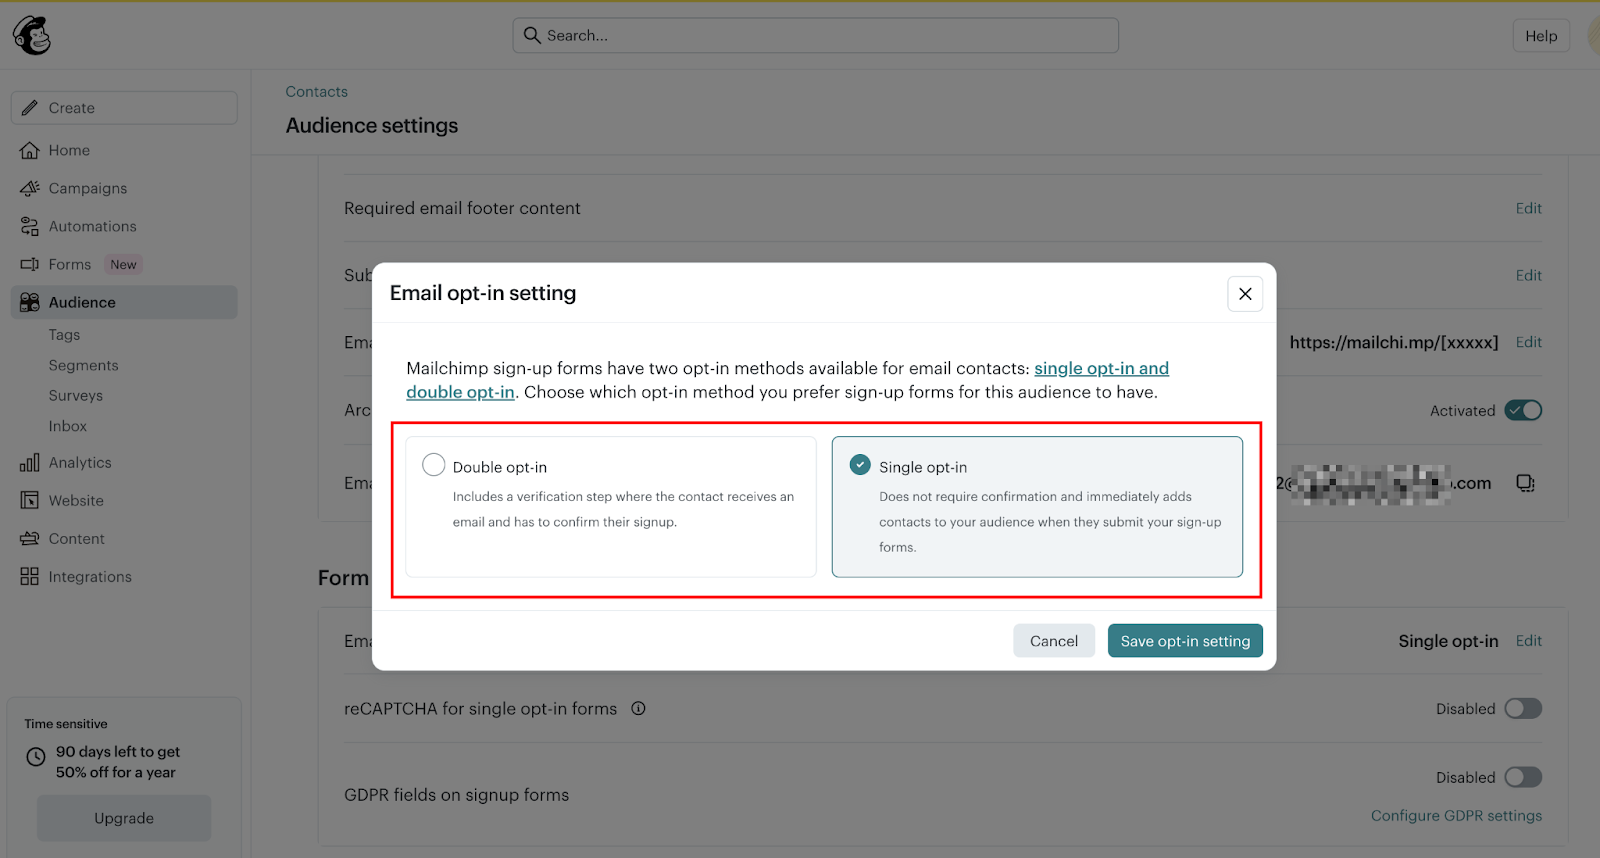
Before publishing, decide whether you want a single opt-in or double opt-in. In Mailchimp, go to Audience → Audience settings → Form settings (audience-wide defaults). Scroll to "Email opt-in settings."
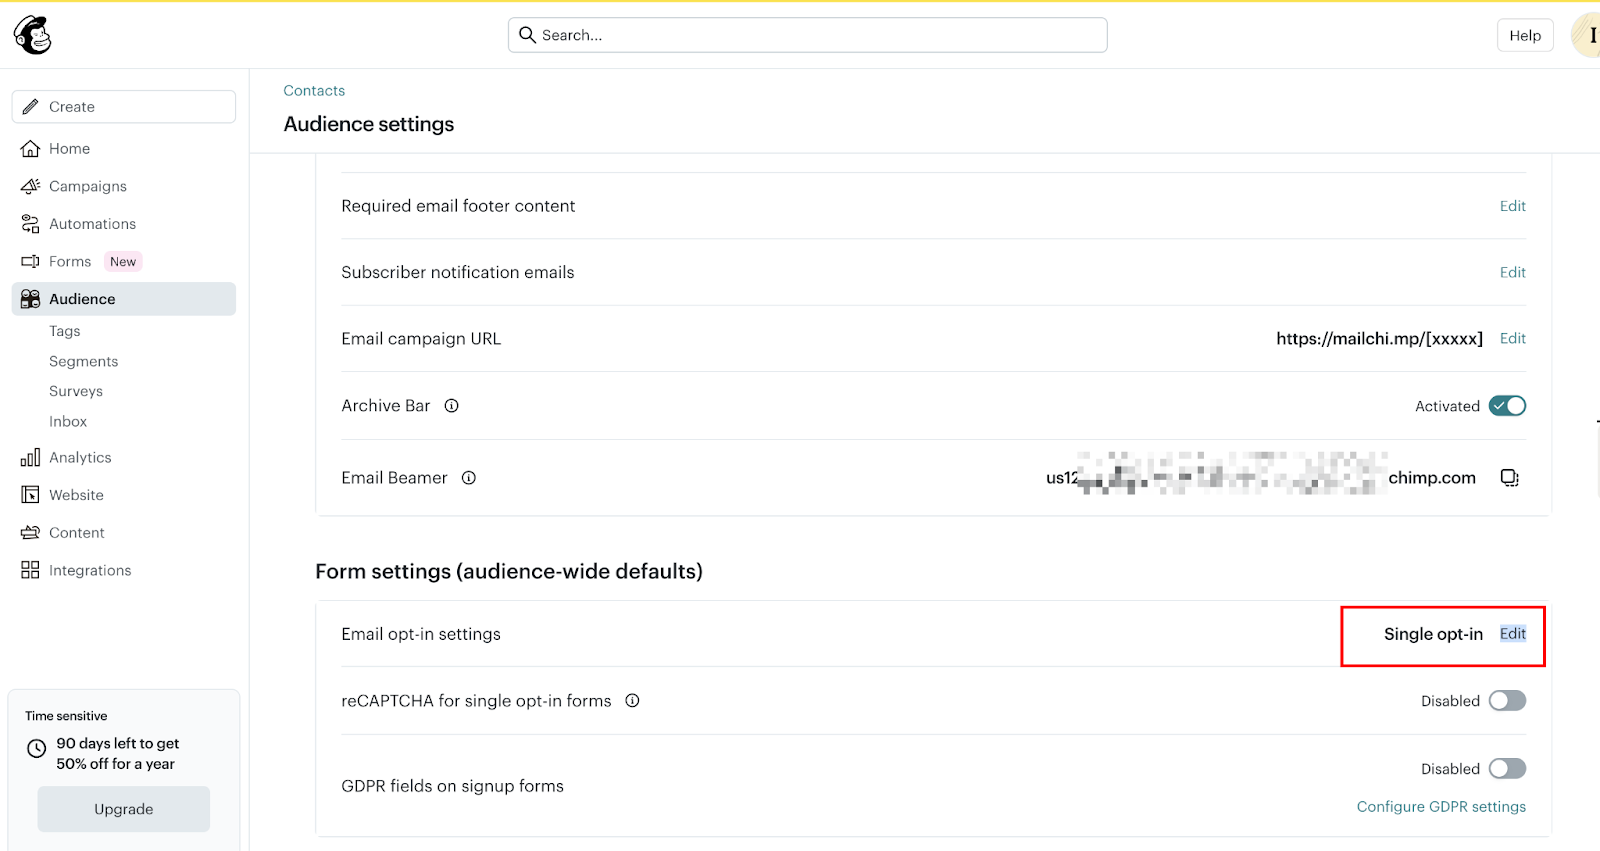
If this is “Double opt-in”, new subscribers receive a confirmation email and must click a link before being added to your audience. If “Single opt-in”, they're added immediately upon form submission.
For GDPR compliance or if you're in the EU, double opt-in is typically required.
For US-based audiences, single opt-in is acceptable and reduces friction. I've found double opt-in reduces list size (many people don't confirm), but those who do confirm are higher-quality subscribers.
Important reCAPTCHA consideration: If you enable reCAPTCHA in Webflow (under Form Settings) and you're using single opt-in in Mailchimp, you must turn off "Enable reCAPTCHA for single opt-in forms" in settings. Having both enabled creates a conflict.
For double opt-in, you can safely enable reCAPTCHA in both platforms.
Step #4: Publish your Webflow site
Visit the live page (not the Designer preview; form actions don't work in preview mode) and submit a test using a real email address you control. Check your email inbox.
If you enabled double opt-in, you should receive a confirmation email from Mailchimp within 2-3 minutes. Click the confirmation link. Then log in to Mailchimp and verify that the contact appears in your audience.
If you used single opt-in, the contact should appear in Mailchimp immediately after submission. If nothing arrives after 5 minutes, you have a configuration issue, likely a mismatched field name or incorrect action URL.
What you get with this method:
- Full control over form styling using Webflow's Designer
- Zero ongoing costs beyond your Mailchimp subscription
- Direct data flow with no middleware latency
- Works on any Webflow plan (no custom code requirements)
What you give up:
- Webflow's success state triggers on submission, but the form redirects to Mailchimp's confirmation page rather than staying on your site — custom success messaging is limited
- Can't add Mailchimp tags programmatically
- No conditional logic based on form responses
- Limited to one audience per form (can't route to different lists)
If those trade-offs are acceptable, you don't need tags, your audience is in one list, and design consistency matters, Method 1 is the right call. If any of those constraints are a problem, Method 2 is where to go.
Method #2: How to connect a Webflow form to Mailchimp with Zapier (advanced tagging and routing)
Setup time: 15 minutes
Cost: $19.99/month minimum (Zapier Professional plan, billed annually)
Best for: Tag-based segmentation, conditional routing, multi-step workflows
Zapier sits between Webflow and Mailchimp as an automation layer. When someone submits a Webflow form, Zapier detects the submission, extracts the form data, and uses Mailchimp's API to add the subscriber with custom tags, audience routing, or conditional logic.
It's the only method that supports programmatic tagging, but it adds cost and latency.
I use Zapier when clients need subscriber segmentation based on form source. A B2B SaaS company runs three landing pages (enterprise, startup, agency) with identical forms. Each form submission triggers a Zapier flow that adds the subscriber to the same Mailchimp audience but applies one of the following tags: "enterprise-lead," "startup-lead," or "agency-lead."
Their email automation sends different nurture sequences based on those tags.
Another client routes demo requests to one Mailchimp audience, newsletter signups to another, and webinar registrations to a third — all from different Webflow forms on the same site. Zapier handles the routing logic in a single dashboard instead of managing three separate Mailchimp connections.
The trade-offs: Zapier costs $19.99/month for the Professional plan (billed annually, 750 tasks/month), and there's processing latency. Form submissions don't reach Mailchimp instantly; Zapier's polling intervals can cause delays of 30 seconds to 3 minutes.
For most marketing use cases, this latency doesn't matter. For time-sensitive workflows like event confirmations or immediate download access, it's problematic.
If that trade-off works for your use case, here's the full setup.
Step #1: Create a Webflow form and a Zapier account
Build your form in Webflow Designer as normal — email field, name fields, any custom data you want to collect. Make sure each input has a descriptive "Name" attribute in the Settings panel. These names become the field labels in Zapier, so "email" is clearer than "field-1."
Publish your Webflow site. Zapier can't access forms in unpublished sites. It monitors your live site for form submissions.
Sign up for a Zapier account if you don't have one.
The free plan includes unlimited Zaps and 100 tasks per month, but limits you to two-step Zaps (one trigger, one action). One form submission with a single action step = one task. If you expect more than 100 signups per month or need multi-step workflows, you'll need the Professional plan at $19.99/month (billed annually) to support 750 tasks.
Step #2: Set up the Zapier workflow (Zap)
Log in to Zapier and click "Create Zap" in the top navigation. This opens the Zap editor.
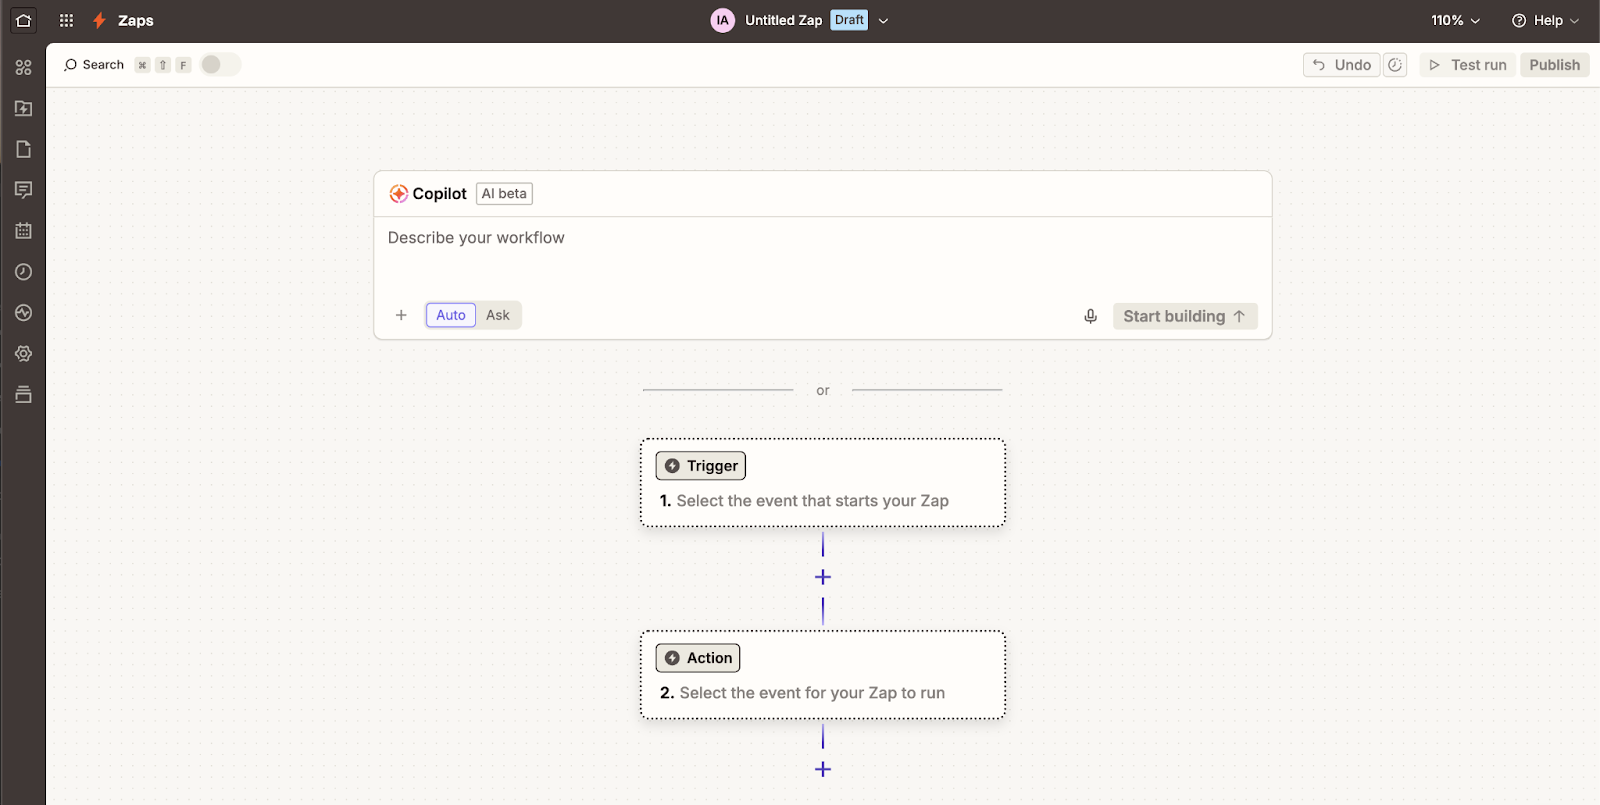
Trigger configuration
Click "Trigger" and search for "Webflow." Select "Webflow" as the trigger app. Choose "New form submission" as the trigger event. This tells Zapier to watch for new form submissions from your Webflow site.
Click "Continue," and you'll be prompted to connect your Webflow account. Click "Sign in to Webflow" and authorize Zapier to access your sites. Zapier uses OAuth, so you're not sharing your password; just granting read access to form submissions.
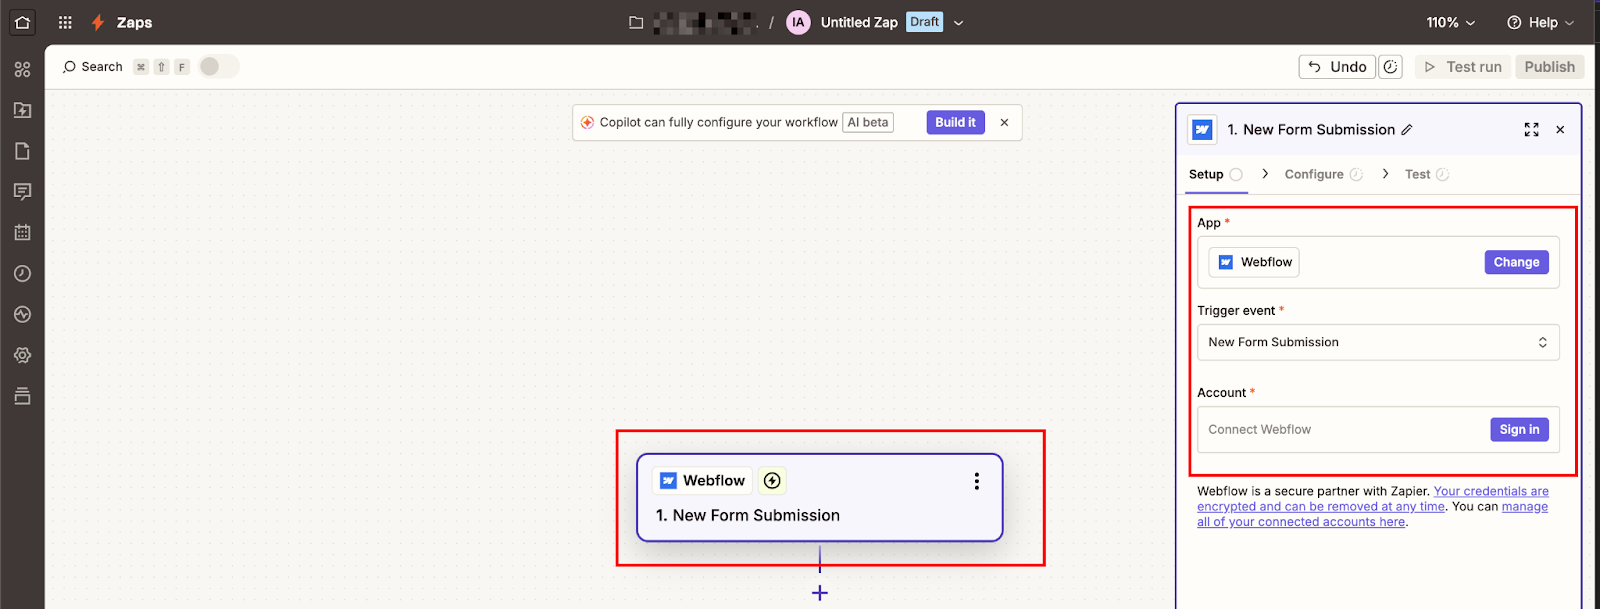
Once connected, select your Webflow site from the "Site" dropdown, then select the specific form from the "Form" dropdown. If you have multiple forms on the same site, make sure you choose the right one.
Click "Test trigger," and Zapier will fetch a recent form submission from your site. If you haven't received any real submissions yet, submit a test on your live Webflow site, then click "Test trigger" again. Zapier needs at least one submission to map the fields correctly.


Action configuration
Click the "+" button below your trigger to add an action step. Search for "Mailchimp" and select it. Choose "Add/Update Subscriber" as the action event. This ensures Zapier checks for existing subscribers before creating duplicates. If the email already exists, it updates the contact instead of creating a new one.
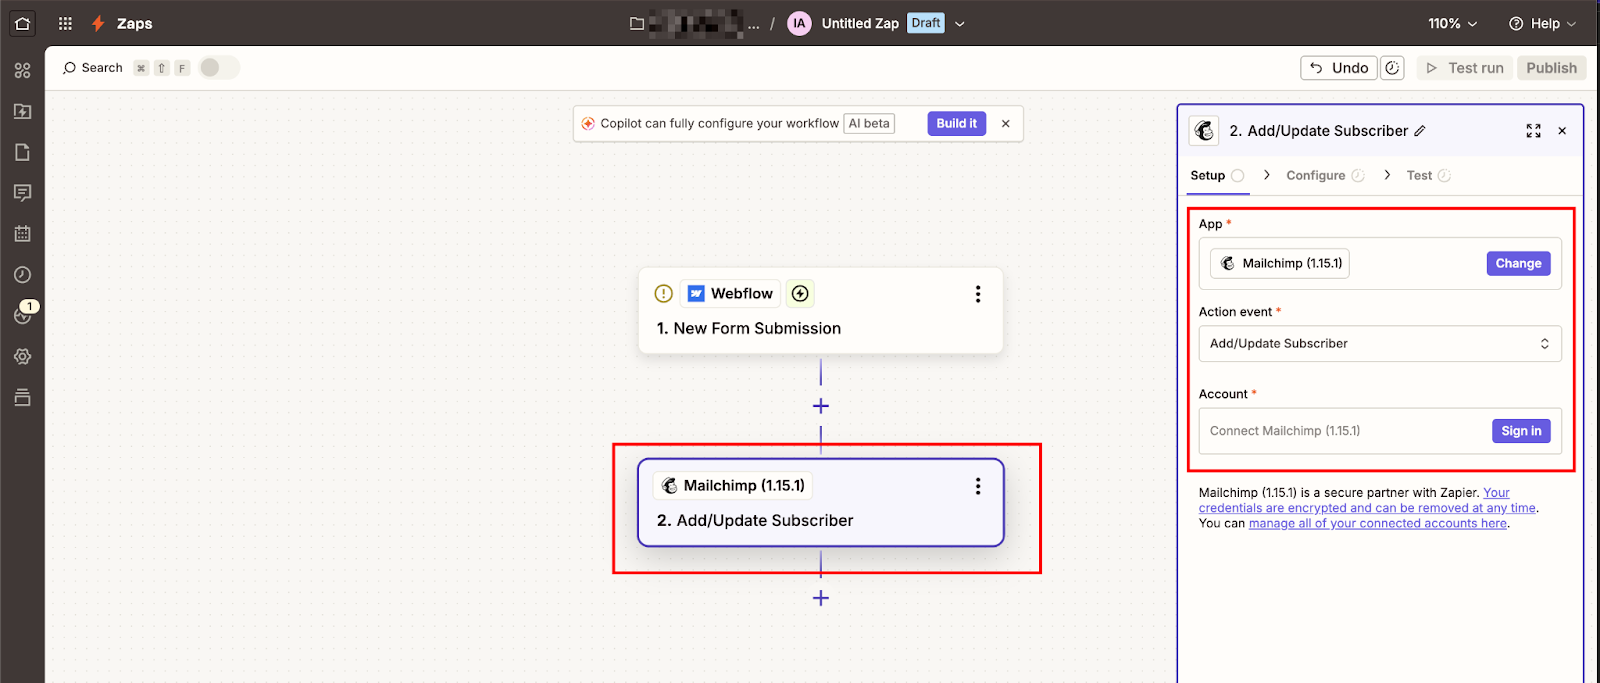
Click "Continue" and sign in to your Mailchimp account. Authorize Zapier to access your audiences.
Now you'll map Webflow form fields to Mailchimp subscriber fields:
- Audience: Select the Mailchimp audience where you want to add subscribers
- Subscriber Email: Click the field and select the email address from your Webflow form (it will appear as a dynamic field from the test data)
- Subscriber Status: Choose "Subscribed" for single opt-in or "Pending" for double opt-in
- Name: If you're using Webflow's default single Name field, map it to Mailchimp's FNAME merge tag. If you split it into two inputs, map them to FNAME and LNAME, respectively
- Tags: This is the power feature. Enter tags as comma-separated text: "webflow-signup,newsletter-subscriber" or use dynamic data from your form
For the B2B SaaS example I mentioned earlier, the Tags field contained dynamic text based on the form's page URL: if the URL contains "enterprise," add the tag "enterprise-lead." Zapier can do this with built-in Formatter steps or conditional paths.
Step #3: Test and activate the Zap
Click "Test action," and Zapier will send test data to Mailchimp. Check your Mailchimp audience—you should see a new contact with the correct name, email, and tags. If the test fails, check your field mappings. Common issues: email field mapped to the wrong variable, tag syntax errors, or audience permissions.
If the test succeeds, click "Publish Zap" at the bottom of the editor.
Give your Zap a descriptive name like "Webflow Newsletter → Mailchimp [Startup Tag]" so you can identify it later when you have multiple Zaps running.
Your Zap is now live. Submit another test on your Webflow site. Wait 1-2 minutes (Zapier checks for new submissions every 1-15 minutes, depending on your plan tier). Then check Mailchimp to confirm the subscriber was added with the correct tags.
Step #4: Monitor Zap history and troubleshoot errors
Zapier provides a detailed task history showing every form submission it processed. Click "Zap History" in the left sidebar to see recent runs. Each entry shows whether the Zap succeeded or failed, the data sent, and any error messages.
Common failure scenarios:
- Missing required fields: Mailchimp requires an email address. If someone submits your Webflow form without entering an email (because you didn't mark it required), the Zap fails.
- Invalid email format: If your Webflow form doesn't validate email syntax, people can submit "abc" or "test@test," and Mailchimp will reject it.
- API rate limits: Mailchimp's API allows 10 requests per second. If you get a massive traffic spike (500 signups in one minute), some Zap tasks will fail. Zapier will retry automatically.
- Duplicate pending subscribers: If someone submits the form multiple times before confirming their email, Mailchimp might reject the duplicate. Use the "Add/Update Subscriber" action instead of "Add Subscriber" to avoid this.
Zapier sends error notifications via email when Zaps fail. You can adjust notification settings in your Zapier account preferences.
What you get with this method:
- Tag-based segmentation and audience routing
- Conditional logic based on form fields or submission source
- Update existing subscribers instead of creating duplicates
- Multi-step workflows (add to Mailchimp, then send Slack notification, then update Google Sheet)
What you give up:
- $20/month minimum cost for the Starter plan
- 30-second to 3-minute latency between submission and Mailchimp sync
- Task limits (100/month free, 750/month on Starter)
- Another third-party dependency to maintain
Both methods get data into Mailchimp. The right choice depends on which trade-offs your project can absorb. Here's how to fix it when either method breaks.
How do you fix Mailchimp-Webflow integration issues?
Most Mailchimp-Webflow failures come down to four things: wrong field names, incorrect action URL, a reCAPTCHA conflict, or browser tracking protection blocking the POST.
Here's how to diagnose each one.
Form submissions aren't appearing in Mailchimp
Check the form action URL first. In Webflow Designer, select your form and verify the Action field contains the complete Mailchimp URL starting with https://. I've debugged this exact issue five times—every time, someone forgot the protocol or copied only part of the URL.
Verify field name mappings. Mailchimp requires uppercase field names: EMAIL, FNAME, LNAME. Open Webflow Designer, click each input element, and check the Name attribute in Settings. If you see "email" or "Email," change it to "EMAIL". This is case-sensitive.
Then, confirm that your form method is set to POST. Select the form container in Webflow Designer, open Settings, and verify that Method is set to "POST" in the dropdown. GET requests will fail silently.
If you're using double opt-in in Mailchimp, check your spam folder. Mailchimp's confirmation emails sometimes trigger spam filters, especially if you're testing with Gmail. The confirmation email subject line is "Please Confirm Subscription" from your Mailchimp account name.
For Zapier integrations: Check your Zap history. Log into Zapier, click "Zap History" in the left sidebar, and look for failed tasks. Error messages will show exactly what went wrong—usually a missing required field or API authentication issue.
Webflow's success state triggers but redirects away from the page
When using the native form action method, Webflow's success state does fire on submission, but Mailchimp then redirects the visitor to its own hosted confirmation page. Your custom success messaging won't display, and users will leave your site.
To bring them back, set up a redirect URL inside Mailchimp:
- Go to Audience → Settings → Audience name and defaults
- Scroll to "Opt-in confirmation," and enter your Webflow thank-you page URL
After confirming their subscription, users will return to your site rather than Mailchimp's generic page.
If you need users to stay on the page entirely without a redirect, switch to Zapier (Method 2), which processes submissions server-side and lets Webflow's in-page success state display normally.
reCAPTCHA causes form submission failures
If you enabled reCAPTCHA in both Webflow and Mailchimp, you've created a conflict.
Here's the rule:
- Single opt-in: Enable reCAPTCHA in Webflow OR Mailchimp, never both
- Double opt-in: You can safely enable reCAPTCHA in both platforms
For single opt-in, I recommend enabling reCAPTCHA in Mailchimp (Audience → Settings → Enable reCAPTCHA for single opt-in forms) and leaving it disabled in Webflow. Mailchimp's CAPTCHA appears after form submission and uses invisible reCAPTCHA, which requires no user interaction unless it detects bot behavior.
If you need reCAPTCHA in Webflow because you're using the native form action method and Mailchimp's embedded CAPTCHA doesn't apply, turn off Mailchimp's CAPTCHA setting and rely solely on Webflow's implementation.
Firefox is blocking form submissions
Firefox's Enhanced Tracking Protection blocks Mailchimp form submissions because it classifies Mailchimp as a tracking service. This affects both native form actions and embedded forms using the POST method.
The workaround: There isn't a reliable one that works for all Firefox users. Mailchimp's documentation acknowledges this issue but doesn't provide a solution.
Your options:
- Accept that some visitors using Firefox with strict privacy settings can't submit (based on data from client sites)
- Add messaging like "If submission fails, please try a different browser or disable tracking protection."
- Use Zapier, which processes submissions server-side and isn't affected by browser tracking protection
This is one reason I recommend Zapier for high-stakes forms, such as demo requests or paid event registrations. You can't afford to lose leads due to browser compatibility issues.
Duplicate subscribers appearing in Mailchimp
If someone submits your form multiple times (common with event registrations or download gates), Mailchimp creates duplicate pending subscribers if you're using double opt-in. This clutters your audience and makes reporting inaccurate.
For native form actions and embedded forms: Mailchimp handles this automatically. If the email already exists with "Subscribed" status, it updates the existing contact. If the email already exists with "Pending" status (waiting for confirmation), it sends another confirmation email without creating a duplicate.
For Zapier: Use the "Add/Update Subscriber" action instead of "Add Subscriber." This checks for existing emails first. If found, it updates the contact's data. If not found, it creates a new subscriber. Configure this in your Zap's action step when setting up Mailchimp integration.
Go further with Webflow's integration ecosystem
The two methods above cover the majority of Mailchimp-Webflow implementations. For teams with more complex data routing needs: custom API calls, webhook-triggered workflows, or real-time sync beyond what Zapier handles, Webflow's developer platform gives you the underlying primitives.
Two starting points worth bookmarking:
- Webflow + Mailchimp integration page: Use cases, setup context, and what the integration supports natively
- Webflow + Zapier integration page: Full list of Zapier triggers and actions available for Webflow
For custom API integrations beyond the Zapier layer, explore Webflow's developer docs for complex routing, custom API triggers, or real-time sync requirements.
Frequently asked questions
Can I use Mailchimp's Interest Groups with Webflow forms?
Yes, but not with the direct form action method. Interest Groups in Mailchimp are subscriber-facing preference categories (the checkboxes or dropdowns that appear on Mailchimp's signup forms). They don't work as standard merge tag field names you can pass via a POST form field.
How do I route different forms to different Mailchimp audiences?
Each Webflow form can connect to only one Mailchimp action URL, which corresponds to a single audience. If you want different forms to feed different audiences, create separate forms in Webflow Designer with distinct action URLs. A pricing page form posts to your "Enterprise Prospects" audience. A blog subscription form posts to your "Newsletter Subscribers" audience. Each form has its own Mailchimp action URL in the form settings.
What happens if Mailchimp is temporarily down during a form submission?
For native form actions: The form submission fails, and visitors see either a browser error page or Mailchimp's error message. Data is lost; there's no automatic retry. This is rare (Mailchimp's uptime is 99.9%+), but it happens during their monthly maintenance windows. For Zapier: The Zap fails initially, but Zapier automatically retries the task. It attempts the submission again 1 minute later, then 5 minutes later, then 15 minutes later. If Mailchimp is still down after multiple retries, the task eventually fails, and you receive an error notification.


