


Connect Figma design tokens and components to Webflow using the official plugin, Style Dictionary, and APIs.
Figma design systems provide the foundation for consistent SaaS marketing sites, but translating those Figma systems into Webflow requires understanding how design tokens, components, and variables map between platforms. This guide explains the architecture, tooling, and workflows needed to maintain design system fidelity from Figma to production.
What this integration enables
Connecting Figma design systems to Webflow creates a workflow where design tokens and components can be synchronized through the official Figma to Webflow plugin and companion Webflow app, though with important technical constraints. According to Webflow's official documentation, the plugin automates component syncing with flexbox conversion and variable synchronization. Developers must handle design token transformation using tools like Style Dictionary, extracting design tokens from Figma using community plugins and converting them to CSS variables for implementation in Webflow's custom code sections.
At a high level, this integration provides:
- Design token synchronization between Figma variables and Webflow variables (supporting multiple collections per sync)
- Component architecture translation from Figma auto-layout frames to Webflow flexbox
- Style mapping from Figma text and effect styles to Webflow CSS classes
- Asset transfer including images and vector icons to Webflow's Assets panel
How Figma design tokens flow to Webflow CSS variables
The integration architecture consists of three layers: Figma as the design source containing design tokens and component specifications, a transformation layer using tools like Style Dictionary or Figma-to-Webflow plugin for manual token conversion and component mapping, and Webflow as the implementation target where converted tokens become CSS variables and components become reusable design blocks.
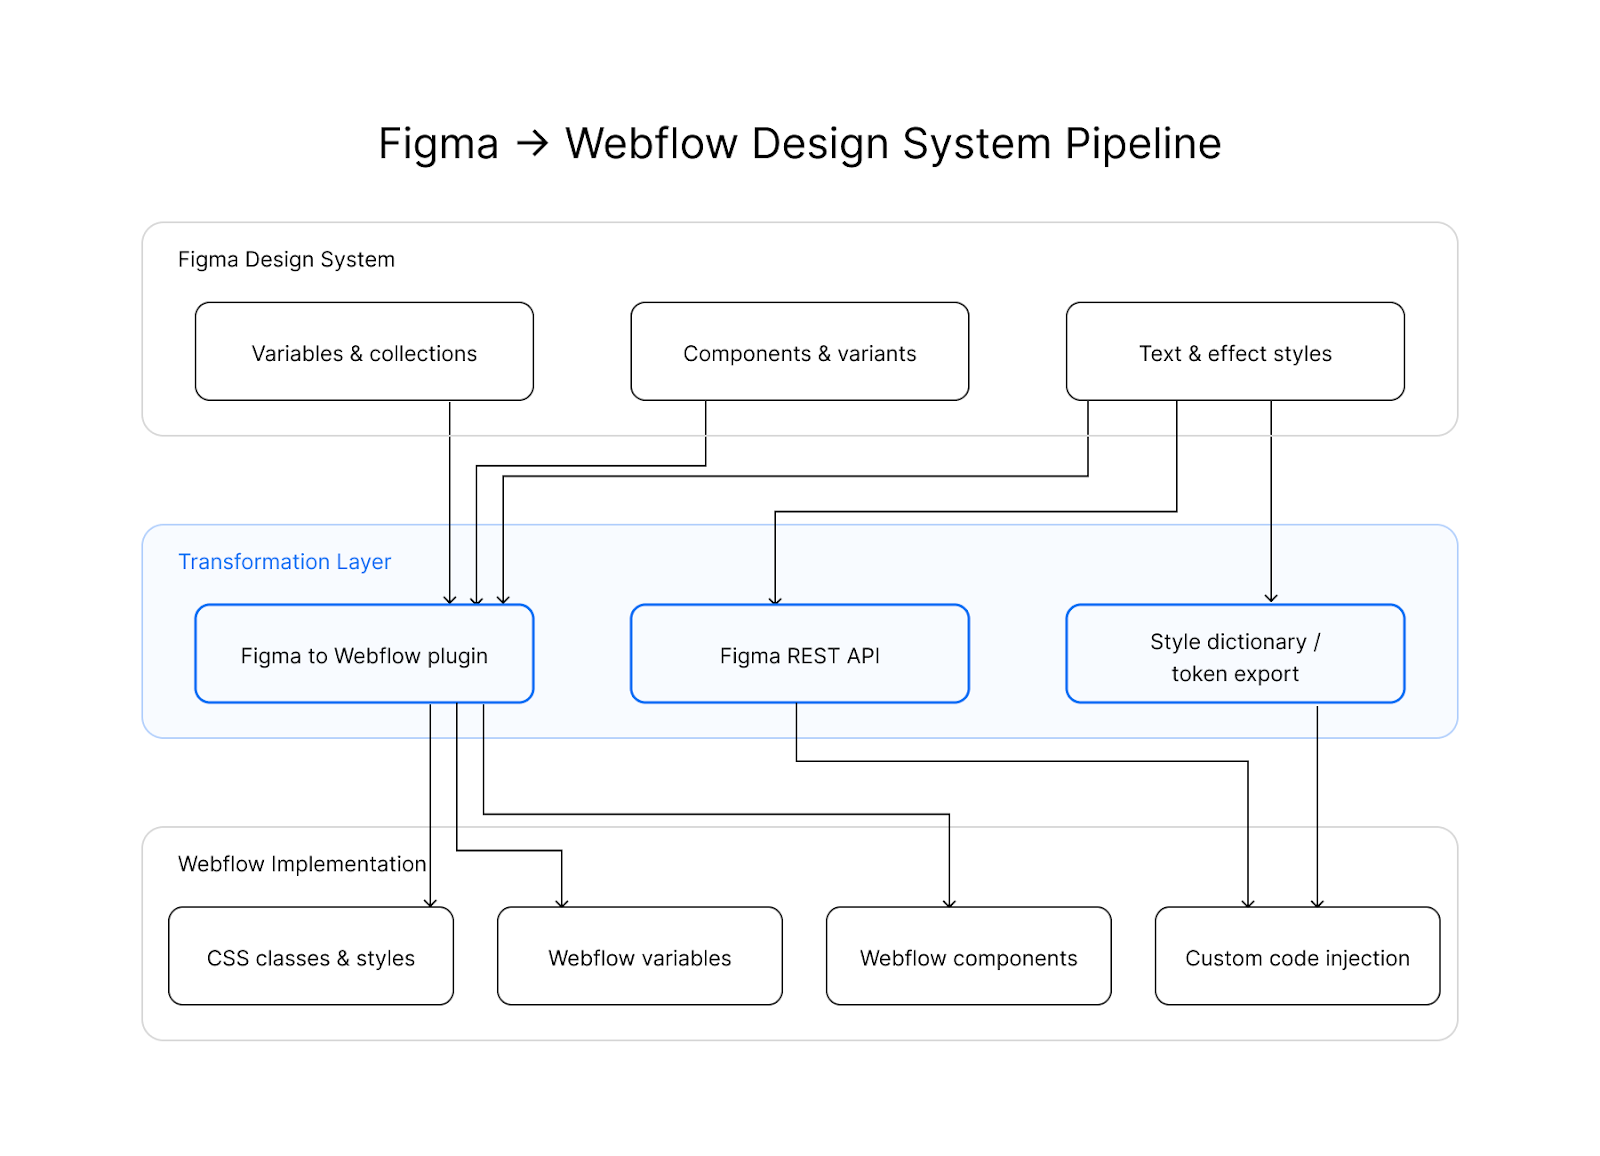
For advanced token workflows, the Figma REST API combined with Style Dictionary enables programmatic control over token transformation and extraction, supporting comprehensive design system automation pipelines.
Account and file requirements for Figma-Webflow sync
Before implementing this integration, ensure you have the following accounts, authentication credentials, and properly structured design files on both platforms.
Figma requirements
Your Figma design system must be structured for Webflow compatibility:
- Auto-layout frames on all layers intended for sync (non-auto-layout frames are unsupported)
- Variables organized in collections for colors, typography, and spacing
- Components using slash-separated naming such as Button/Primary/Large
- Text and effect styles defined at the file or team level
For programmatic access via the Figma REST API, generate a personal access token or implement OAuth 2.0 authentication.
The Variables REST API requires a Full seat in an Enterprise organization. Teams without Enterprise access must use the Plugin API or third-party token export plugins.
Webflow requirements
Your Webflow workspace needs:
- Variables panel access for managing native design tokens (color, size, font, number, and percentage variable types) that will sync automatically from Figma using the official Figma to Webflow plugin.
- Components library to store reusable UI elements with component properties and slots that correspond to your Figma component structure, ensuring updates propagate across all instances site-wide.
- Custom code injection capabilities at three levels: site-wide head code (for global CSS variables), page-level custom code (for page-specific overrides), and Code Embed elements (for inline component styling). Note that Webflow enforces a shared 50,000-character pool across ALL custom code locations combined (site-wide head/footer, page-level head/footer, Code Embed elements, and CMS Rich text fields).
- Site token authentication configured with appropriate API scopes if you plan to programmatically manage design tokens through Webflow's Designer API or Data API for automation workflows.
- Shared Libraries enabled if managing design systems across multiple sites in your workspace, allowing components, variables, and assets to be reused consistently across projects.
- Responsive breakpoint configuration for tablet (991px), mobile landscape (767px), and mobile portrait (478px) settings that will be applied during Figma-to-Webflow synchronization.
- Custom fonts pre-uploaded to your site before syncing from Figma, as custom fonts are not automatically transferred during the plugin's conversion process and will default to system fonts if not manually added first.
Environment separation: Use separate Webflow sites for development and production. Test design token syncs on a staging site before applying to production to catch conversion issues early.
For API-driven workflows, create a site token with appropriate scopes to authenticate requests.
Step 1: Sync design tokens using the Figma to Webflow plugin
The official Figma to Webflow plugin provides direct integration through Webflow's native Designer API. According to Webflow's official Help Center documentation, the plugin implements three synchronized workflows: the Layers Tab converts Figma auto layout frames into Webflow's flexbox structure, the Variables Tab syncs Figma design tokens to Webflow variables, and the Styles Tab maps Figma text and effect styles to Webflow CSS classes. The system requires manual HTML tag assignment for semantic markup, with designers explicitly mapping layer names to appropriate tags.
Configure the plugin connection
Install the Figma to Webflow plugin from Figma Community (Webflow's official integration operating through direct Designer API connectivity) and the Webflow app in your Webflow workspace to begin syncing design tokens, components, and styles. The modern workflow uses both the Figma plugin and Webflow app together for optimal bidirectional sync capabilities.
At a high level, you'll:
- Connect your Webflow account via OAuth in the Figma plugin and authenticate to your target site
- Select the target Webflow site for asset uploads and choose the variable collection to sync
- Configure base font size for typography variable conversion and upload custom fonts to Webflow first (or they will be lost during sync)
- Set class name prefixes to prevent naming conflicts and map layer names to semantic HTML tags (button, heading, anchor) for proper markup
- Ensure all Figma layers use auto layout; frames without auto layout will not convert properly
- Sync components, variables, and styles in batches of 100 or fewer to maintain stable performance
The plugin operates through three tabs: Layers for structure, Variables for design tokens, and Styles for text and effect mappings. See the official plugin documentation for interface details.
Sync variables and styles
The Variables tab syncs Figma design tokens to Webflow variables. Webflow supports five variable types: Color, Size, Font, Number, and Percentage.
At a high level, you'll:
- Select variable collections in Figma to sync
- Map variable types to Webflow equivalents
- Configure unit conversion (px, em, rem) for size variables
- Resolve conflicts when variable names already exist in Webflow
For design systems with multiple modes (light/dark themes), sync each mode separately by adjusting which mode is active in Figma before initiating the plugin sync, or manually create additional variable modes in Webflow's Variables panel after the initial sync.
Transfer components and layouts
The Layers tab in Webflow's official Figma to Webflow plugin converts Figma auto-layout frames to Webflow flexbox elements. Layer names from Figma are automatically converted to CSS class names in Webflow, streamlining the component mapping process during integration.
At a high level, you'll:
- Select frames or components in Figma
- Assign HTML tags based on semantic purpose (layer names like "button" map to anchor tags, "heading" to H1-H6 elements)
- Configure responsive breakpoints for tablet (991px), mobile landscape (767px), and mobile portrait (478px). Note that responsiveness cannot be applied if layer width is less than 250px or if elements are already stacked vertically.
- Handle class conflicts by choosing to create new classes, reuse existing classes, or update existing classes with Figma styles
Sync components in smaller batches rather than entire pages, with a maximum batch size of 100 components to maintain stable performance during the transfer process.
Step 2: Export design tokens and implement as CSS custom properties
For advanced design system needs beyond Webflow's native Variables feature, export Figma tokens to CSS custom properties using verified community plugins. These plugins export design tokens in JSON, CSS, SCSS, and other formats compatible with Style Dictionary, the industry-standard transformation tool for converting design tokens into platform-specific code.
Extract tokens from Figma
All five plugins support JSON and CSS variable outputs. Design Tokens Manager and Pinwheel explicitly support the W3C Design Tokens Format Module specification, ensuring interoperability with other design token tools and platforms.
Transform tokens with Style Dictionary
Style Dictionary is the industry-standard tool for transforming design tokens from JSON into platform-specific formats. For Tokens Studio integration, use the official @tokens-studio/sd-transforms package for optimized transforms.
{
  "source": ["tokens/**/*.json"],
  "platforms": {
    "css": {
      "transformGroup": "css",
      "buildPath": "build/css/",
      "files": [{
        "destination": "variables.css",
        "format": "css/variables"
      }]
    }
  }
}
This configuration specifies that token source files are located in the tokens/ directory, the CSS platform uses the standard CSS transform group, and the output builds to build/css/variables.css. When executed with the style-dictionary build command, this generates CSS custom properties suitable for injection into Webflow's custom code sections. See the Style Dictionary configuration reference for transform options and output formats.
Inject CSS variables into Webflow
Webflow provides five injection points for custom code: site-wide head code, site-wide footer code, page-level head code, page-level footer code, and Code Embed elements. Important: Webflow enforces a shared 50,000-character pool across ALL custom code locations combined, including site-wide head/footer, page-level head/footer, Code Embed elements, and CMS Rich text fields. Plan your custom code budget accordingly. Site-wide head code is the recommended location for global CSS custom properties.
Access Site settings > Custom code > Head code and add your CSS variables:
<style>
:root {
  /* Colors */
  --color-primary: #0066FF;
  --color-secondary: #FF6B6B;

  /* Typography */
  --font-heading: 'Inter', sans-serif;
  --font-size-h1: 48px;
  --line-height-heading: 1.2;

  /* Spacing */
  --spacing-sm: 8px;
  --spacing-md: 16px;
  --spacing-lg: 32px;

  /* Shadows */
  --shadow-sm: 0 1px 2px rgba(0,0,0,0.05);
  --shadow-md: 0 4px 6px rgba(0,0,0,0.1);
}
</style>
Do not include <html>, <body>, or <head> tags in custom code sections. For page-specific overrides, use Page settings > Custom code. Page-level code appears after site-wide code in markup, enabling cascading overrides. See Webflow's custom code documentation for injection point details.
Step 3: Map Figma components to Webflow components
Webflow components use a different architecture than Figma components. Figma uses instance overrides while Webflow uses component properties and slots for customization. The official Figma to Webflow plugin enables automated conversion of auto-layout frames to Webflow flexbox structures with automatic class name generation and variable syncing.
Component architecture differences
Figma Concept
Critical limitation: Figma variants (responsive, state, or style variants) are not automatically converted by any Webflow-native integration tool. Each variant frame creates a separate Webflow component, requiring manual management of component relationships using Webflow's style variants system.
Implement variant patterns manually
Implement state and size variations using Webflow's style variants system:
- Create a base component in Webflow
- Define style variants using combo classes for different states (hover, active, disabled) according to Webflow's Components Overview
- Use component properties for content variations (text, images, links)
- Create separate components for size variants if styling differs significantly, or use style variants to manage size-based styling changes
See Webflow University's component documentation for implementation patterns.
Share components across sites
Webflow Libraries enable cross-site component sharing within a workspace. Components, variables, assets, and layouts can be installed on multiple sites to maintain design system consistency.
Variables can be shared across multiple sites within the same Workspace through Shared Libraries. For projects in separate Workspaces, use Libraries to share variable collections across sites, or implement identical CSS custom properties via custom code injection for cross-project consistency.
Step 4: Verify integration success
After syncing design systems, verify that tokens, components, and styles transferred correctly to Webflow.
Verify design tokens transferred correctly
In Webflow's Variables panel, confirm:
- All expected variables exist with correct types (Color, Size, Font, Number, Percentage)
- Variable values match Figma source values
- Variables can be applied to elements via the Style panel
- Variable updates propagate to all linked elements
Use the Variables panel documentation to understand variable behavior and limitations.
Validate component structure and responsive behavior
For transferred components, verify:
- Flexbox structure matches Figma auto-layout behavior
- Class names follow expected naming conventions
- Images and icons appear in the Assets panel
- Component props allow intended customizations
Test responsive behavior across all Webflow breakpoints: desktop, tablet (991px and below), mobile landscape (767px and below), and mobile portrait (478px and below).
Confirm text and effect styles match source
- Font families render correctly (custom fonts must be manually uploaded to Webflow before syncing)
- Typography properties match (size, weight, line height, letter spacing)
- Shadows and effects sync but may require manual fine-tuning after import
- Colors match source values in both light and preview modes
Custom code effects only appear on published sites or in preview mode, not in the Designer canvas.
Step 5: Automate token sync with Figma and Webflow APIs
For automated workflows and CI/CD integration, both platforms provide REST APIs for programmatic access. This section covers when you need direct API access beyond the plugin workflow, such as building custom automation pipelines, integrating with existing development toolchains, or managing design tokens at scale.
Figma API token extraction
The Figma REST API provides endpoints for extracting design system data.
Response structure for variables:
{
  "meta": {
    "variables": {
      "VariableID:123": {
        "name": "color-primary",
        "resolvedType": "COLOR",
        "valuesByMode": {
          "ModeID:456": {
            "r": 0.0,
            "g": 0.4,
            "b": 1.0,
            "a": 1.0
          }
        }
      }
    },
    "variableCollections": {
      "CollectionID:789": {
        "name": "Colors",
        "modes": [{"modeId": "ModeID:456", "name": "Light"}],
        "defaultModeId": "ModeID:456"
      }
    }
  }
}
Figma to Webflow data transformation:
- Figma: {r: 0.0, g: 0.4, b: 1.0, a: 1.0} (RGBA 0-1 range)
- Webflow CSS: --color-primary: rgba(0, 102, 255, 1) (RGBA 0-255 range)
- Webflow Variable: Color type with hex value #0066FF
Color values in Figma's API are returned as RGBA objects with floating-point values from 0 to 1. When converting to standard CSS formats, multiply RGB values by 255 to convert from the 0-1 range to the standard 0-255 range used in CSS, while the alpha channel value remains in the 0-1 range.
The Variables API requires file_variables:read scope and Enterprise organization membership. See the Variables endpoints documentation for complete specifications.
Webflow API custom code injection
The Webflow Custom Code API enables programmatic script and style injection:
POST /sites/{site_id}/registered_scripts/inlineKey endpoints include:
- POST /sites/{site_id}/registered_scripts/inline for inline script registration
- POST /sites/{site_id}/registered_scripts/hosted for external script URLs
- POST /sites/{site_id}/pages/{page_id}/scripts for page-specific script injection
Authentication uses Bearer tokens with site-specific scopes. For broader platform integration, Webflow supports OAuth 2.0 authentication flows (Data API Reference).
Webflow Designer API for variables
The Designer API provides programmatic control over design elements, styles, components, and variables. The Variables API enables management of design tokens including colors, sizes, fonts, numbers, and percentages.
// Get default variable collection
const collection = await webflow.getDefaultVariableCollection()

// Create a color variable
const primaryColor = await collection.createColorVariable("primary", "#ffcc11")

// Update variable value
const variable = await collection.getVariableById(variableId)
await variable.set("#0066FF")
Designer API methods execute in the browser, manipulating the Designer interface in real-time.
Automation workflow patterns
For teams requiring automated synchronization between design updates and production sites, automation platforms provide webhook triggers and API integrations.
Available automation triggers
Figma webhook events
Figma Webhooks V2 supports these events:
- FILE_UPDATE for any file change
- FILE_VERSION_UPDATE for version history and published design system updates
- LIBRARY_PUBLISH for component library publication (most relevant for design system workflows, and includes variable data)
Example webhook payload:
{
  "event_type": "LIBRARY_PUBLISH",
  "file_key": "abc123",
  "file_name": "Design System",
  "timestamp": "2024-01-15T10:30:00Z",
  "triggered_by": {
    "id": "user123",
    "handle": "designer"
  }
}
Verify webhook authenticity:
const isValid = verifyWebhookSignature(
  request.headers['x-figma-signature'],
  request.body,
  webhookSecret
)
Configure webhooks with a team ID and file scope.
Webflow webhook events
Webflow webhooks focus on content events: site_publish, collection_item_created, collection_item_changed, collection_item_deleted, form_submission, and e-commerce events. No native webhook exists for design or style updates—design token synchronization requires custom automation workflows.
Troubleshooting common integration issues
Integration failures typically stem from five specific technical requirements: Figma frames must use auto-layout, responsive settings cannot be applied if layer width is under 250px, custom fonts must be manually uploaded to Webflow before syncing, and the plugin is not supported in Safari browsers.
Plugin sync failures
Variable sync issues
Browser and environment issues
For additional troubleshooting, see the official plugin documentation.
Advanced considerations
Multi-site design system distribution
For SaaS products with multiple marketing sites, Webflow Libraries provide cross-site component sharing within a workspace. Combine with Webflow's native Variables system to distribute a complete design system across all sites.
Enterprise API access
Teams requiring programmatic variable management through the Figma Variables REST API need a Full seat in an Enterprise organization. Evaluate this licensing requirement during technical architecture planning.
W3C Design Tokens Format Module Compatibility
For multi-platform design systems, Design Tokens Manager and Pinwheel export W3C Design Tokens Format Module-compliant JSON, ensuring interoperability with other design token tools and platforms.
CI/CD pipeline integration
Automated token pipelines typically follow this pattern:
- Tokens Studio exports to a GitHub repository with automated triggers
- GitHub Actions triggers on token file changes and runs Style Dictionary transformation
- Style Dictionary transforms tokens to CSS custom properties format
- Custom deployment script updates Webflow via API custom code injection or manual publish
See the Tokens Studio documentation for transformation configuration details.


