Being the skeptical person I was, I decided that to really test the SEO capabilities of Webflow I needed to migrate my WordPress blog.
This was back in 2017, and I felt stuck because I was trying to scale my website, while simultaneously trying to rely on less tools.
I was convinced Webflow was the answer, but I was also terrified of a migration because I ranked for a lot of keywords.
At the time, my site was freshly hacked and I was tired of relying on so many third party plugins to help me whip up (somewhat) custom landing pages without knowing how to code
So I decided to go all in on Webflow. It would just be a matter of time before I would figure out if it was the best SEO decision I’d made or the worst.
Over the next few weekends, I migrated my site from WordPress to Webflow. I watched YouTube videos from Webflow University, Flux, CharlieMarieTV, pixelgeek, and Timothy Ricks to figure everything out.
Within a few days of launching my new Webflow site, I found that not only did I keep all my rankings, but I actually improved on some of them as well. For example, before I migrated to Webflow, I ranked #8 for a highly desirable keyword, and post-migration I was at #2.
This drove me down a rabbit hole to figure out why this happened and what Webflow was really all about. I knew it was a great tool for designers and front-end developers, but was it also a marketer's best kept secret? I certainly wouldn’t be the first marketer to tell you Webflow has some of the best SEO features out there.
Webflow is an underrated tool for marketers
Full disclosure, at the time of writing this, I work at Webflow and help lead SEO initiatives. It’s nearly impossible to avoid sounding biased at times because I’ve used Webflow for a while now — including before I worked for the company.
But even if I didn’t work at Webflow, I’m confident that Webflow would still be my main tool for building websites and managing content in a CMS.
Because, as a marketer, I need a platform that maximizes my SEO efforts, lets me quickly spin up custom landing pages to use in marketing campaigns, and gives me the ability to design custom experiences without needing to involve engineers.
And I’m not the only one — marketers that have used Webflow have found that they have total control over their company’s website. There’s no need to get development teams involved when marketing teams need to edit content, add tracking codes, or build new pages on a website.
This makes it so that even a solo marketer can build a fast, SEO-friendly company website from the ground up.
“Webflow just lets me do what I want to do. No need to push to staging, no need to call a developer friend to code up a mock. With Webflow, I can actually just do everything myself with confidence.”
It’s been amazing to see how migrating to Webflow has improved SEO traffic for many companies. Not only are their sites faster and more lightweight on Webflow, they also have a better content structure, which makes it easy for Google to crawl and index pages.

Even at Webflow, we use the Webflow CMS for creating landing pages and blog posts — all powered with Webflow Hosting.
And in the past year, we’ve been able to use Webflow’s SEO features to grow to our blog — the one you’re currently reading — to over 300,000 visitors per month:

And yes, Webflow.com is made and hosted completely in Webflow so that should say something about its power.
So, is Webflow good for SEO? I would say it’s one of the best options available. Even Astawa would agree:
For marketers, SEO is crucial — without solid SEO efforts, you’ll have a hard time gaining organic visitors from search engines. Unfortunately, if you look online for SEO guides or ranking factors, you’ll find a lot of noise.
Let’s simplify it. If you want a well optimized website, these are the most important questions to ask yourself:
- Does my website have responsive design?
- Am I limiting the number of scripts I use and is the code lightweight?
- Do I have a secure and fast hosting provider?
- Can I create different content formats like blog, category pages, product pages, landing pages, etc.?
- Can I easily add and edit meta titles, descriptions, and alt tags?
- Can I edit technical SEO settings like canonicals, sitemaps, robots.txt file, reverse proxies, and custom code?
If you can say “yes” to all six questions, you have all the controls you need to create an SEO-friendly website.
Luckily, in Webflow, we can say “yes” to all six. But you ask, how can I maximize my SEO efforts in Webflow? Let me explain.
Webflow: your one-stop-platform for an SEO-optimized site
You can’t have great SEO if your website is slow or difficult for Google to index and rank. That’s why the Webflow team put so much thought and effort into making Webflow fast and lightweight.
With Webflow, you can ensure all your websites use enterprise-grade hosting (built on AWS), produce clean semantic code, allow you to adjust SEO settings without adding plugins, and give you more flexibility with content structures and web design.
Here’s why Webflow is the best choice SEO-wise for your website.
Responsive design

It’s no surprise that Google likes to rank websites that provide a good user experience. But how does Google judge something so subjective?
One key thing that Google looks for is responsive web design. This means that, pages on a website should feel as though they are designed specifically for the screen they are being viewed on — whether it’s a desktop computer, tablet, or mobile device.
Webflow has tons of HTML elements and pre-built layouts that are fully responsive. And if you grab a template from the template marketplace, or follow a tutorial on Webflow University, you can be confident knowing that everything is responsive.
Schema markup and custom code
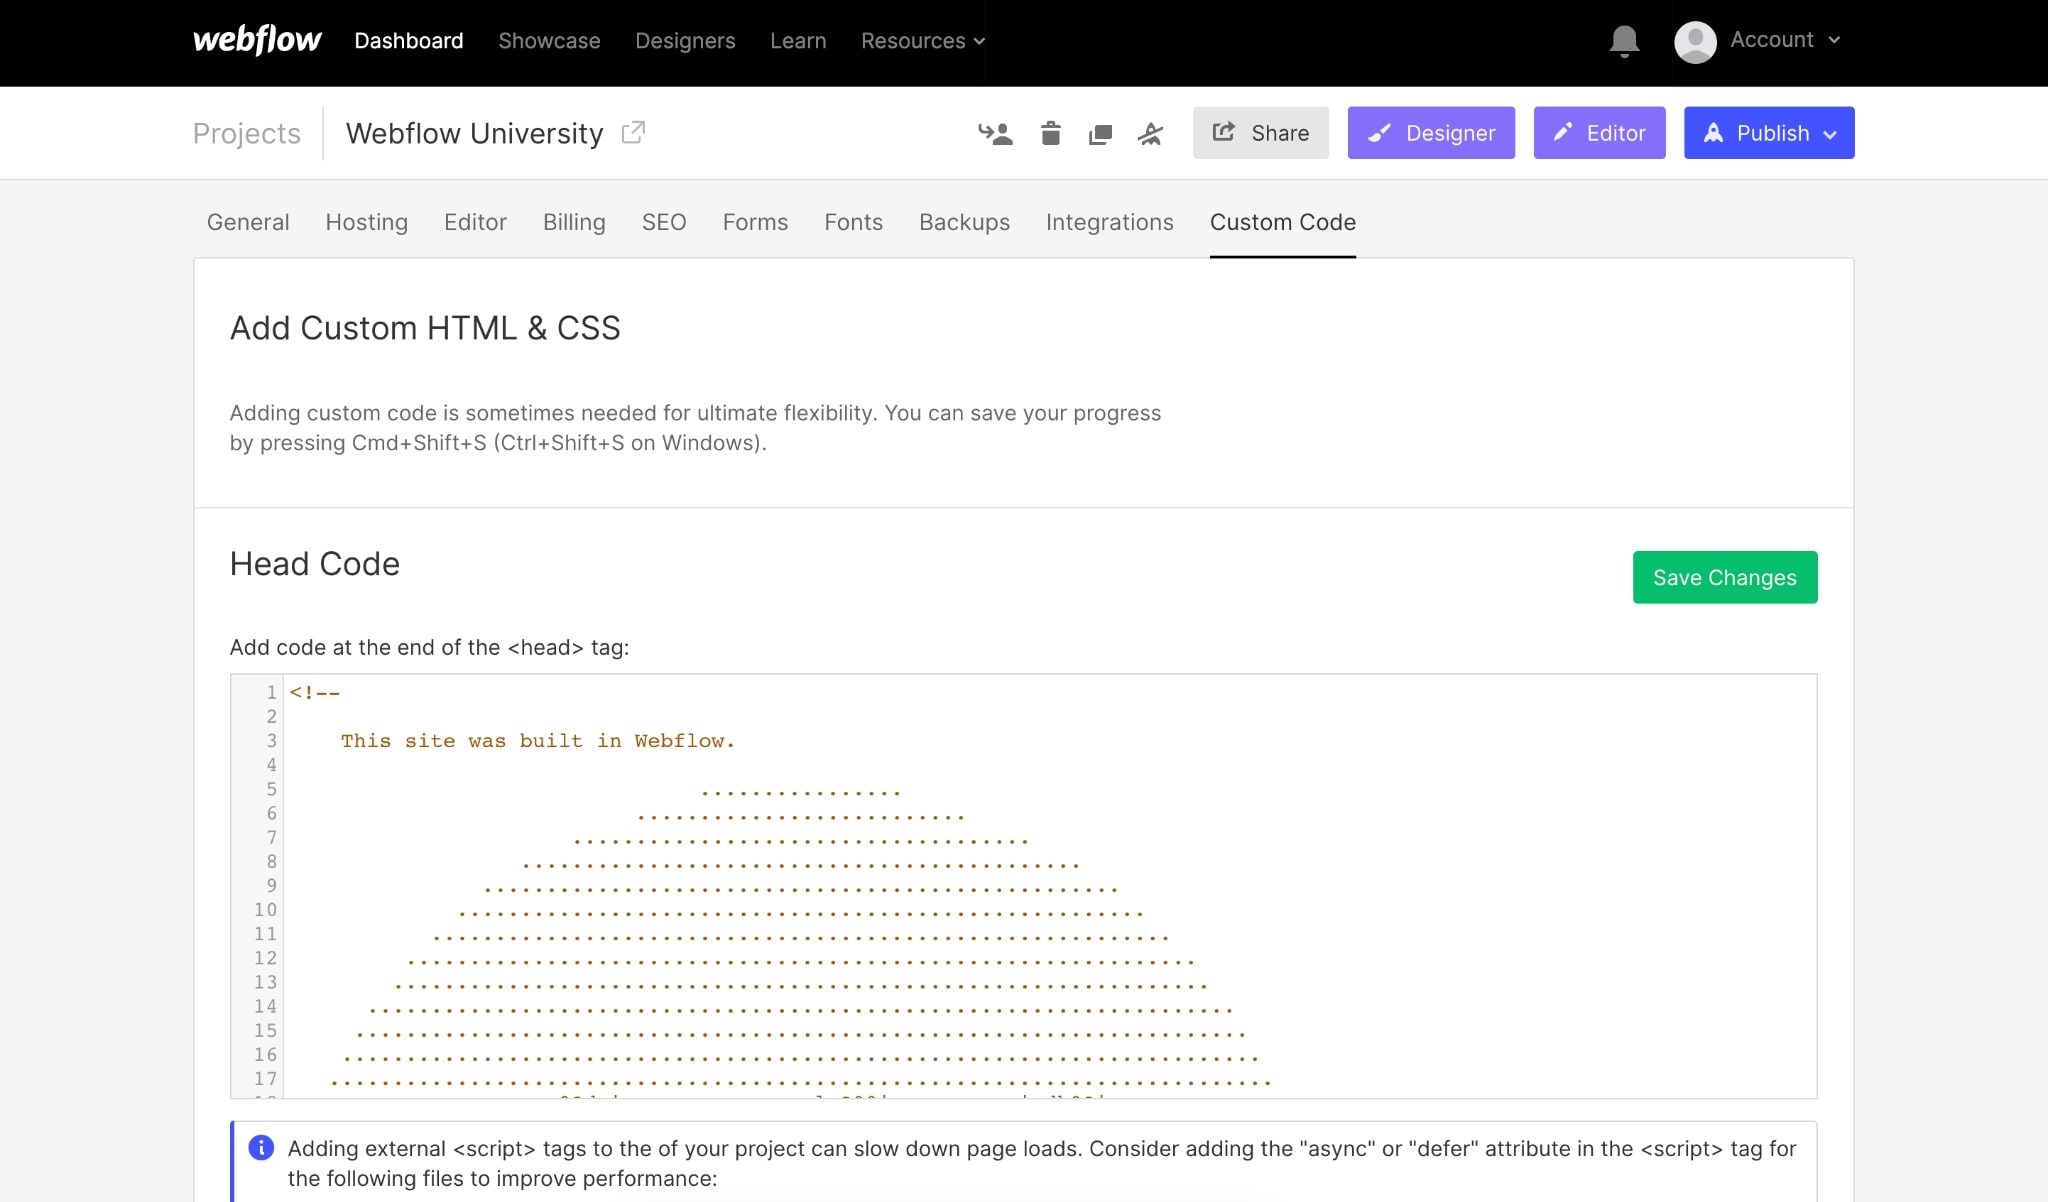
Being able to add custom code to a project is important. In Webflow, if you want to add custom code to your entire website (all pages) you can do it in your project settings.
If you want to add custom code to individual pages (static or dynamic) you can add custom code in the page settings in the Designer.
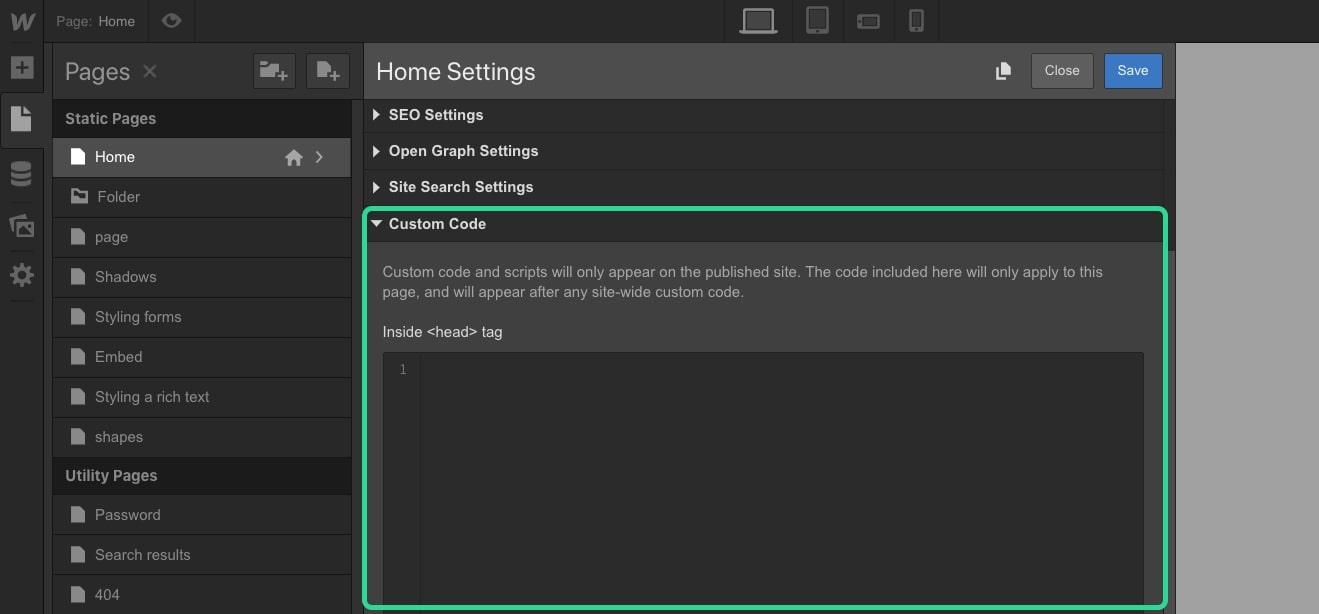
The custom code you add to your page settings can be anything from adding a canonical tag (more about that soon) to JavaScript code.
Because there are so many different content types on the web, it’s a best practice to let Google know as much information about your content as possible. This way, Google can be more confident about what purpose your content serves and how to rank it appropriately.
One way to go about this is to add schema markup to your website. What a schema markup does, is “improve the way search engines read and represent your page in a search engine result page (SERPs.)” On Webflow, you can add the schema custom code for a blog post straight into the custom code section of your CMS template page settings. By doing so, you’ll not only have better information represented in search, you’ll have a better chance of earning the coveted Google featured snippet.

Meta titles and descriptions
Webflow gives you the ability to edit meta titles and descriptions for every page you create, whether it’s static or dynamic (CMS). On Webflow, you can also see a preview of what the link would look like in Google’s search results by going to the view shown below.
Being able to edit these will not only help you rank for certain keywords and help your users easily find what they’re looking for, but it will also give you the opportunity to A/B test headlines and descriptions to improve the clickthrough rate (CTR) of your pages.
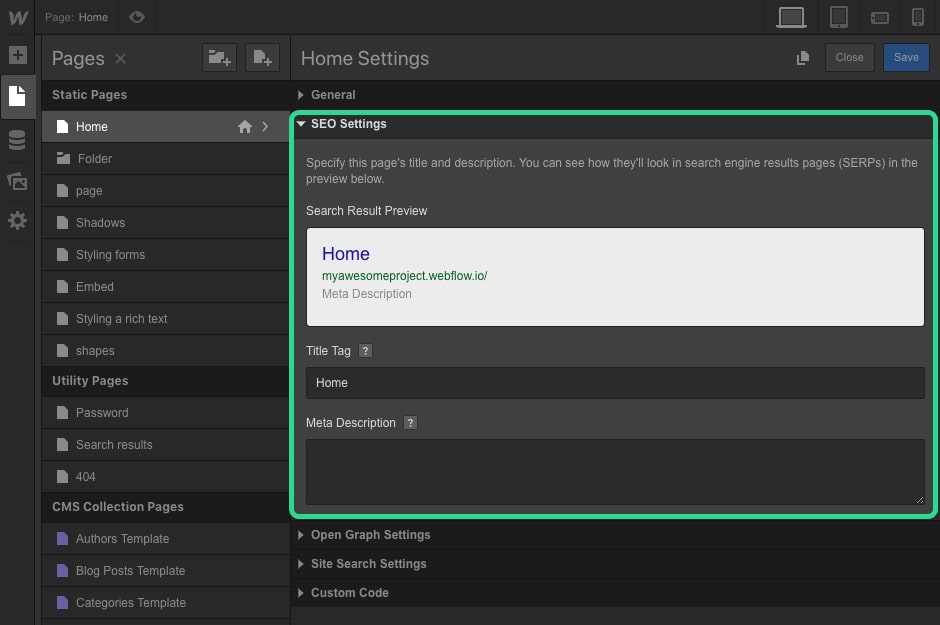
It’s important that all your live pages have accurate title tags and meta descriptions. You generally want to stay under 60 characters for title tags and under 155 characters for meta descriptions.
Here’s an example of what that could look like for a static:

Meta title and description for CMS collection pages
For dynamic content, like blog posts or CMS-based landing pages, you’ll want to edit the CMS Collection pages.
To do this, you'll define a pattern that all pages in a Collection will use for their title tag and meta description. This way, all Collection items will automatically pull their SEO settings from each Collection based on the pattern you define.
To define your pattern, go to your Collection Template settings in the Pages panel and add the Collection fields you want to use for your SEO meta title and description in the SEO settings section.

For example, you could add the “Name” field of your blog post as the title tag. This way, each blog post will automatically have the name set as the title tag.
For the meta description, you'll do the same. Reference your blog post "summary."
You can also combine fields and even type custom text to work with these fields — they're like variables which you can switch between so you can preview all your collection items.
Robust 301 redirect management
Sometimes URLs change. Whether it’s because of a platform migration, domain migration, or content update, it’s important to make sure outdated URLs redirect to new ones.
In your Webflow project settings, you can easily set up 301 redirects.

This is a useful feature if you’re migrating from a different platform, or if you decide to update URLs to boost SEO traffic.
Historically, we’ve seen jumps in traffic for blog posts when we update them to be optimized around a specific keyword.
For example, we once updated the slug on a blog post to be more SEO-friendly and after we published the update, we set a 301 redirect from the old slug to the new one. This ensured that all the SEO juice from the old link was passed to the new one. Here’s how it affected traffic to the blog post:

Right away, traffic doubled. And the great thing is that we were able to set up the 301 redirect without involving the engineering team. We were able to set everything up right in our Webflow project settings and publish the change in seconds.
Simple image alt tag editing
Alt tags play an important role in both SEO efforts and web accessibility. Adding descriptive alt text to images helps Google understand what the image and the associated content is about, which influences how the content is ranked. Additionally, that same alt text ensures that visitors who rely on screen readers will get a description of the image.
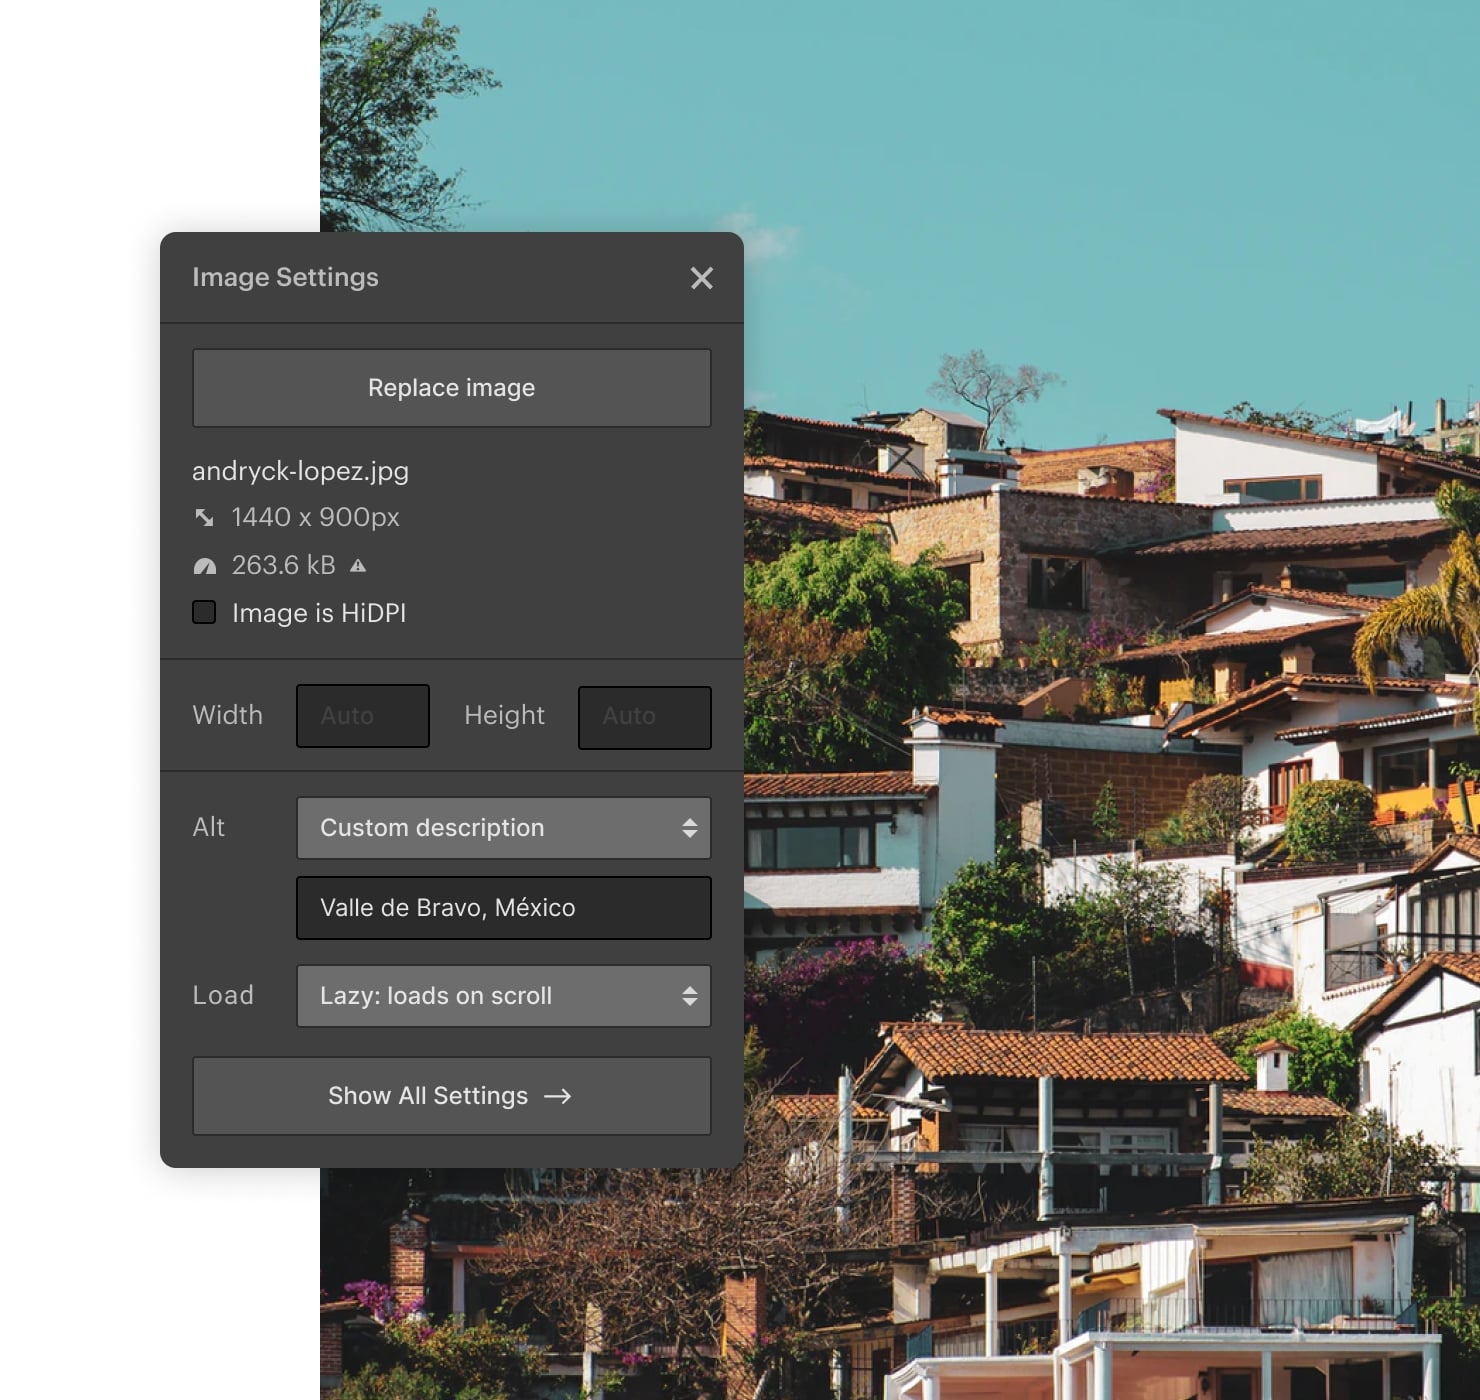
Including alt tags feeds into your overall user experience as well — websites that are accessible to more individuals provide a better experience than those that are not.
When you upload an image asset into the Designer, you can easily set an alt tag to be the description of the image.
Indexing and sitemap controls
Telling Google which pages you do and don’t want it to crawl is vital to the SEO health of your website.
In Webflow, you can set indexing preferences and even create a robot.txt file where you can define which pages you don’t want Google to index and rank in search results.

Check out the full guide on setting up your robots.txt file on Webflow University.
While it’s important to tell Google which pages you don’t want it to index, it can also be helpful to tell Google which pages you definitely want it to index. You do this by creating a sitemap and submitting it to Google Search Console.
In your Webflow project settings, you have the option to auto-generate a sitemap or manually create one yourself.
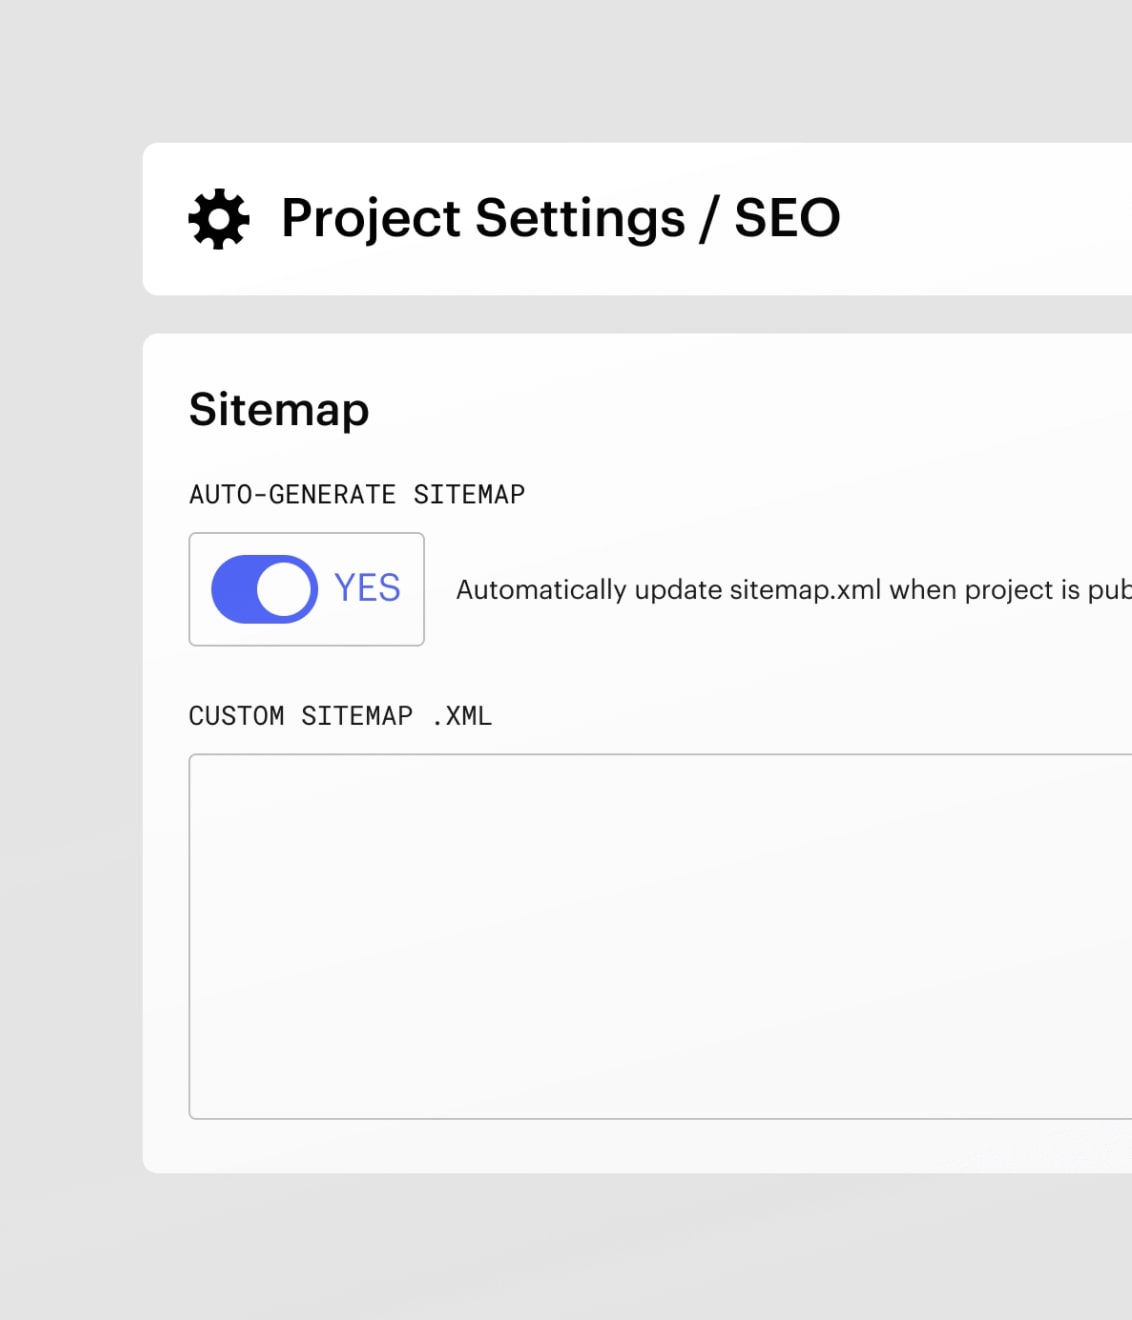
In most cases, you want to auto-generate your sitemap. But for more complex and larger sites it might make sense to go manual, as you’ll be able to exclude pages that you don’t want to be indexed by Google, like “log in” or “app dashboard” pages.
Once you publish your sitemap, you can find it at yoursite.com/sitemap.xml — this is also the URL you’ll submit in Search Console to notify Google of the most important pages on your site.

Canonical tags
Although Google’s algorithm has advanced to the point where it can often identify duplicate content on its own, the best way to stay ahead of the algorithm is to set canonical links.
When you add a canonical tag to a web page, it basically tells Google that this is the original page. It’s a bit like minting a page, for all you NFT fans out there.
This way, if you run into link migration issues or someone rips off your content, you’re able to give Google the source of truth.
Canonicals are so important that we use them on almost all of our pages on the Webflow site. There are two ways you can add a canonical tag to a page — custom code or project settings.
The more manual route is to add this line of code to an individual page:

The image above shows how our blog is set up. “Canonical” is a custom collection field that we defined here as the URL of a blog post.
The setup for a static page would look like this:

But this is all manual and a bit outdated.
So, we created a feature that allows you to add a global canonical tag in your project settings. This sets a canonical for your entire project.
You simply define your URL in your project settings one time and Webflow will automatically create the appropriate canonical tag for each page on your site, whether it’s a static or dynamic page.
All you need to do is go to the SEO tab in your main project settings and enter your main domain.

Note: the canonical is set at the project level, something to keep in mind if you’re setting up reverse proxies with Webflow.
Reverse proxy
In more enterprise use cases, you might have a large website with a large database that is partially hosted off of Webflow. Or, you might have several Webflow projects that you want to stitch together and host as a single website.
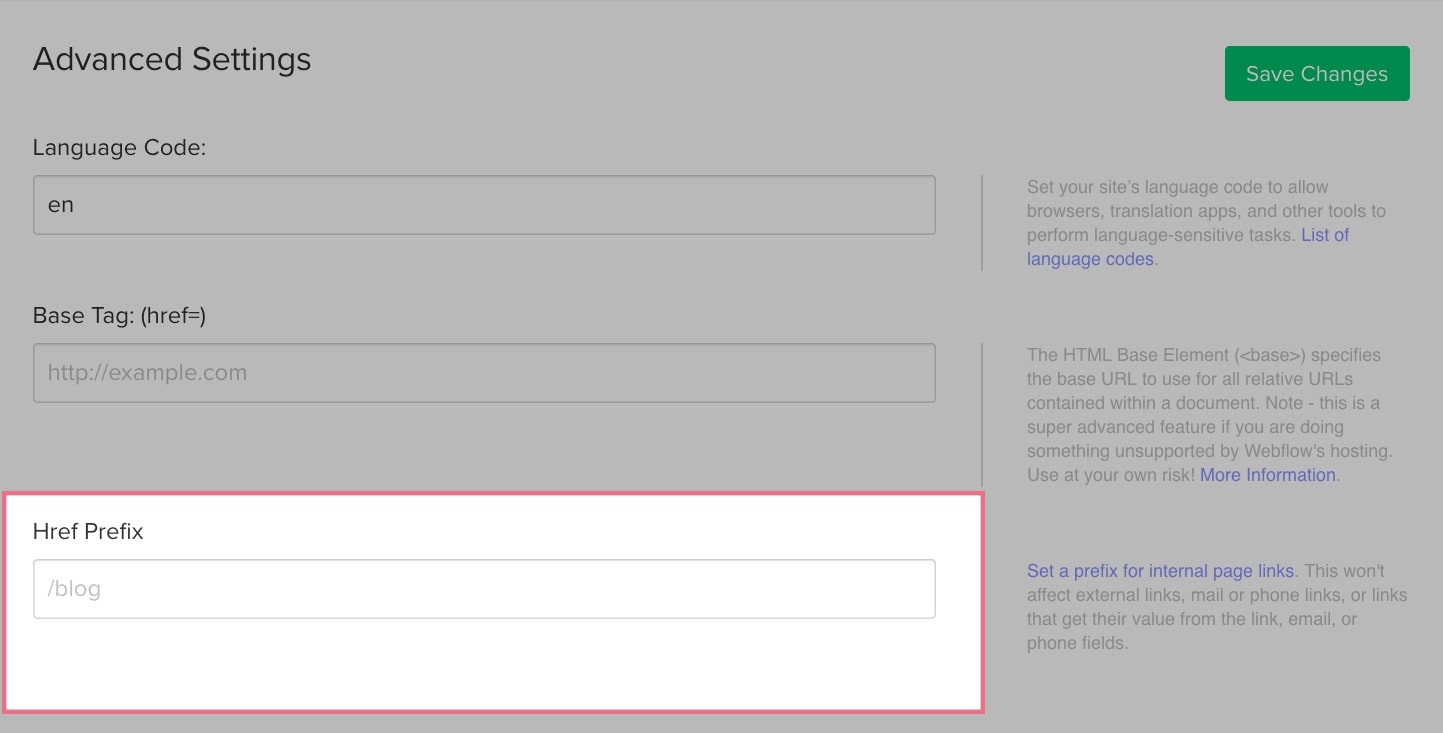
In order to have a setup like this, you’ll need to set up reverse proxies or use the href prefix in your project settings.
With reverse proxies, you’ll need to get a development team involved to set them up. But, you can be confident knowing that they don’t negatively affect your SEO rankings when done correctly.
For more information on setting up reverse proxies with Webflow check out these resources:
Advanced publishing options
In the hosting tab of your project settings, if you scroll to the bottom you’ll see this:

Here you can enable (or disable) a few features that will help speed up your website. It’s a good SEO practice to enable all of these. This way, you can keep your website secured with an SSL and help speed up your websites by minifying HTML, CSS, and JS.
Incredibly fast hosting used by big brands
All the features mentioned above are great and vital to properly optimizing your website. But if your website can’t reach people all across the world — whether it’s because someone has a slow internet connection or they are too far away from your server — none of the optimizations matter.
That’s why web hosting is so important.
To maximize your SEO efforts with on-page and technical SEO, Webflow’s hosting has been designed to be serverless and extremely fast.
This means Webflow has a 99.99% uptime and there’s never any need to update anything on the server-side of your website.
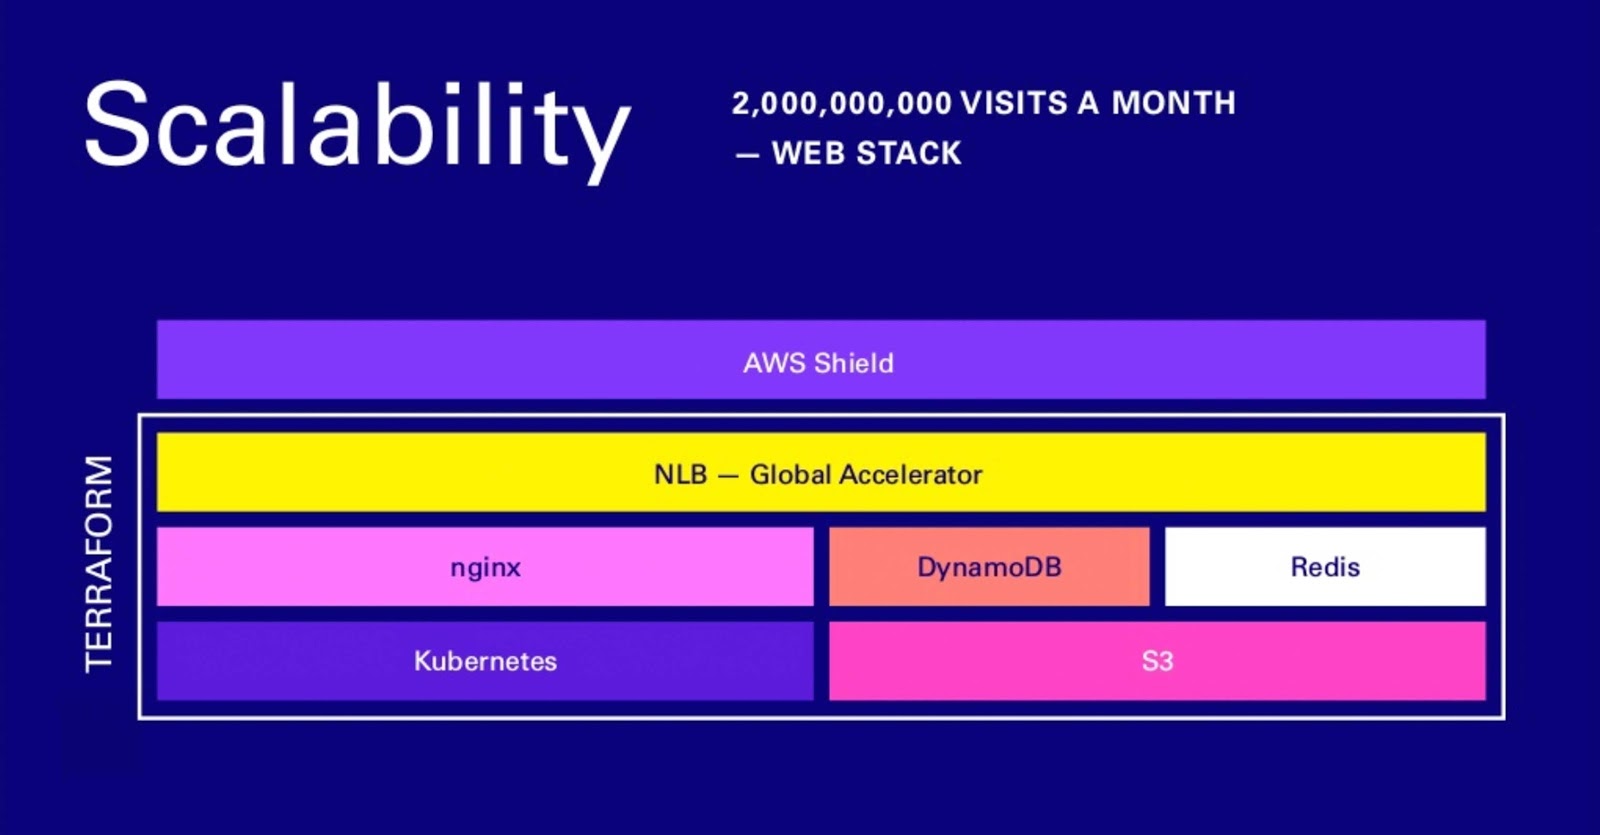
Webflow.com is completely hosted with Webflow, and we have millions of page views each month. So you can feel confident that every single Webflow site you build will have secure, enterprise-grade hosting that scales.


SEO and Webflow: the essential guide
Get 13 need-to know tips on website SEO — whether or not you use Webflow.
Increase organic traffic by scaling content production
Knowing how to optimize your website for search engines is important. But knowing how to drive SEO traffic to your website is essential.
There are two main levers you can pull when it comes to growing your organic traffic:
- New pages being created on your site
- New backlinks being acquired.
New pages mean more chances for someone to click on your URL in Google search results, and more backlinks mean higher domain authority so those URLs rank higher in search results.
We won’t get into backlinks (sometimes referred to as off-page SEO) in this article because that’s a whole topic of its own, and it’s not dependent on Webflow in any way.
But the most important thing we can control is creating new pages, and that can be done in Webflow. You’ll find that Webflow is also a platform created for the modern-day content marketer.

Webflow’s flexible content management tools allow you to build out whatever content types your site needs. You can easily:
- Create a user-friendly interface for content teams to add and edit new content
- Add custom fields without plugins
- Design content-driven layouts visually
- Import content via a CSV
While designers work in the Webflow Designer, marketers and content managers can work in the Webflow Editor. This way, content teams (and individuals) are empowered to produce content at scale. Editor makes adding new content as easy as filling out a form. Plus, it allows you to edit SEO and Open Graph tags.

So what type of content supports SEO traffic growth?
Examples of content types to grow organic traffic
Here are some content types for different pages you might want to create to drive meaningful SEO traffic:
- Product pages (see example)
- Use case pages (see example)
- Audience pages (see example)
- Vs pages (see examples)
- Blog posts (see example)
These content-rich pages will help you rank for more keywords and give people the opportunity to discover your content in Google when they are looking for a solution to their problem.
If you’re a newer site, consider creating blog posts to drive top-of-funnel SEO traffic to your page. Blog posts will generally drive the most non-branded SEO traffic to your website.
We won’t get into how to write the perfect blog post in this article, but we do have a full guide on how to create one that ranks in Google.
Create new pages programmatically
Creating pages programmatically can also be another way to drive a meaningful amount of SEO traffic to your website.
Not only that, it can be an extremely efficient way to create new pages on your website. All of the product pages, use case pages, audiences pages, vs pages can be created programmatically — freeing you up from having to create them one by one.
The great thing about Webflow CMS is that you can also create these pages in about the same amount of time it takes to publish a blog post.
Creating a CMS Collection list for each category, product page, use case page, audience page, and vs page allows you to create a landing page design system template for each category.
Once you have your landing page design templates, you can whip up new landing pages incredibly quickly without involving a designer.
You can create a landing page design system for any type of landing page on your website. Let’s say you want to go after local SEO and rank for services in different cities.
All you would have to do is design a CMS template page and set fields for where content will dynamically be pulled from the CMS for each new page.
This way, you could import say a CSV with 100 different city names and in one click generate 100 different landing pages!
Related reads: Programmatic SEO: how to create 300 landing pages in a week
Track SEO efforts with analytics
Lastly, it’s important to have feedback loops that tell you if your SEO strategy is working or not.
This is where analytics comes into play. While there are tons of third-party SEO research tracking tools, you really only need them if you’re aggressively targeting certain keywords. Plus, these tools aren’t always accurate.
Google Search Console and Google Analytics are more reliable as sources of truth for understanding if people are getting to your site from search engines.
Setting up your Google Analytics tracking code in Webflow is as easy as going into your project settings and adding your tracking ID.
You can also use the custom code tab in your project settings to add other marketing analytic codes like tag manager, segment, mixpanel, Amplitude, and other third-party tools.
SEO management designed for individuals and teams
As marketers, we have a large responsibility when it comes to keeping businesses healthy and successful.
If you think about it, most businesses have roughly three core problems that they are continuously solving: capital, hiring, and finding customers.
These are all very important problems for a business, and marketing plays a major role in solving one of those core pillars — finding customers.
Marketers not only bring a lot of value to businesses, but they also bring value to society by connecting individuals to products that they may need. And that's literally what SEO is. It’s creating and optimizing content so it shows up in search engines when people are searching for things.
How much SEO traffic a marketer can successfully generate depends on a lot of factors such as the team, strategy, and tools involved. While tools alone won’t help you, the combination of great tools and content strategy can be powerful.
Think of it like a NASCAR race:
- The driver: SEO and content marketing strategy
- The car: a platform like Webflow that will enable the driver to win
- Pitstops: third-party SEO tools
All of these elements have to work well individually and together to be successful.
This walkthrough shows how to use Webflow’s built-in SEO tools to manage meta titles, descriptions, indexing, and site-wide optimizations. All without relying on plugins.


