


Learn how to embed Calendly as a popup modal in Webflow and boost booking completion without redirecting users off your site.
I've watched too many perfectly good landing pages lose conversions at the finish line. You build this beautiful Webflow site, nail the messaging, design a CTA that actually gets clicked, and then you redirect users to “calendly.com/your-booking-page” to schedule a call.
Half of them never make it back.
Guess why?
The problem is breaking the user's flow. Every external redirect is a friction point where people decide "maybe later" and close the tab.
I've experimented with this across dozens of sites, and I can tell you for a fact: keeping scheduling on-page with a modal increases booking completion compared to external links.
The fix is straightforward: embed Calendly as a popup modal that opens directly on your Webflow page: no redirects, no new tabs, no opportunity for prospects to get distracted by their inbox and forget about you.
In this guide, we'll walk through exactly how to add a Calendly popup modal to Webflow. You'll learn which of Calendly's three embed methods actually converts (spoiler: two of them are terrible for landing pages).
💡 A quick headsup, we're focusing on the popup embed method, which doesn't require any integration setup or authentication. You'll just embed Calendly's scheduling widget directly into your Webflow site.
If you need more advanced functionality down the line, see the Webflow Calendly integration page, which covers the full range of integration options.
3 ways to embed Calendly in Webflow, and why popup modal wins
Before we start copying code, let's talk about which Calendly embed method you're actually implementing. Calendly offers three ways to add scheduling to your Webflow site, and only one of them makes sense for conversion-focused pages.
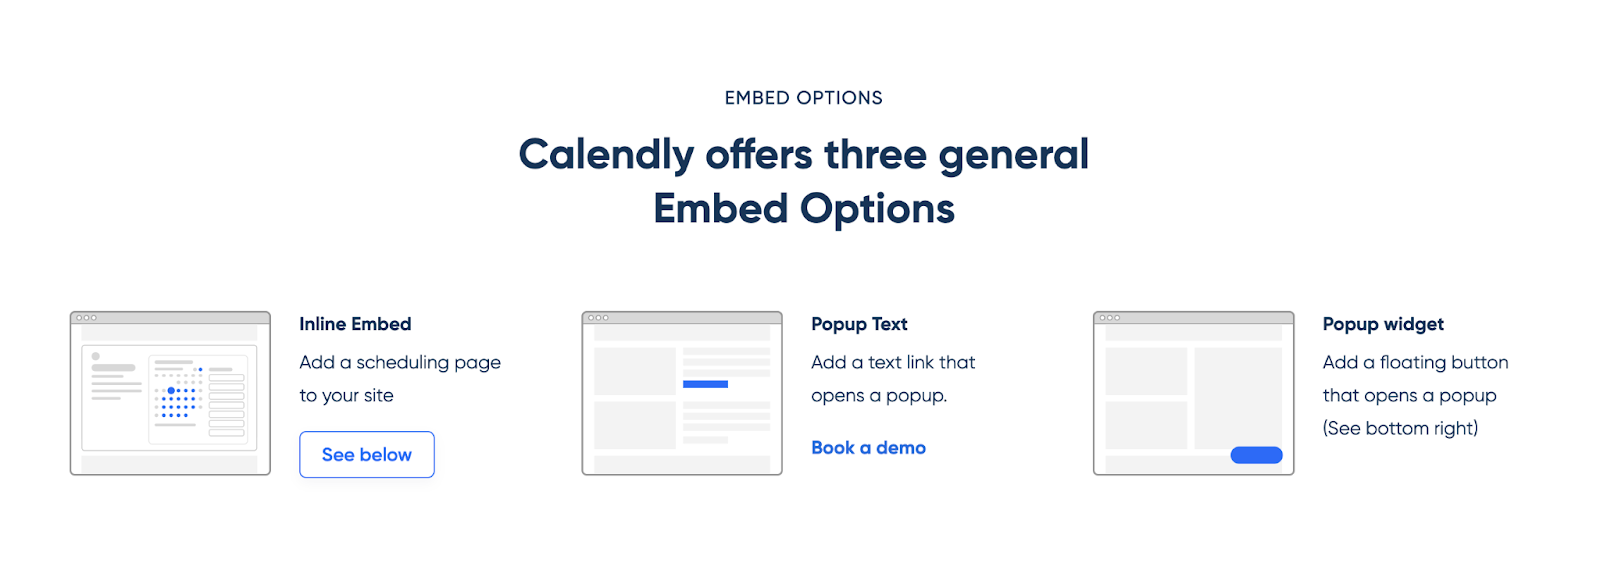
Calendly popup modals open Calendly in an overlay when users click your CTA: no page navigation, no broken flow, while inline embeds consume 600+ pixels of vertical space and direct links send prospects to calendly.com, where half never return.
The popup text option adds a styled text link (like "Book a demo") that opens your Calendly calendar in an overlay when clicked. Visitors stay on your page, the scheduling experience appears on demand, and your layout stays clean.
This is the method we're implementing in this guide. It gives you full control over where booking CTAs appear (header, hero, pricing table, or footer), all while triggering the same Calendly modal, without cluttering your design with multiple embedded calendars.
For sites where scheduling is important but not the primary goal of every page, this flexibility matters.
What do you need to add a Calendly popup modal in Webflow?
You need a Calendly account with an Event Type created, access to Webflow's site-level Custom Code section, and a button or link element on one of your pages. For implementation, you'll paste Calendly's script in your footer code, add a trigger to your button, and publish on the site.
The implementation complexity is low, as you're not building anything from scratch, just connecting Calendly's existing popup functionality to a button in your Webflow design.
Here's what you need to implement the Calendly popup modal in Webflow.
A Calendly account with at least one Event Type created
The Calendly free plan works fine for this. You'll need your Event Type's scheduling URL, which looks like “calendly.com/your-username/30min-call”.
If you haven't created an Event Type yet, log into Calendly, click "Create" in the top nav, and set up a basic meeting type. Then, name it, choose a duration, and connect your calendar. Takes about 3 minutes.
Access to Webflow's Custom Code section
This is site-level, not page-level. You'll find it in Project Settings → Custom Code.
If you're working on a client site and don't have access to the site settings, you'll need to request it from the project owner. The popup modal requires adding Calendly's external script to your site's footer code, which means you need this permission level.
A button or link element in your Webflow design
This can be anything: a styled button, a text link, a custom div with click interactions. The popup modal gets triggered by whatever element you choose. You'll give this element a unique ID or a shared class name, which we'll use to connect it to Calendly's popup function.
If you're planning multiple booking CTAs across different pages, think about whether you want them all to use the same class name for easier management.
One thing that trips people up: Calendly's popup modal won't work in Webflow's preview mode.
5 steps to add a Calendly popup modal in Webflow
Adding a Calendly popup modal to Webflow takes five steps: get the embed code from Calendly's dashboard (Popup Text option), paste the script in Webflow's site-level Custom Code footer, add a button to your page with a unique ID, paste trigger code in an Embed element that connects your button to Calendly's popup function, and publish to test on your live site.
The entire process takes 10-15 minutes, and the popup will open Calendly in an overlay when visitors click your CTA without redirecting them off your page.
Step #1: Get your Calendly embed code from the dashboard
Log in to your Calendly account and go to the Home dashboard, where you see your Event Types listed. Find the meeting type you want to embed, whether that's a 30-minute consultation, a demo call, or whatever you've set up. Click the gear icon next to the Event Type name to open settings.
If you haven't created an Event Type yet, click "Create" in the top navigation. You'll set a name, choose a duration (15/30/60 minutes), select your meeting location (Zoom, Google Meet, phone, etc.), and connect your calendar to check availability.
Select the popup text embed option
In the Event Type settings, look for the "Add to Website" section in the left sidebar.

Click it, and you'll see Calendly's three embed options: Inline Embed, Popup Widget, and Popup Text.

Popup Text is the option that gives you code designed to be triggered by links or buttons you control. This is what makes the modal open when someone clicks your CTA.
Copy the embed code snippet
After selecting Popup Text, Calendly shows you a preview and asks you to customize the link text. You can set this to "Book a call," "Schedule a meeting," or whatever makes sense for your use case.
This text is what would appear if you pasted the code directly into your page, but we're going to replace it with your own styled button anyway, so the exact wording here doesn't matter much.
Click "Continue" and then "Copy Code."
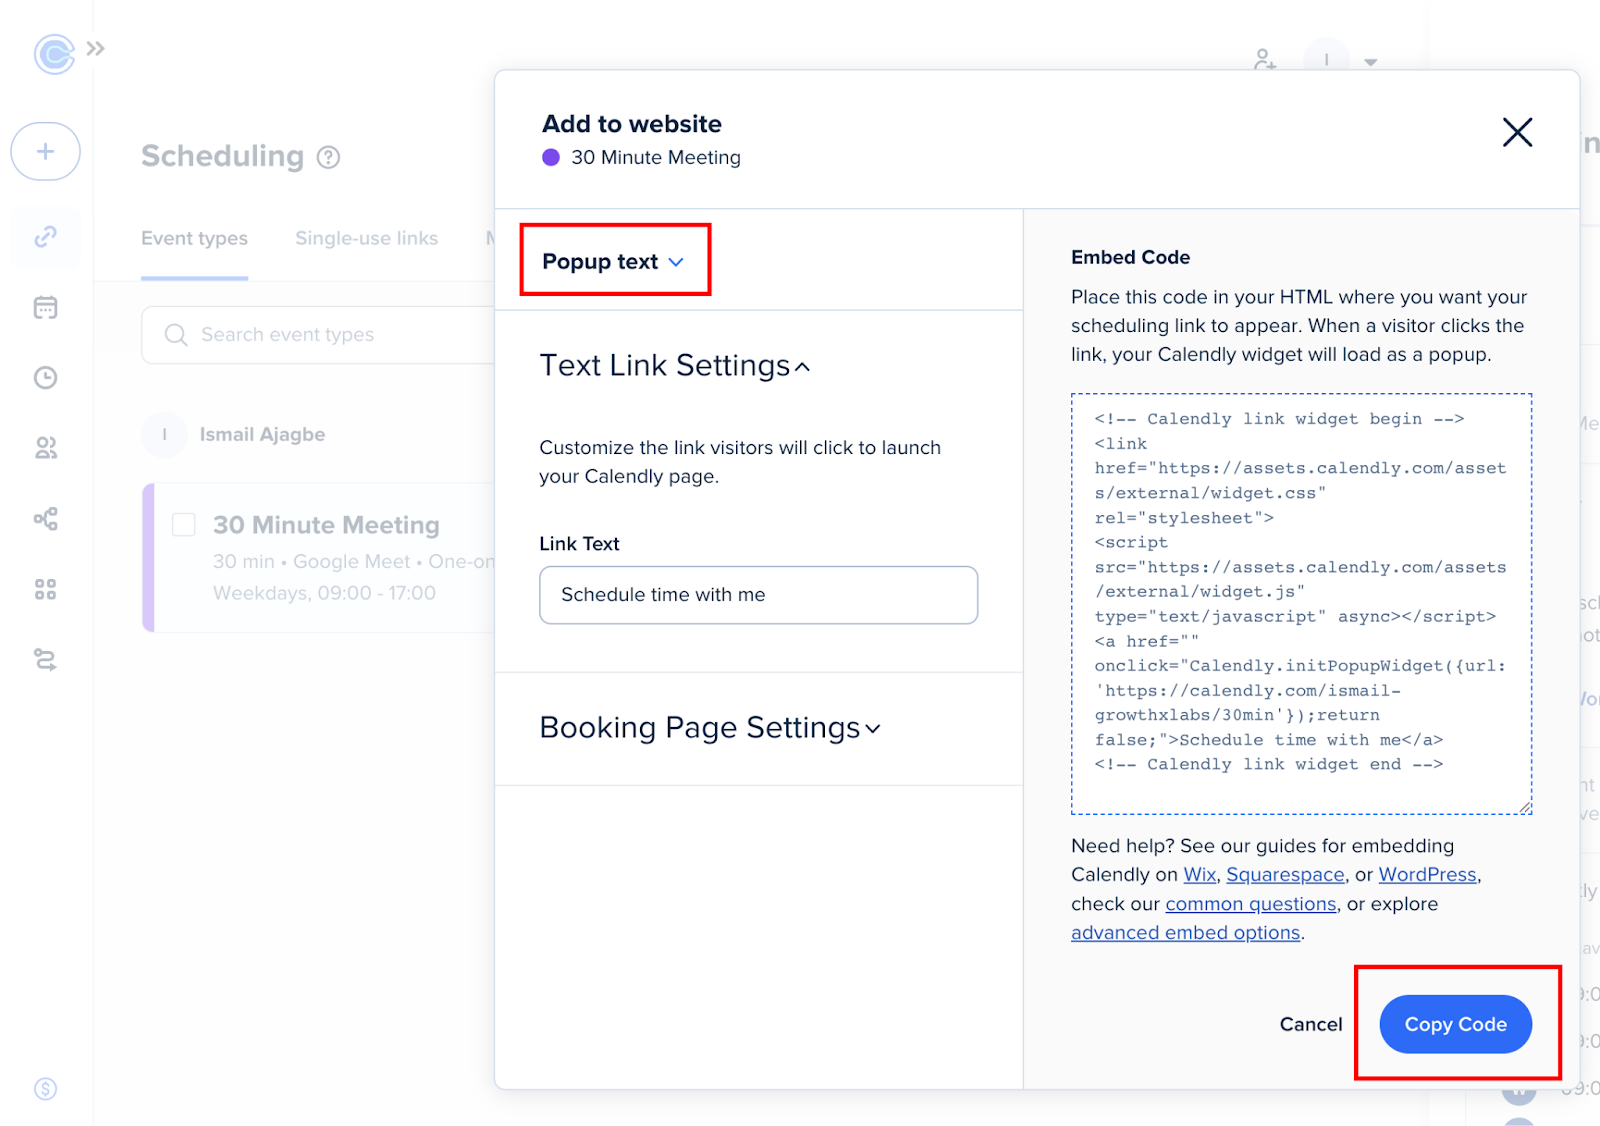
The snippet you're copying looks something like this:
<!-- Calendly link widget begin -->
<link href="https://assets.calendly.com/assets/external/widget.css" rel="stylesheet">
<script src="https://assets.calendly.com/assets/external/widget.js" type="text/javascript" async></script>
<a href="" onclick="Calendly.initPopupWidget({url: 'https://calendly.com/your-username/30min'});return false;">Schedule time with me</a>
<!-- Calendly link widget end -->
Notice the structure: there's a CSS link, a JavaScript script tag, and an anchor tag with an onclick handler. The important pieces here are the script that loads Calendly's widget functionality and the URL to your specific Event Type (calendly.com/your-username/30min).
We'll split this code into the next steps, where the script goes in one place in Webflow, and the trigger code goes somewhere else.
Step #2: Add the Calendly script to Webflow custom code
In your Webflow project, click the gear icon in the left sidebar to open Site Settings.
You'll see a list of settings categories. Look for "Custom Code" and click it. This is different from page-level settings (where you'd add code to specific pages) or the Embed element (where you'd add code inline in your design).
The Custom Code section controls code that loads site-wide.
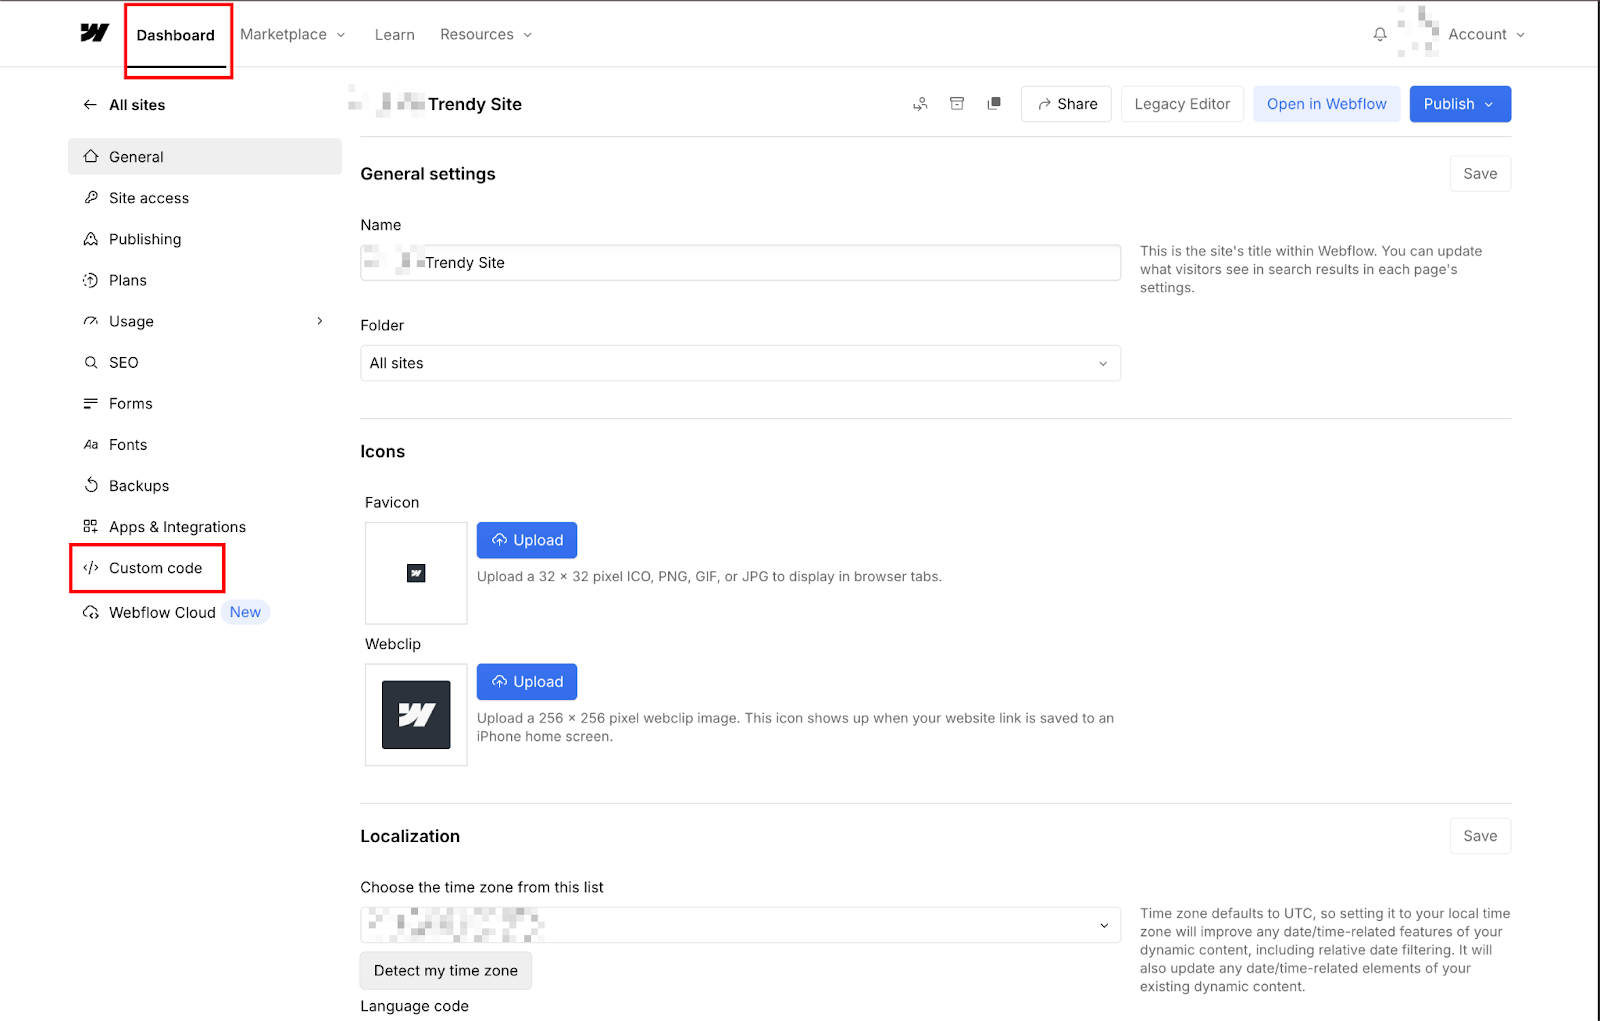
If you don't see Custom Code in your Project Settings menu, you might not have the right permission level on this project. Webflow restricts site-level Custom Code access to project owners and editors with full access.
If you're a designer, vibe coder, or have limited permissions, you'll need the project owner to either grant you access or paste this code for you. This is a common blocker if you're working on client sites.
Paste the script in the footer code section
In Custom Code, you'll see two text boxes: "Head Code" and "Footer Code." Click into the Footer Code box. This is where Calendly's script needs to go.
From the embed code you copied from Calendly, you need two lines: the CSS link and the script tag. The CSS is required, because without it, the modal loads but renders unstyled.
Paste both of these into the Footer Code box:
<link href="https://assets.calendly.com/assets/external/widget.css" rel="stylesheet"> <script src="https://assets.calendly.com/assets/external/widget.js" type="text/javascript" async></script>


Don't paste the anchor tag with the onclick handler here; that goes somewhere else in the next step.
Paste the script tag into the Footer Code, then click "Save Changes" at the bottom of the page. You don't need to publish yet. Just save the Custom Code changes.
Step #3: Add a button trigger to your Webflow page
If you already have a "Book a Call" or "Schedule Demo" button in your Webflow design, you can use that. If not, drag a Button element from the Add panel onto your page wherever you want the booking CTA to appear, e.g., the hero section, pricing table, or footer, whichever makes sense for your layout.
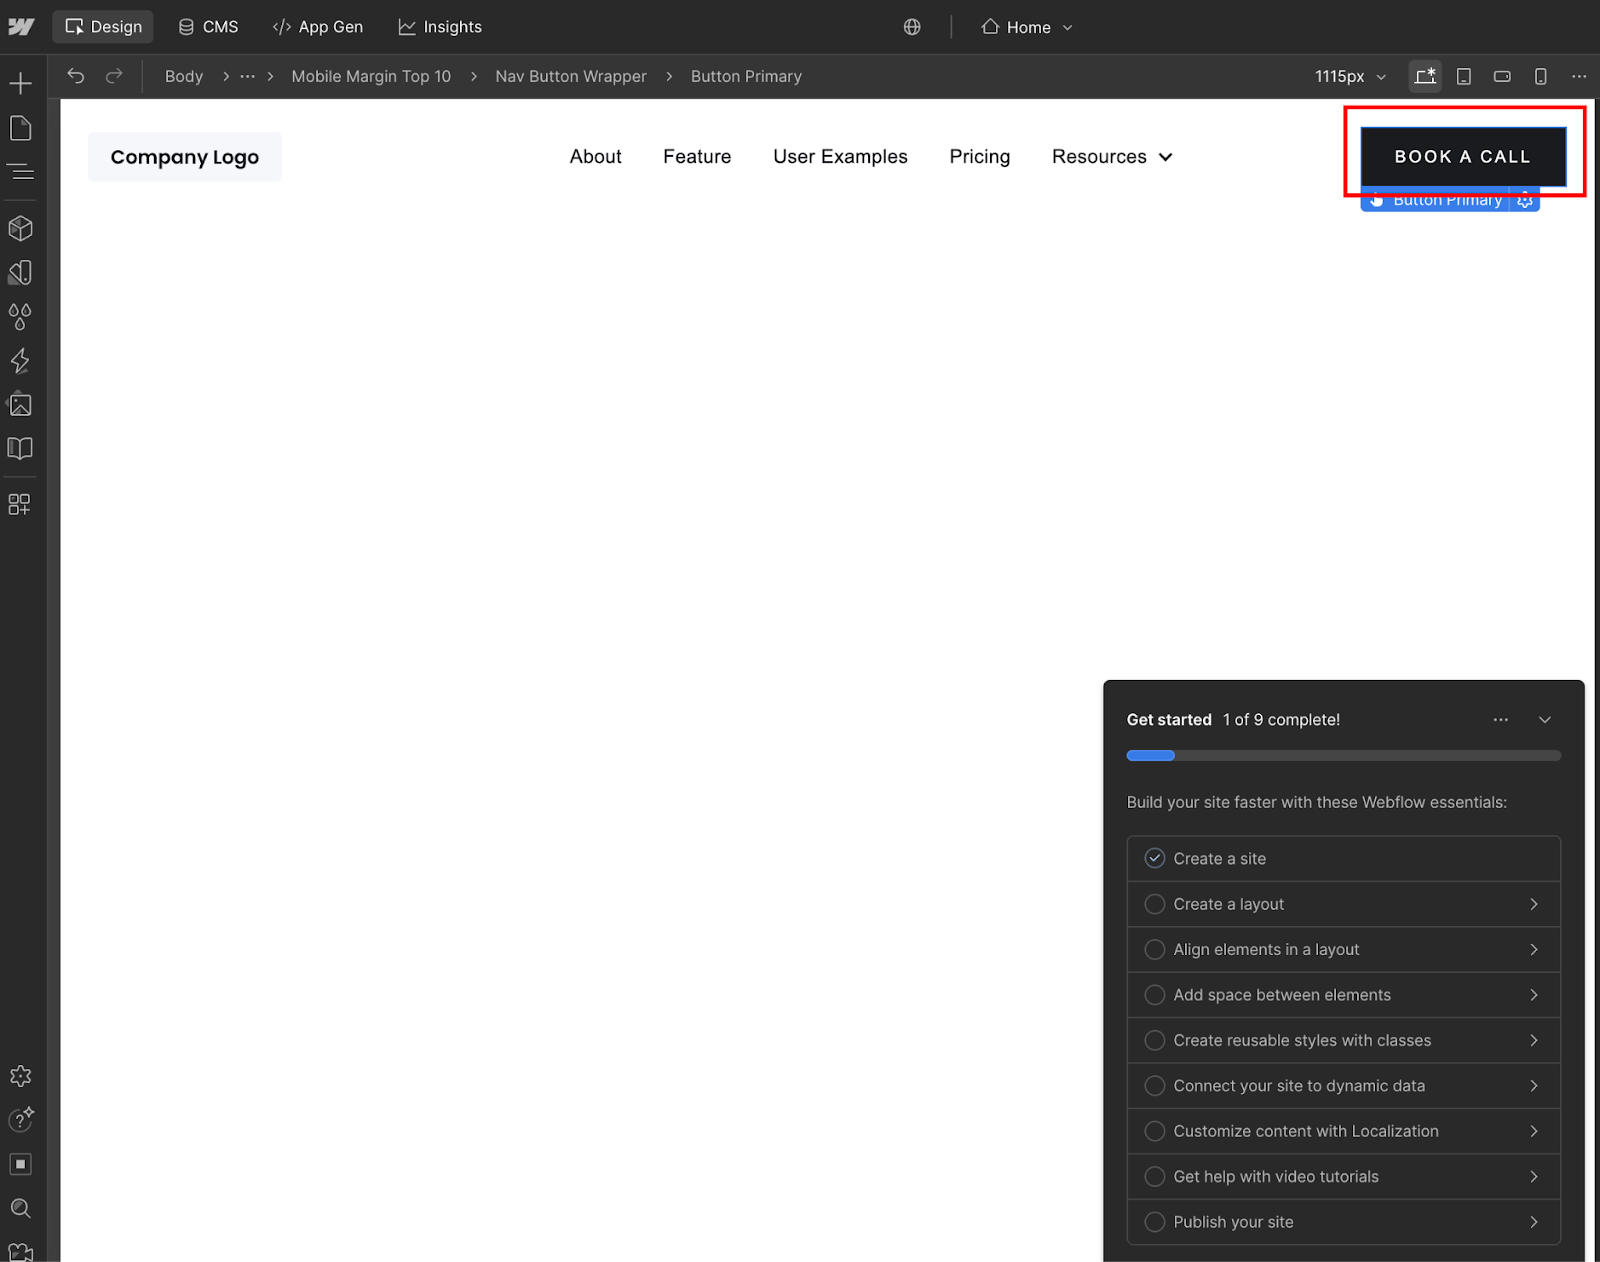
The button can be styled however you want. Webflow's native button element, a text link with a button class, a custom div with button styling, it doesn't matter.
The popup trigger works with any clickable element. I've seen people trigger Calendly modals from image cards, navigation links, and custom-designed CTAs. As long as it's a DOM element that can receive a click event, it'll work.
Also, position matters less than you might think.
The button doesn't need to be near the Embed element we're adding next. You can have your button in the header and the Embed element at the bottom of the page, or the button in your hero and the Embed element in the footer. The JavaScript will still connect them.
Give your button a unique ID in element settings
Select your button element in the Webflow Designer. In the right sidebar, you'll see the Element Settings panel (the gear icon). Look for the "ID" field near the top. It's right below the element selector and above the class field.
Click into the ID field and give your button a unique identifier. Something like book-call-btn, schedule-demo or calendly-trigger. Keep it simple, lowercase, and use hyphens instead of spaces or underscores (that's just standard convention for IDs in web development).
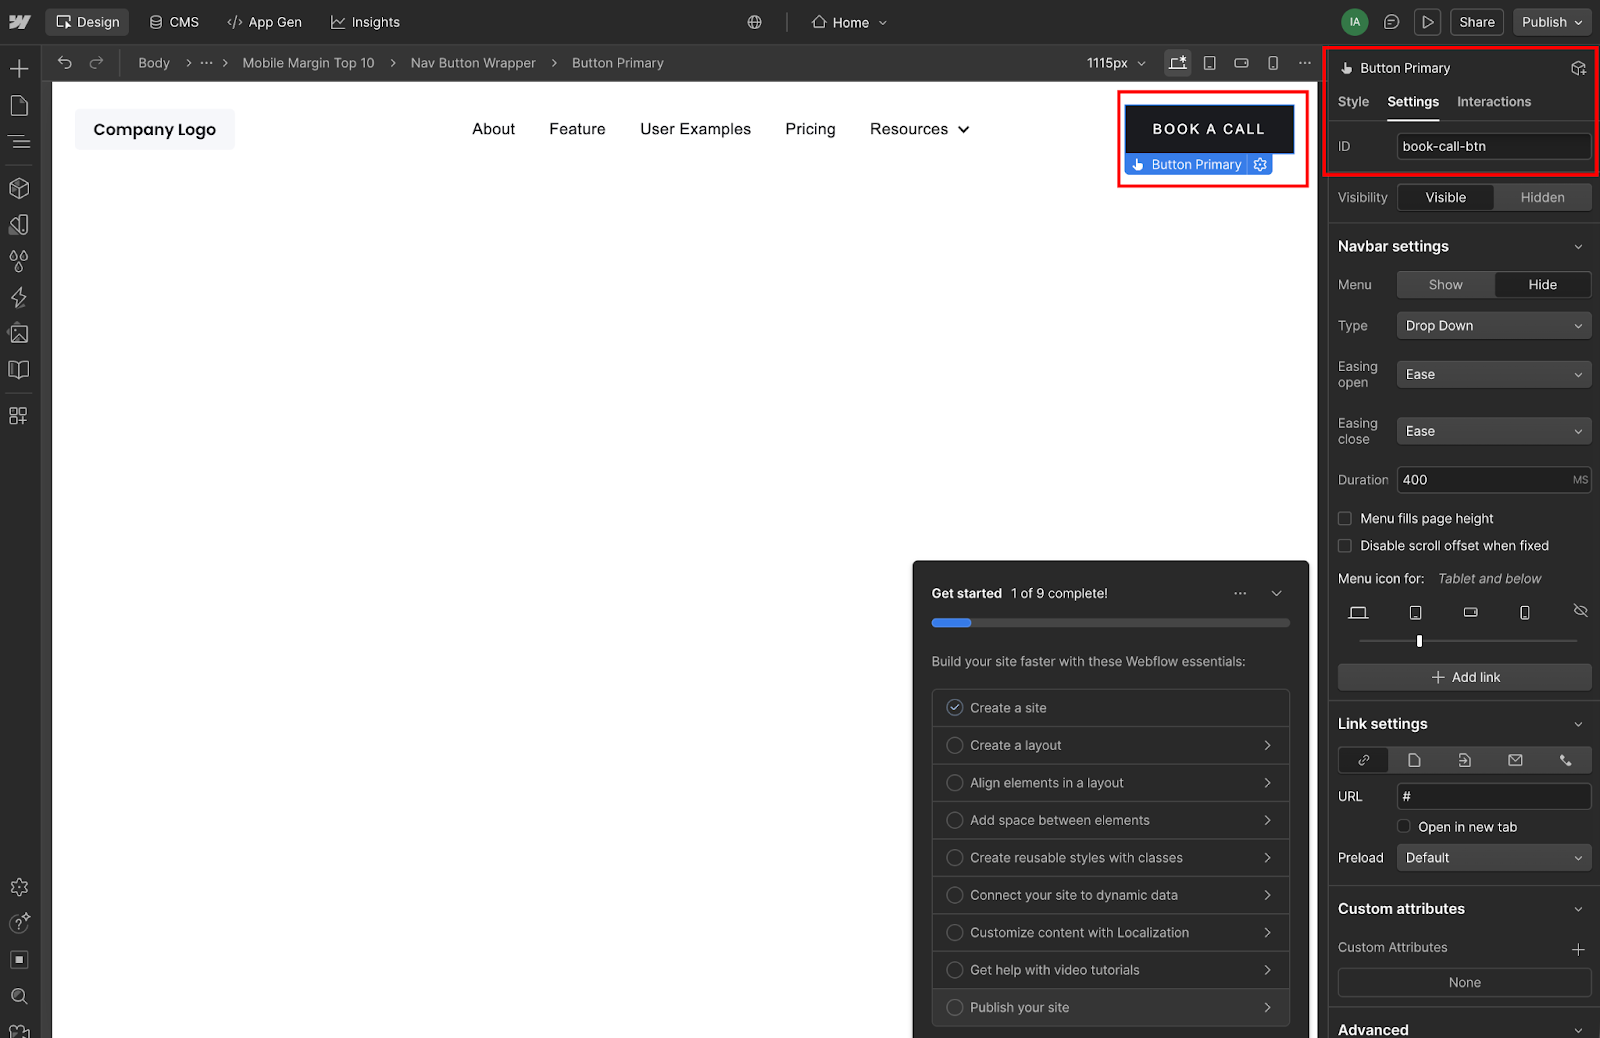
This ID needs to be unique on the page.
Don't give multiple buttons the same ID; that'll break the trigger because JavaScript's getElementById only grabs the first matching element it finds. If you want multiple buttons to open the same Calendly modal, we'll handle that in Step 5 using classes instead of IDs. For now, we're setting up one trigger.
Write down or remember this ID because you'll need it in the next step when we paste the trigger code.
Add a Code Embed element with the trigger code
Now we're connecting your button to Calendly's popup function.
From the Add panel in Webflow (press A on your keyboard or click the plus icon), drag an Embed element onto your page. The placement doesn't matter much. I usually drop it near the button or at the bottom of the section for easy finding later, but technically, it can go anywhere on the page.
Double-click the Embed element to open the code editor. This is where you'll paste JavaScript that listens for clicks on your button and triggers the Calendly popup.
Here's the code to paste:
<script>
  document.getElementById('book-call-btn').addEventListener('click', function() {
    Calendly.initPopupWidget({url: 'https://calendly.com/your-username/30min'});
    return false;
  });
</script>
You need to modify two things in this code:
- Replace
'book-call-btn'with the actual ID you gave your button in the previous step. If you named itschedule-demo, change this line todocument.getElementById('schedule-demo'). - Replace
'https://calendly.com/your-username/30min' with your actual Calendly Event Type URL. This is the same URL you saw in the embed code from Step 1. It points to your specific scheduling page.
Click "Save & Close" on the Embed element. You won't see anything change visually in the Designer, as the Embed element just shows as a gray box with </> Custom Code label. That's normal. The code inside only executes when someone clicks your button on the live site.
The entire script is wrapped in <script> tags because the Embed element accepts HTML, and JavaScript needs to be inside script tags to execute in a browser.
Step #4: Publish and test your Calendly popup modal in Webflow
In the Webflow Designer, click the "Publish" button in the top-right corner.
If you have multiple publishing targets (staging site, production site), choose where you want to test. For initial testing, publishing to a staging environment makes sense if you have one configured, but the live site works fine too.
Wait for the publishing process to complete, and Webflow will show a progress indicator. This usually takes 30-60 seconds, depending on how many pages and assets your site has. Don't navigate away or close the tab while it's publishing.
Once publishing finishes, Webflow will show a success message with a "View Live Site" link. Click it, or copy your site's URL and open it in a new browser tab. This is important: you need to test on the actual published URL (yoursite.webflow.io or your custom domain), not the preview link (preview.webflow.com/preview/yoursite...).
Click your button and verify the modal opens
Navigate to the page where you added your booking button. Click it.
If everything's connected correctly, you'll see Calendly's scheduling interface open as an overlay on top of your page. The background should dim slightly, and the calendar should appear centered in your viewport.
The modal should display your Event Type's name, duration, description (if you added one), and available time slots based on your calendar availability. Users can scroll through dates, select a time, and complete the booking without leaving your Webflow site.
When they close the modal (by clicking the X button or clicking outside the overlay), they return to your page exactly where they left off.
If clicking your button does nothing (no modal, no error, just nothing), the most common causes are: the script isn't in Footer Code (check Project Settings → Custom Code), the button ID in your trigger code doesn't match the actual button ID (check for typos), or you're still testing in preview mode instead of the published site.
Step #5: Add multiple Calendly popup triggers on the same Webflow page
If you followed Step 3, your button has a unique ID, such as book-call-btn.
For multiple buttons, we need a different approach because IDs must be unique; you can't give five different buttons the same ID and expect getElementById to work.
Instead, you can assign the same class name to all your booking buttons.
Select each button where you want the Calendly popup to trigger, go to the Selector field (where you add classes in Webflow), and add a class like calendly-trigger.
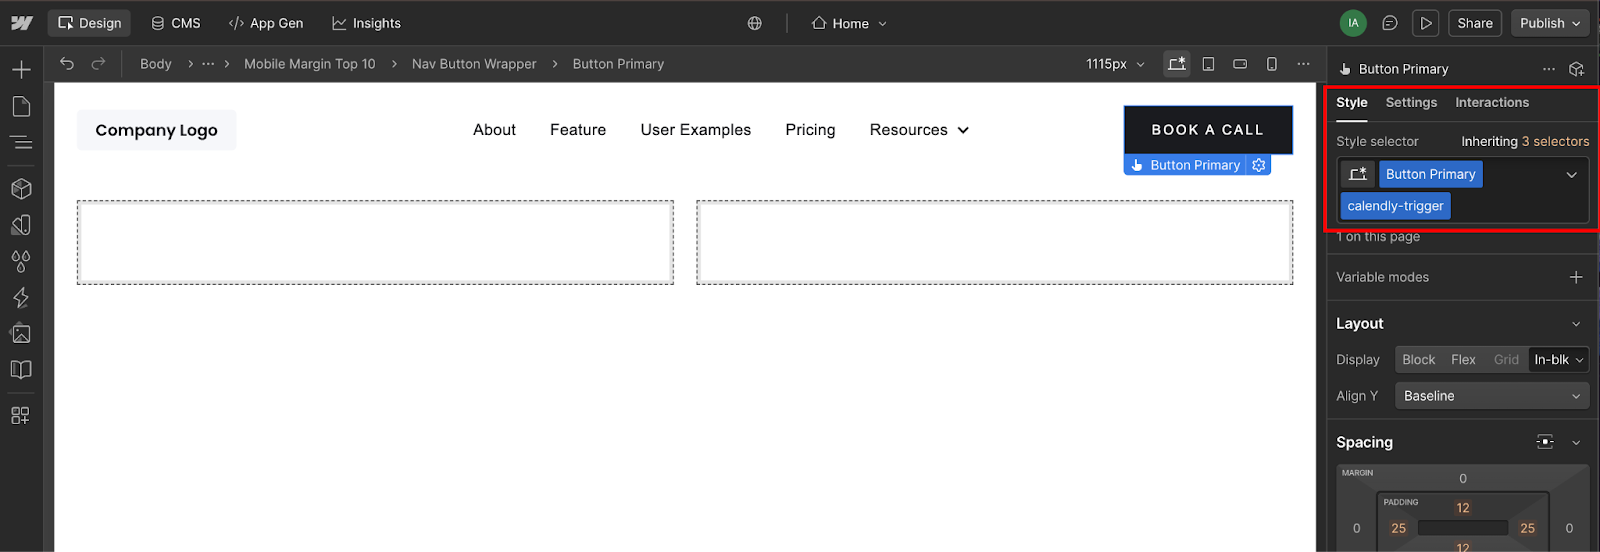
You can name it whatever makes sense (booking-btn, schedule-cta, open-calendly), just be consistent.
Add this class to every button across all pages where you want the popup to work. Header navigation? Add the class. Hero CTA? Add the class. Pricing table button? Add the class. Footer link? Add the class.
As long as they all share the same class name, the trigger code will work on all of them.
You can keep your other styling classes, too. If your hero button has classes like button, button-primary, and button-large, just add calendly-trigger as an additional class. The trigger code only needs that one shared class to find all the buttons.
Update your Embed code to target all matching buttons
Go back to the Embed element where you added your trigger code in Step 3. Double-click it to open the code editor. Replace the existing code with this updated version:
<script>
  document.querySelectorAll('.calendly-trigger').forEach(function(button) {
    button.addEventListener('click', function() {
      Calendly.initPopupWidget({url: 'https://calendly.com/your-username/30min'});
      return false;
    });
  });
</script>
The key changes: querySelectorAll('.calendly-trigger') finds all elements with that class (notice the period before the class name — that's CSS selector syntax), and .forEach() loops through each one, attaching the click listener to all of them.
Make sure to replace 'https://calendly.com/your-username/30min' with your actual Calendly Event Type URL, same as before.
Save and close the Embed element, then publish your site again. Now every button with the calendly-trigger class will open your Calendly modal when clicked.
Place the Embed element strategically for site-wide coverage
If you want booking buttons across multiple pages, you have two options for where to put the Embed element with your trigger code.
Option 1: Add it to a global element, such as your footer or header symbol. If you've created a Webflow symbol for your site's header or footer (which you probably have for consistency), add the Embed element to that symbol. Since symbols appear on every page where they're used, the trigger code will load site-wide.
Option 2: Add the Embed element to each page individually. If you don't use symbols or only want the booking modal on specific pages, add the Embed element to the body section of those pages. This gives you more control over where the popup is available, but requires more manual work if you decide to update the code later.
I'd recommend the symbol approach if you're using the same Calendly Event Type across your whole site. Put the Embed in your footer symbol, and any page with a calendly-trigger button will work automatically.
Test all trigger points after publishing
After publishing with the updated code, test every button that has the calendly-trigger class. Click the header button; the modal should open. Click the hero button; the modal should open. Click the pricing button; the modal should open.
They should all trigger the same Calendly scheduling interface because they're all running the same initPopupWidget call with the same Event Type URL.
If one button works but another doesn't, check that both actually have the calendly-trigger class applied. In Webflow, it's easy to think you've added a class to an element when you've actually only selected it in the Style panel but haven't clicked "Create New Class" or applied an existing one.
One edge case: if you have buttons inside Collection Lists (e.g., a grid of team members with a "Book with [Name]" button), you'll need to adjust the approach slightly to pass different Calendly URLs for each team member.
That requires reading data attributes or using different classes, which is beyond this basic implementation, but worth mentioning if your use case needs it.
4 common Calendly popup modal issues in Webflow and how to troubleshoot
The three most common issues are testing in preview mode instead of the published site (custom code doesn't execute in preview), browser extensions blocking Calendly's script (ad blockers often flag assets.calendly.com), and button ID mismatches between your trigger code and actual element ID (check for typos).
Less common issues include page scroll problems after the modal opens and Event Types showing "not available" when they're actually deactivated in your Calendly dashboard.
Let’s see how to navigate these issues.
1. Button click does nothing
If clicking your button produces no modal and no visible error, check these in order:
- Verify you're testing on the published live site (not preview.webflow.com)
- Confirm the script is in Project Settings → Custom Code → Footer Code (not page settings)
- Verify your button ID in the Embed trigger code exactly matches the ID you gave the button element (case-sensitive, no typos)
Open your browser's developer console (F12 or right-click → Inspect → Console tab) and look for JavaScript errors. If you see Calendly is not defined, the script didn't load from the Footer Code.
If you see Cannot read property 'addEventListener' of null, your getElementById didn't find the button because the ID doesn't match.
2. Popup works in Safari or Incognito, but not regular Chrome
Browser extensions, particularly ad blockers and privacy tools, often block third-party scripts, such as Calendly's widget.js. Test in Incognito/Private mode (where extensions are typically disabled) to confirm this is the issue.
If the popup works in Incognito but not regular browsing, disable extensions one by one to find the culprit, or add an exception for your site in your ad blocker settings.
3. Page scrolls weirdly after popup opens
Calendly's modal adds a class to the body element, but doesn't always prevent background scrolling on all Webflow templates.
If users can scroll the page behind the modal or the page jumps when the modal opens, add this CSS to your site's Custom Code (in the Head Code section):
<style>
body.calendly-overlay-open {
  overflow: hidden;
}
</style>
This prevents scrolling when Calendly's modal is active, fixing the jump issue on both desktop and mobile.
Event Type shows "not available" or no time slots
Log in to your Calendly dashboard and verify that the Event Type is active (the toggle should be "On," not "Off"). Check that your availability settings aren't too restrictive; if you only show slots 60 days out and you're testing with today's date, nothing will appear.
Confirm your connected calendar is syncing properly in Calendly's Calendar Settings.
Build more interactive features in Webflow beyond scheduling
You've solved scheduling with a popup modal.
But converting visitors on consulting and SaaS sites requires more than booking buttons: you need lead capture forms that route to different calendars based on service type, qualification flows that show pricing before booking, dynamic content that adapts to visitor behavior, and payment collection that happens before appointments are confirmed.
Most teams hit a wall after implementing basic embeds. They need a modal for lead magnets, a multi-step form for qualification, a data table for pricing comparison, or a date picker that's not tied to Calendly.
Each one means choosing between clunky third-party embeds, expensive custom development, or Webflow's code components.
For interactive components beyond scheduling (modals, forms, data tables), look at custom code implementations or Webflow's code components as the ecosystem expands.
Frequently asked questions
Does the Calendly popup modal work on Webflow mobile sites?
Yes, Calendly's popup modal is responsive by default and works on mobile devices without additional code. On smaller screens, the modal expands to fill most of the viewport, with touch-friendly date selection and form inputs. The close button remains accessible, and users can scroll through available time slots naturally.
Can you track Calendly popup modal conversions in Webflow or Google Analytics?
Calendly doesn't automatically send conversion events to Google Analytics when someone books through the popup modal. To track bookings as conversions, you need to implement Calendly's webhook system (available on paid plans) that sends booking data to a custom endpoint, which can then fire GA4 events or update your CRM. Alternatively, track the popup open event itself (when users click your booking button) as a micro-conversion using GTM or Webflow's native analytics, though this measures intent rather than completed bookings.
Can you customize the Calendly popup modal colors to match your Webflow brand?
Calendly's free plan doesn't support color customization in the popup modal. It uses Calendly's default blue-and-white theme. Paid plans (Essentials and above) let you customize the primary button color, background color, and text color through Calendly's Event Type settings under "Invitee Settings" → "Customize." Changes apply to all embed types, including the popup modal.
Does adding a Calendly popup modal slow down your Webflow site?
Calendly's widget.js script loads asynchronously (the async attribute in the script tag) and weighs about 45KB, so it doesn't block your page from rendering. The script only executes when someone clicks your booking button, so the scheduling interface loads on demand rather than on initial page load. For most sites, the performance impact is negligible; you're adding a single small external script that loads in the background and activates only when triggered.


