

UX wireframes provide the scaffolding for all your layouts, user flows, and interfaces, creating an outline for your design process.
Website design requires significant forethought to plan layout, interfaces, and visual components. To streamline this planning process, designers use user experience (UX) wireframes that trace layouts in high or low fidelity, enabling them to fill in outlines with all the visual details and functionality a web page needs.
Knowing when to start wireframing and how to use wireframing tools can make all the difference for the final version of your site design. Learn how to use a low-fidelity wireframe to create a basic outline and a high-fidelity one to create a usable prototype.
What’s a wireframe?
A UX wireframe is a layout sketch consisting of line drawings and mockups of user interfaces. After you’ve created several for the same webpage, you then link these wireframes together to outline the user flow through your website or app.
Determining if you need a wireframe
Any remotely complex page layout can benefit from some visual forethought, and wireframing is the best way to plan these elements at scale. Wireframes help communicate your design ideas to clients and fellow developers who need to understand what you have in mind before approving the project or taking it to the next stage.
Depending on what you’re designing, you’ll likely use the following types of wireframes:
- Low-fidelity wireframes: A starting point for your design process that consists of simple sketches, often handwritten, that outline the basic layout of web pages.
- Mid-fidelity wireframes: Modestly detailed sketches that add more information about what will go in each layout, such as CTA buttons or the types of images.
- High-fidelity wireframes: Highly detailed visualizations that show how a finished UI will look so designers can prototype them with users.
Benefits of using UX wireframes in your design process
Wireframing can significantly enhance your UX design process because it gives you space to explore the user experience, conduct testing, and gather feedback before committing to hours of design work. Here are some of the key benefits of creating UX wireframes:
Discovering possibilities
A low-fidelity sketch of your UI design is easy to improve upon, leaving you open to try new ideas on a whim. For example, you might start with a simple F-pattern website design and discover through wireframing that a more unique page layout would be better at communicating your ideas.
Communicating visual design
UX designers often work with external stakeholders who don’t understand industry terminology without a visual representation. Sketching your UI design and intended user experience can help you better communicate your ideas to clients and developers.
Prototyping
Wireframing tools like Figma, Sketch, and Photoshop can quickly turn high-fidelity wireframes into testable prototypes. This usability testing provides crucial feedback that’ll help you optimize your user interface before launch.
The wireframing process in 5 steps
Here’s a step-by-step process you can use whenever you need to create a wireframe of any level of fidelity.
1. Define each page’s goals
Clearly describe the desired functionality on every page. Think of this as a mission statement, like “Engage leads and drive them to convert to paying subscribers” or “Inform interested visitors and build hype for a new product.” This statement should guide every decision you make for the page’s wireframe.
2. Choose the appropriate fidelity level (low, mid, or high)
Determine whether you need to start with a low-fidelity wireframe or if you’re ready to move directly to a high-fidelity one. You can use a premade wireframe UI kit to create a high-fidelity prototype immediately. If you’re starting from scratch, begin with a rough outline on paper or a digital whiteboard to do some low-fidelity wireframing that’ll help you explore your design ideas.
3. Start sketching basic elements like navigation and layout
To build a strong foundation, begin your wireframing with the most essential UI elements that your web page needs. Navigation menus, CTAs, and sign-up forms are all good candidates for design elements to sketch out before moving on to other parts of the interface.
4. Iterate and refine
Once you have a mockup that outlines all the essential UI elements, play with its organization until you find a sensible layout. Incorporate new details like spaces for visuals, expanded functionalities, and custom animations. As you fold in each new detail, re-examine your wireframe mockup to ensure you follow the mission statement you set for yourself in the first step.
5. Gather feedback from stakeholders
Clean up your wireframes to ensure they’re readable and reach out to peers or your client for feedback. Ask them questions that will give you actionable answers, like “What attracted your attention the most?” or “What’s the first thing you’d click on this page?” Use this feedback to determine the strengths and weaknesses of your design ideas and refine them again until you get the answers you’re after.
Wireframed interface design examples
Before you start wireframing your design ideas, you must identify the fidelity you need. Each level of detail provides different benefits. Here are examples of low-, mid-, and high-fidelity wireframes to help you decide which level is appropriate for your project.
Low-fidelity wireframe
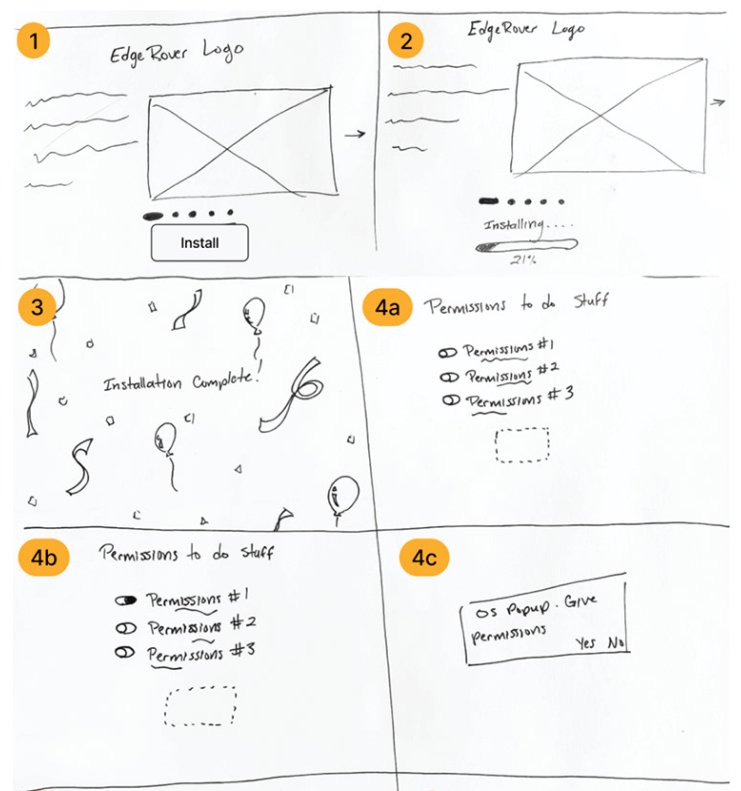
This low-fidelity wireframe created by Sarah Lauchli showcases how rough sketches can help you plan your UX designs. Each box shows how individual page layouts lead from one to the next while also visualizing the general spacing of design elements. Basic shapes indicate where important visuals will go, and scribbles indicate where text belongs. This rough outline gave Sarah a clear plan to follow in the next steps of her design process, and it all started with a pen and a piece of paper.


Ultimate web design
From 101 to advanced, learn how to build sites in Webflow with over 100 lessons — including the basics of HTML and CSS.
Mid-fidelity wireframe
From those low-fidelity sketches, Sarah was able to craft these mid-fidelity wireframes in Figma that offer a bit more detail. Basic shapes still indicate where design elements belong, but now it’s all laid out using the screen resolution, fonts, and reusable components that might ultimately find their way into the product.
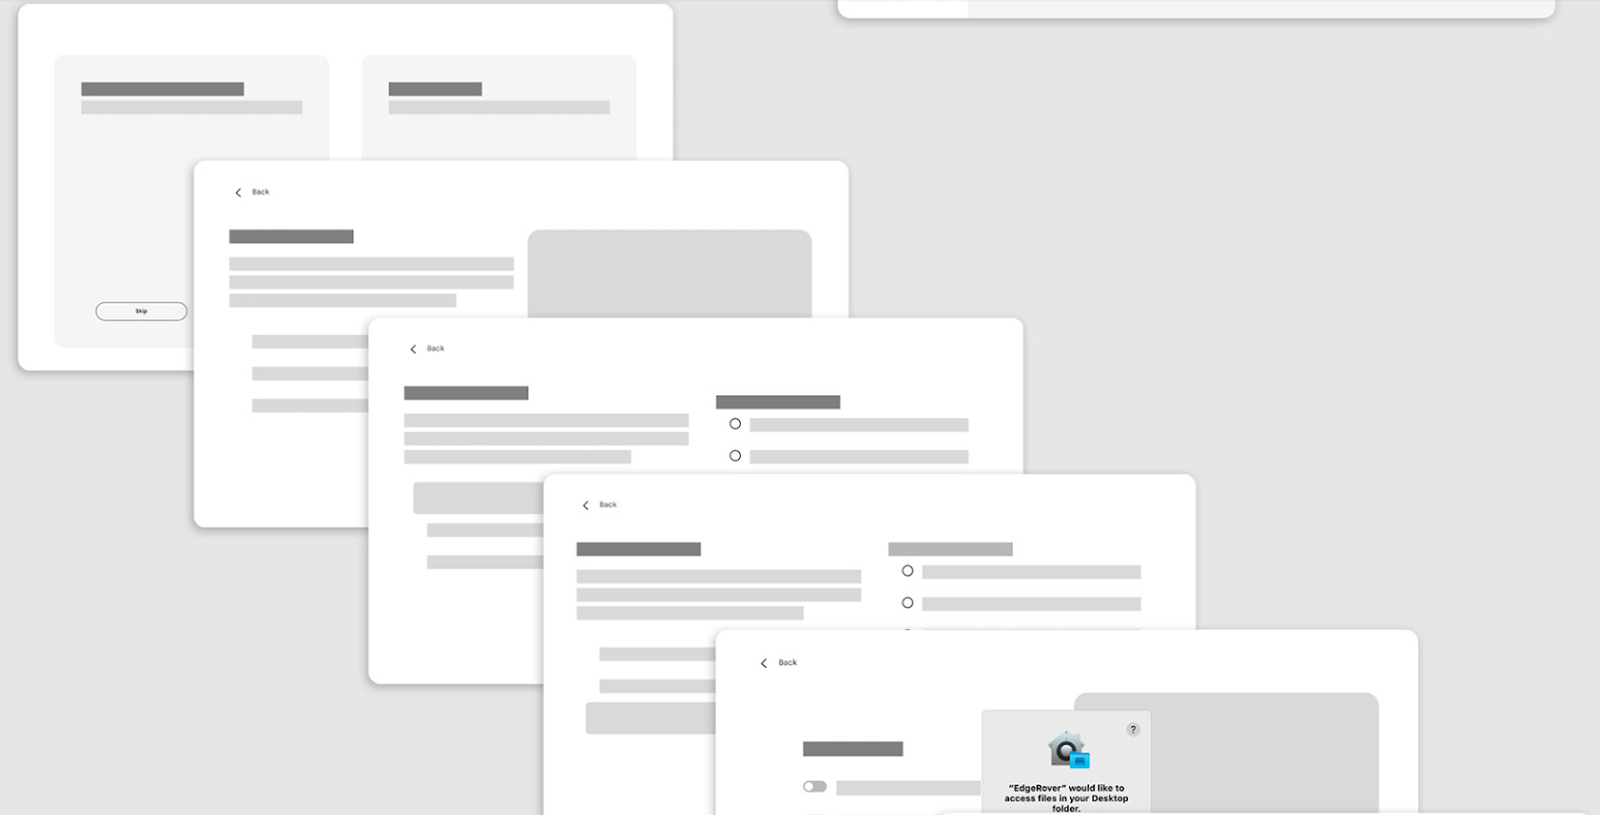
High-fidelity wireframe
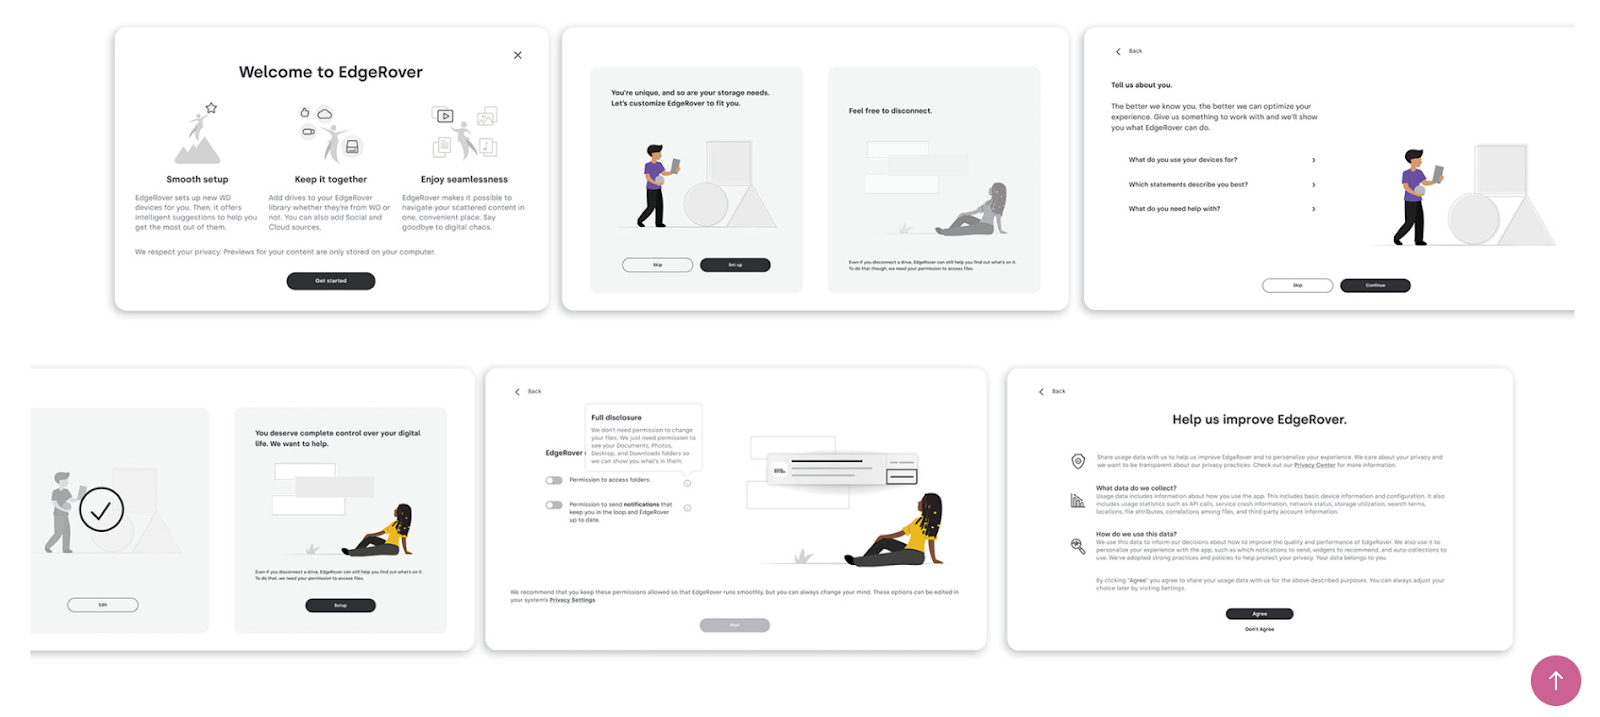
A high-fidelity wireframe is essentially a pixel-perfect prototype, like this completed onboarding flow. Compare this set of wireframes to the last two, and you can see the evolution this user experience took with each iteration. Along the way, rough shapes became detailed graphics, scribbles became blocks of text, and placeholders became consistent UI elements. At this point, a developer can take these wireframes and turn them directly into functioning software, with no guesswork left.
Tools for wireframing
While you can create your wireframes using paper and pencil, experimenting with a digital whiteboard is often faster and easier. With a digital tool, you can drag and drop design elements, create reusable components, and change everything instantly. Here are a few popular wireframing options:
Figma
Figma is a UI/UX design tool that offers an intricately customizable digital whiteboard that multiple designers can work on simultaneously. You can draw UI elements and easily move them around to create wireframes that visualize user flow. It also has interactive design tools that help turn your mockups into fully functional prototypes, allowing you to collect testing data before launch.
Sketch
Sketch is a wireframing tool that supports all the same features as Figma, plus real-time prototype creation that updates as you refine your UI designs. It’s exclusively available for macOS, with a browser preview and a companion app to send prototypes to people on other devices. If you plan to use it to create UX wireframes, all the designers on your team will need to be on macOS to collaborate.
Adobe Photoshop
Photoshop is primarily an image editing tool, but you can use the same functionality for wireframing. Learning Photoshop from scratch is much more daunting than Figma or Sketch, but if you’re already an Adobe virtuoso, you’ll find that it offers more than enough features for UX/UI designers. However, when it comes to transferring your designs into an actual prototype, Adobe doesn’t offer the compatibility and flexibility that you get from other tools.
Elevate your design process with effective UX wireframes
Developing mockups, experimenting with them, and building prototypes lets you fine-tune your user interface to achieve the best possible structure for your web design. And if you’re using Figma, your wireframes will transfer directly to your web design platform thanks to integrations like the Figma to Webflow plugin.
To learn more about how to streamline designing and prototyping with Webflow, check out our blog, where you can learn how to use Webflow to meet every client’s design needs.
Build websites that get results.
Build visually, publish instantly, and scale safely and quickly — without writing a line of code. All with Webflow's website experience platform.